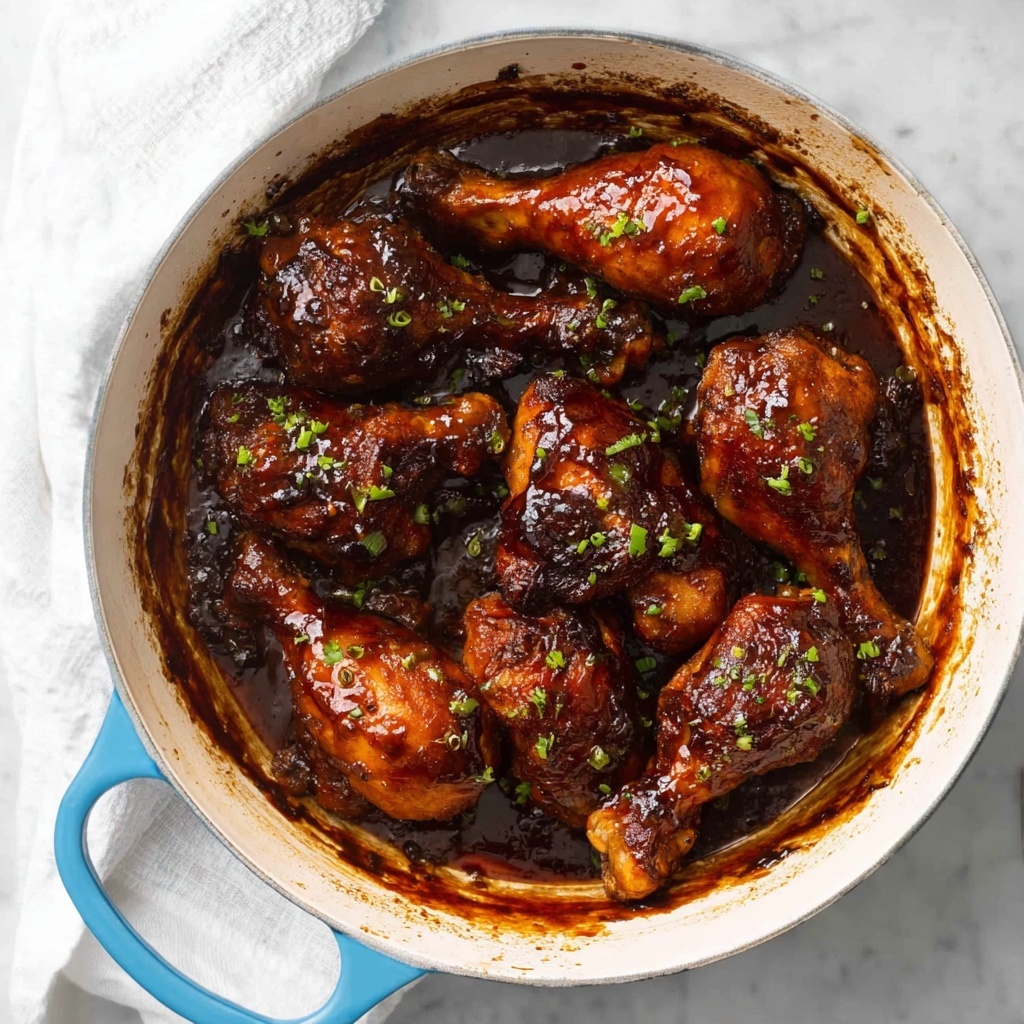
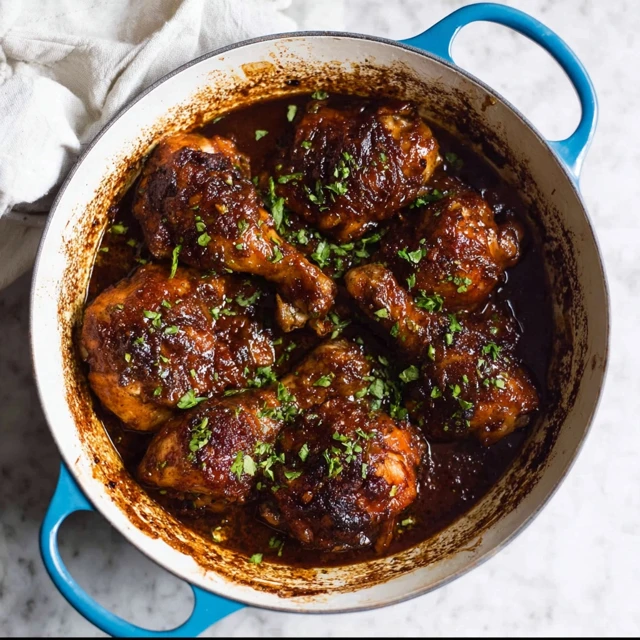
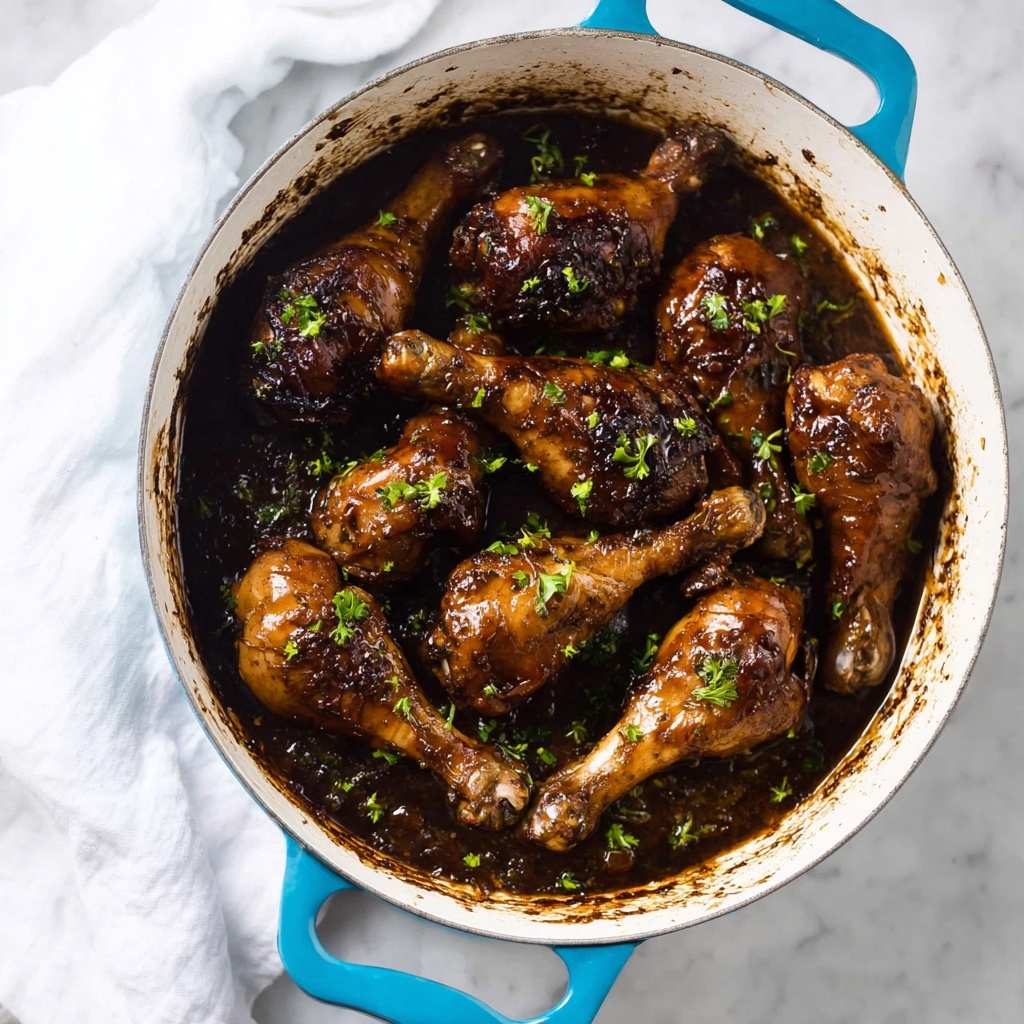
If you’re craving a dish that wakes up your taste buds and is insanely easy to make, the 5 Ingredient Sticky Stove Top Balsamic Drumsticks Recipe should be your next go-to. This recipe is a divine marriage of sweet, tangy, and savory flavors, all bubbling together into a sticky glaze that clings beautifully to tender, juicy drumsticks. The best part? You only need five star ingredients to transform humble chicken drumsticks into a show-stopping meal that feels indulgent but comes together with little hassle. Ready to wow your family or friends without spending hours in the kitchen? Let’s dive in!
Ingredients You’ll Need
The magic of this 5 Ingredient Sticky Stove Top Balsamic Drumsticks Recipe lies in its simplicity. Each ingredient plays a crucial role in building the flavor profile and texture, from the richness of balsamic vinegar to the punch of garlic and the sugary sweet stickiness that holds it all together.
- Chicken drumsticks: Choose fresh drumsticks with skin on for that crispy, flavorful bite.
- Balsamic vinegar: Adds a deep tanginess and caramelized sweetness that’s the heart of the glaze.
- Soy sauce: Brings a salty, umami boost that balances the vinegar’s sharpness perfectly.
- Brown sugar: Provides essential sweetness that helps create that irresistible sticky coating.
- Garlic: Adds a fragrant savory note, elevating the overall taste with aromatic warmth.
How to Make 5 Ingredient Sticky Stove Top Balsamic Drumsticks Recipe
Step 1: Combine Ingredients in the Pan
Start by grabbing a large skillet or frying pan big enough to fit your drumsticks in a single layer. Toss in the chicken, balsamic vinegar, soy sauce, brown sugar, minced garlic, water, freshly grated ginger, and Sriracha or red pepper flakes if you love a bit of heat. Mix everything gently so the flavors start mingling right from the get-go.
Step 2: Bring to a Boil and Simmer
Turn the heat to medium-high and bring your pan to a lively boil. Flip the chicken drumsticks, then dial down the heat to medium so the mixture simmers energetically without boiling over. Keep the pan uncovered so the sauce begins to reduce and concentrate in flavor.
Step 3: Cook the Drumsticks
Let the chicken cook for about 20 minutes. Around the 10-minute mark, remember to turn each drumstick to ensure even cooking and allow all sides to soak up that sticky balsamic glaze. This gradual simmer tenderizes the chicken while thickening the sauce around it.
Step 4: Clear the Pan Surface
When the chicken is cooked through, gently move them to the edge of the skillet, stacking or propping them up to free up space in the center. This step is key because it clears the liquid area so you can focus on reducing the sauce quickly without overcooking the chicken.
Step 5: Reduce the Sauce
Turn up the heat slightly and let the sauce simmer for about 5 minutes until it thickens to the consistency of thick pouring cream. Stir gently and keep a close watch — once the sauce starts thickening, it will reduce rapidly. When it’s perfectly sticky, roll each drumstick in the glaze to coat them generously.
Step 6: Let the Flavors Set
Remove the skillet from the heat and let it rest for 5 minutes. During this rest time, the sauce will thicken further, clinging even better to the chicken. Give the drumsticks another toss in that luscious glaze before plating for maximum flavor impact.
How to Serve 5 Ingredient Sticky Stove Top Balsamic Drumsticks Recipe
Garnishes
A sprinkle of finely sliced parsley or scallions adds a fresh, vibrant pop of color and a mild herbal brightness that complements the richness of the chicken. It’s a simple touch that makes your dish look and taste even more inviting.
Side Dishes
These sticky drumsticks pair beautifully with fluffy jasmine rice or buttery mashed potatoes, absorbing all the extra glaze. A crisp green salad or roasted vegetables add contrast with their fresh crunch, balancing the stickiness and robust flavors perfectly.
Creative Ways to Present
For a casual dinner party, serve these drumsticks on a large platter with plenty of glaze pooled around for dipping. For a more modern approach, place a few drumsticks atop a bed of garlic sautéed greens with a drizzle of balsamic reduction for that extra wow factor. Don’t hesitate to get creative and make the dish your own!
Make Ahead and Storage
Storing Leftovers
Once cooled, place any leftover drumsticks along with the glaze in an airtight container and store in the refrigerator. They’ll keep well for up to 3 days, retaining their full flavor and sticky texture that reheats beautifully.
Freezing
If you want to save some for longer, freeze the cooked drumsticks and sauce in a freezer-safe container or heavy-duty bag. For best taste and texture, try to use within 2 months. Thaw overnight in the fridge before reheating.
Reheating
Reheat your drumsticks gently in a skillet over low to medium heat to keep the skin from drying out and to revive the luscious glaze. If using a microwave, cover loosely to maintain moisture and heat in short intervals to prevent overcooking.
FAQs
Can I use other cuts of chicken for this recipe?
Absolutely! Chicken thighs or even wings work well with this balsamic glaze. Just adjust cooking times slightly to ensure they’re fully cooked and tender.
Is it necessary to use brown sugar, or can I substitute it?
Brown sugar adds a rich molasses flavor that enhances the glaze’s sweetness and depth. You can substitute with white sugar, honey, or maple syrup, but the flavor may differ slightly.
How spicy is this dish with Sriracha or red pepper flakes?
The spice level is moderate and can be customized easily. Reduce or omit the chili components if you prefer no heat, or add more if you like a fiery kick.
Can I prepare this recipe in advance?
Yes! You can cook the drumsticks ahead of time and store them in the fridge. Reheat gently before serving. The flavors actually deepen when the chicken rests with the glaze.
What kind of balsamic vinegar should I use?
Stick with a good-quality regular balsamic vinegar for the perfect balance of acidity and sweetness. Avoid the very thick ‘glaze’ types as they may alter the cooking consistency.
Final Thoughts
This 5 Ingredient Sticky Stove Top Balsamic Drumsticks Recipe has quickly become one of my favorite weeknight meals because it’s effortless yet packed with incredible flavor. It’s proof you don’t need a long ingredient list or complicated steps to create an unforgettable dinner. Give it a try, and I promise it will become a staple in your recipe lineup too!
Print
5 Ingredient Sticky Stove Top Balsamic Drumsticks Recipe
- Prep Time: 5 minutes
- Cook Time: 25 minutes
- Total Time: 30 minutes
- Yield: 4 servings
- Category: Main Course
- Method: Stovetop
- Cuisine: American
Description
This 5 Ingredient Sticky Stove Top Balsamic Drumsticks recipe offers a simple yet flavorful way to prepare tender chicken drumsticks glazed in a sweet and tangy balsamic sauce. Perfect for a quick dinner, the chicken is simmered on the stove and finished with a luscious reduction of soy, balsamic vinegar, garlic, ginger, and a spicy kick from Sriracha or red pepper flakes. Garnished with fresh parsley or scallions, this dish delivers rich taste with minimal ingredients and effort.
Ingredients
Chicken
- 8 chicken drumsticks (2 lb / 1 kg)
Sauce & Seasonings
- 1 cup water
- 1/2 cup balsamic vinegar
- 1/3 cup soy sauce (all purpose or light, not dark)
- 3 tbsp brown sugar
- 3 garlic cloves, minced
- 2 tsp fresh grated ginger
- 2 tbsp Sriracha or 1 tsp red pepper flakes
Garnish
- Parsley or shallots/scallions, finely sliced
Instructions
- Combine Ingredients: In a large skillet, fry pan, or pot, add the chicken drumsticks and pour in all other ingredients including any extra flavorings like garlic, ginger, and chili. Ensure the chicken is arranged in a single layer for even cooking.
- Bring to Boil: Place the skillet over medium-high heat and bring the mixture to a boil. Once boiling, turn each piece of chicken to coat it evenly with the sauce.
- Simmer the Chicken: Reduce the heat to medium to simmer energetically but without rapid boiling. Do not cover the pan. Cook the chicken for about 20 minutes, turning the drumsticks after 10 minutes to ensure they cook evenly.
- Prepare for Sauce Reduction: After 20 minutes, the chicken should be fully cooked. Push and stack the chicken drumsticks to the side or edges of the skillet to clear the liquid surface.
- Reduce the Sauce: Let the liquid simmer uncovered for about 5 minutes until it thickens to the consistency of thick pouring cream. Stir gently and roll the chicken in the glaze to coat them well.
- Rest and Final Coating: Remove the skillet from heat and let it stand for 5 minutes. During this time, the sauce will thicken a bit more. Toss the chicken again in the glaze to ensure maximum coating.
- Serve: Plate the drumsticks and garnish with finely sliced parsley or scallions/shallots to add a fresh touch and extra color.
- Notes: This recipe uses stovetop cooking and does not require an oven or special equipment. The glaze may thicken quickly during reduction, so monitor it closely to prevent burning.
Notes
- Use light or all-purpose soy sauce for best flavor and avoid dark soy sauce which can overpower the dish.
- Adjust the heat level by substituting Sriracha with red pepper flakes or leaving out chili entirely for a milder version.
- Avoid covering the pan during simmering to allow the sauce to reduce properly and create a sticky glaze.
- The chicken should be cooked through after 20 minutes of simmering; check doneness if unsure by cutting into a drumstick.
- Leftover chicken can be stored in an airtight container in the refrigerator for up to 3 days and reheated gently on the stovetop.

