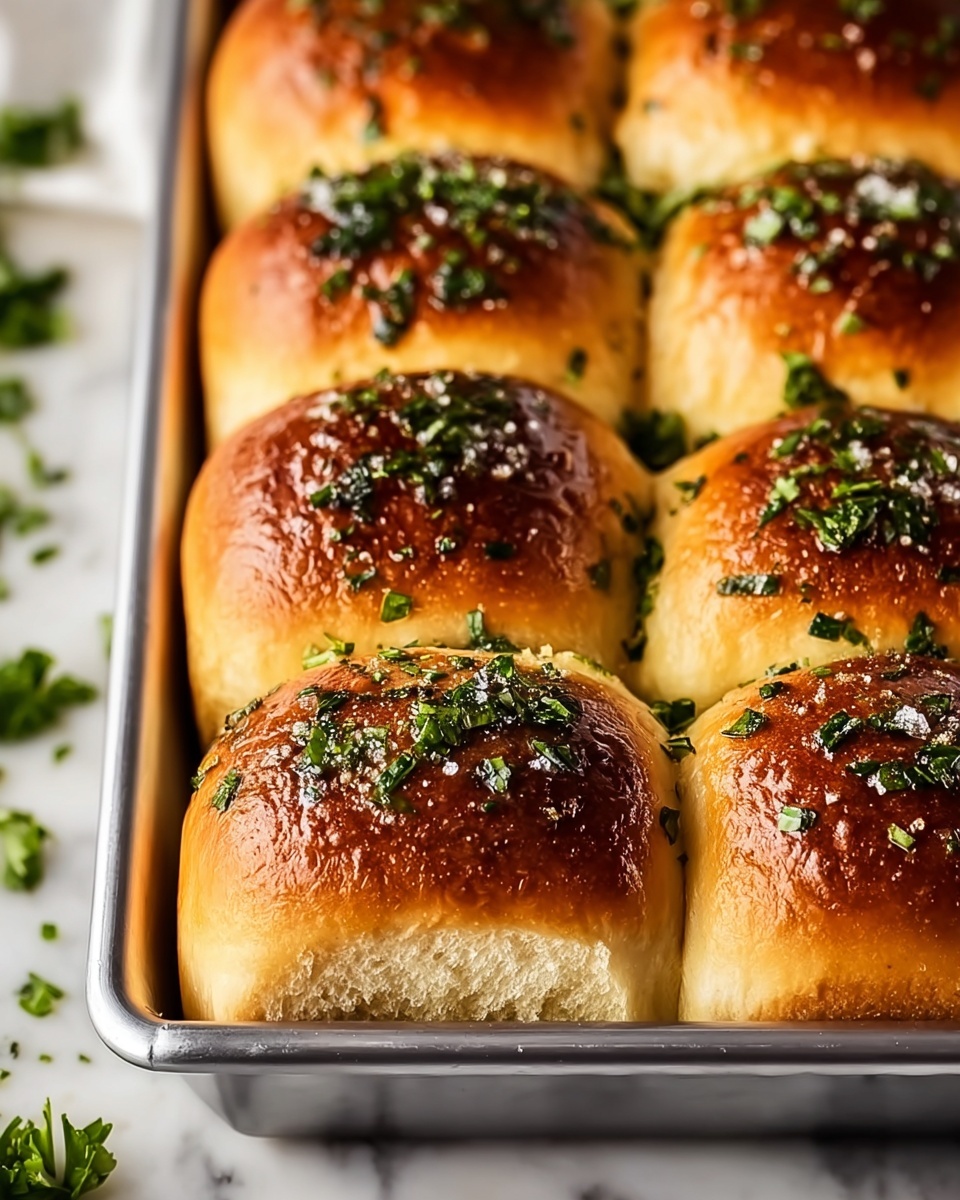
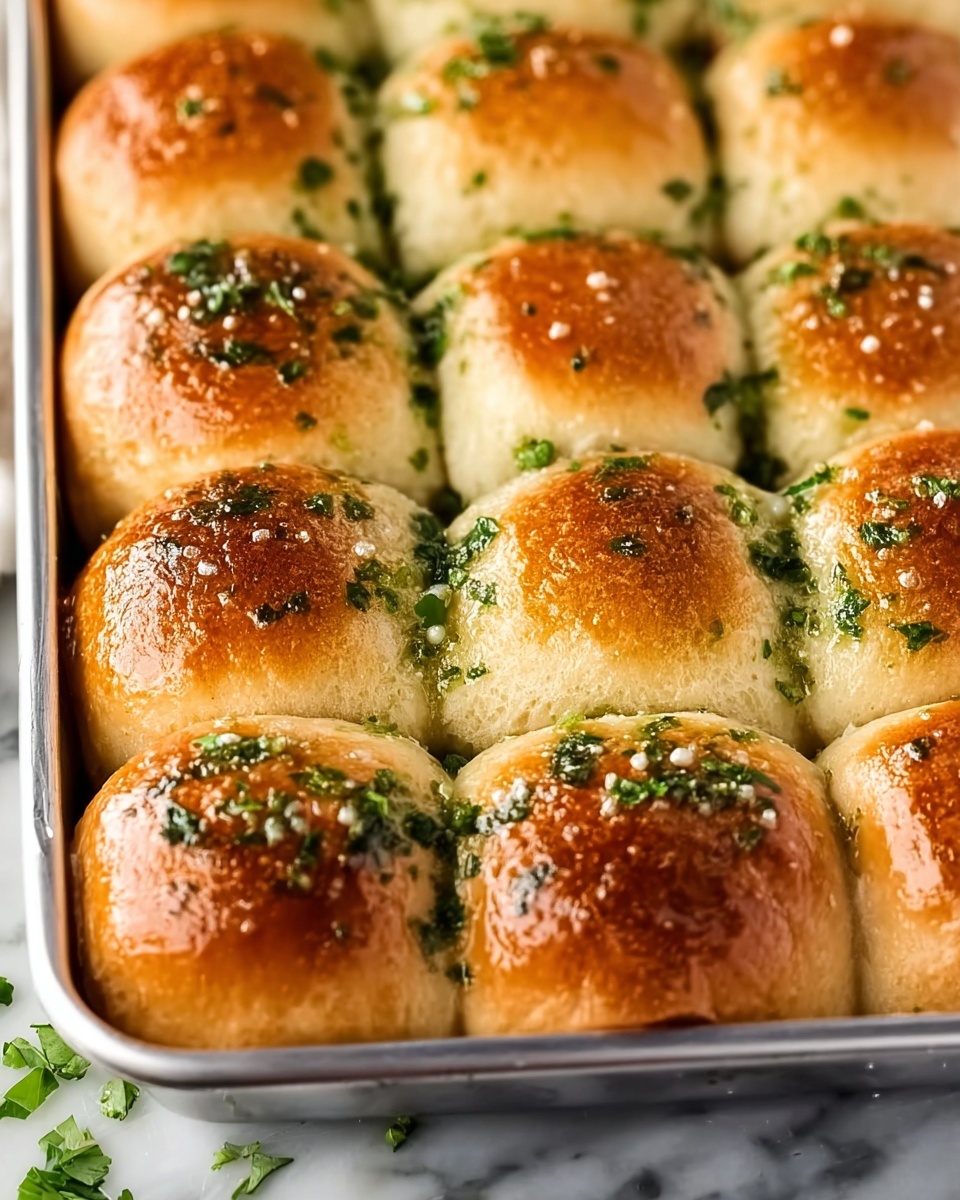
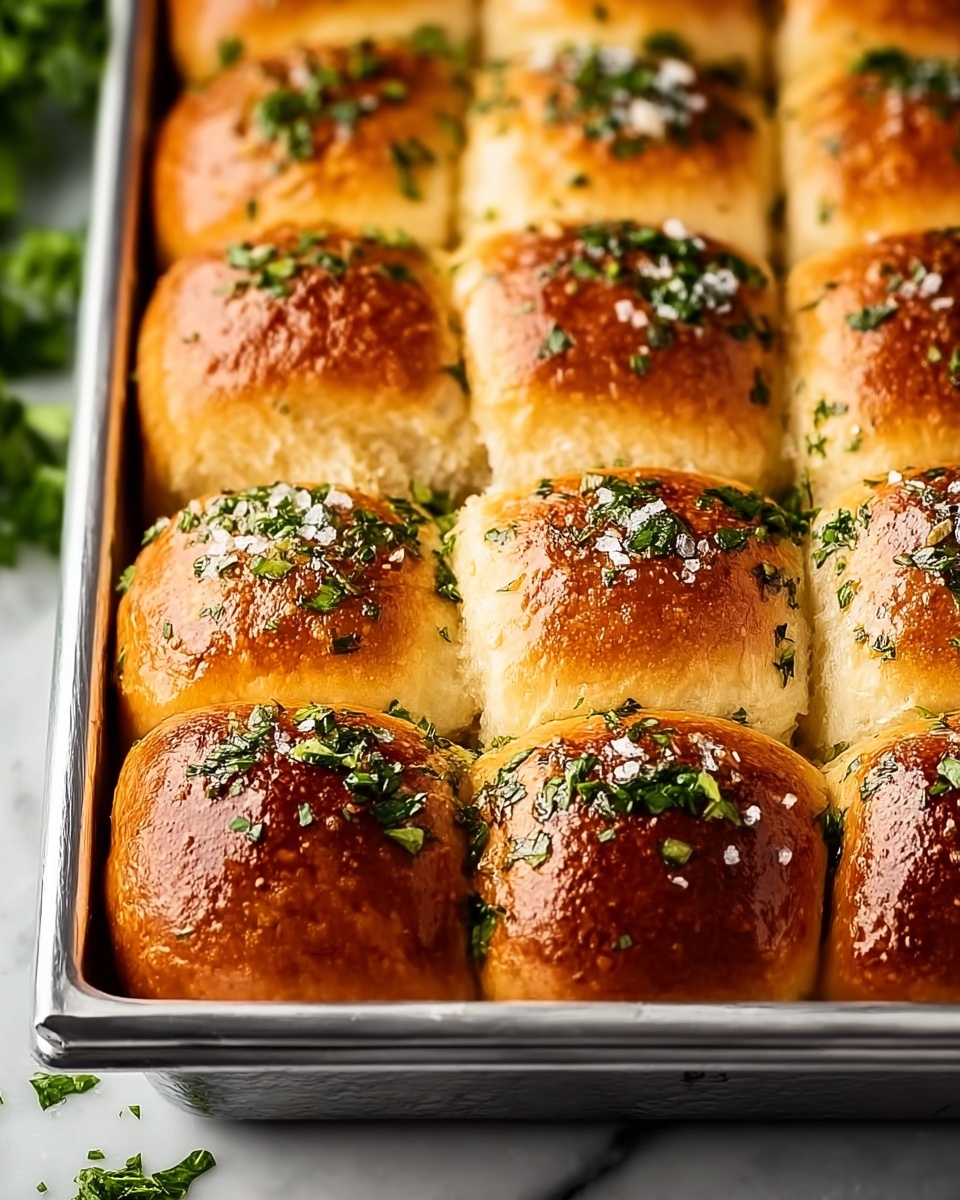
If you have ever dreamt of the fluffiest, most flavorful bread to accompany your meals, look no further than this Perfect Homemade Garlic Rolls Recipe. These rolls boast a wonderfully soft crumb, a golden crust brushed with rich garlic butter, and just the right amount of fresh herb kick—all wrapped up in a simple dough that feels like a warm, comforting hug. Making these garlic rolls from scratch is surprisingly straightforward, and the result is a batch of irresistible bites perfect for sharing with family or friends around any table.
Ingredients You’ll Need
Gathering the right ingredients is half the joy when making this recipe. Each component plays a crucial role in creating these soft, aromatic garlic rolls—from the yeast activating to give life to the dough, to the fresh garlic that delivers that unmistakable zest. Plus, the melted butter ensures a tender texture and beautiful golden finish, while a touch of parsley adds a dash of color and freshness.
- 4 cups All-Purpose Flour: Sift before measuring for light, airy rolls with perfect structure.
- 2.25 teaspoons Active Dry Yeast: Ensure yeast is fresh to get a strong rise every time.
- 1.5 cups Warm Water: Keep around 110°F (43°C) to activate the yeast without killing it.
- 2 tablespoons Granulated Sugar: Feeds the yeast so the dough rises beautifully.
- 1 teaspoon Salt: Enhances the overall flavor without overpowering the garlic.
- 0.5 cups Unsalted Butter: Melted, it enriches the dough and is perfect for brushing on top.
- 4 cloves Garlic: Freshly minced for a punch of vibrant garlic flavor.
- 2 tablespoons Chopped Fresh Parsley: Optional, but it adds a lovely fresh color and mild herbiness.
How to Make Perfect Homemade Garlic Rolls Recipe
Step 1: Activate the Yeast
Start by warming up the water to around 110°F to create the ideal environment for the yeast to awaken. Combine the sugar and warm water in a small bowl, then sprinkle the yeast evenly over the surface. Let this mixture sit patiently for 5 to 10 minutes until it becomes frothy and lively—that’s your signal that the yeast has woken up and is ready to make magic.
Step 2: Mix the Dough
In a large mixing bowl, whisk together the sifted flour and salt, then create a well in the center. Pour in the activated yeast mixture along with most of the melted butter, reserving a little for later. Stir everything until it forms a rough, shaggy dough. This humble beginning is the foundation of your delicious rolls, so don’t rush this lovely messy stage.
Step 3: Knead Until Smooth
Turn your dough out onto a floured surface and knead it for 8 to 10 minutes. This step is all about patience and muscle, as kneading develops the gluten structure that gives your rolls their soft yet sturdy texture. You’ll know it’s done when the dough feels silky, elastic, and springs back gently when poked.
Step 4: First Rise
Lightly grease a bowl and place your dough inside. Cover it with a clean towel or plastic wrap and let it rest in a warm, draft-free spot for about 1 to 1.5 hours. During this time, the dough will double in size, becoming pillowy and ready for the exciting next steps.
Step 5: Add Garlic and Shape Rolls
After gently punching down the dough to release excess air, fold in the freshly minced garlic and chopped parsley evenly. Then divide the dough into 12 to 15 equal pieces—this is where those adorable, fluffy rolls start taking shape. Roll each piece into a smooth ball, preparing for their final rise.
Step 6: Second Rise
Arrange the rolls in a greased baking dish, ensuring they have a little room to expand but will touch sides after rising—this will help create soft sides. Cover again and let them rise for another 30 to 45 minutes until they’re plump and puffy, almost ready to bake.
Step 7: Preheat and Bake
While your rolls do their final puffing up, preheat your oven to 375°F (190°C). Once heated, place the rolls inside and bake for 20 to 25 minutes. You’ll know they’re done when the tops turn a gorgeous golden brown—a beautiful signal of that perfect crust meeting tender inside.
Step 8: Brush with Garlic Butter
While the rolls bake, melt the remaining butter and mix in some additional minced garlic and a pinch of salt. As soon as the rolls come out, brush this fragrant garlic butter all over their warm surfaces for that irresistible glossy, buttery finish with a flavorful hit in every bite.
Step 9: Cool and Enjoy
Let the garlic rolls cool just slightly so they’re warm but not scorching. This is the moment to gather your loved ones and experience the joy of tearing into these soft, savory beauties fresh from your kitchen.
How to Serve Perfect Homemade Garlic Rolls Recipe
Garnishes
Sprinkle freshly chopped parsley or even a little grated Parmesan on top right after brushing with the garlic butter to add vibrant color and an extra savory note. These simple touches make your garlic rolls look bakery-quality and taste even more special.
Side Dishes
Garlic rolls are the perfect companion for so many meals—think rich pasta dishes like spaghetti Bolognese or creamy Alfredo, robust soups such as tomato basil or hearty chili, and even alongside roasted meats or fresh salads. They’re the perfect little pillowy side to soak up your favorite sauces.
Creative Ways to Present
For a fun twist, serve the rolls in a bread basket lined with a colorful kitchen towel or create individual mini garlic roll sandwiches with melted cheese and fresh greens tucked inside. You can even transform them into garlic pull-aparts by placing the dough balls closer together in the baking dish, turning dinner into a joyful sharing experience.
Make Ahead and Storage
Storing Leftovers
If you have any leftovers, place them in an airtight container or wrap tightly with plastic wrap to keep them soft. Stored this way, garlic rolls will stay fresh at room temperature for up to two days, maintaining their delightful texture.
Freezing
You can freeze the rolls before or after baking. To freeze before baking, let the dough rise once, shape the rolls, then freeze them on a tray before transferring to a container. For baked rolls, wrap them well in foil or plastic wrap and place in a freezer bag. Frozen rolls will keep well for about 2 to 3 months.
Reheating
To enjoy your rolls after storage or freezing, reheat them wrapped in foil in a preheated oven at 350°F (175°C) for about 10 to 15 minutes. You can also microwave them briefly, but the oven method helps retain that freshly baked texture and flavor.
FAQs
Can I use garlic powder instead of fresh garlic?
While fresh garlic gives the best vibrant flavor, garlic powder can substitute in a pinch. Use about 1 teaspoon of garlic powder mixed into the dough, but keep in mind the texture and aroma won’t be quite the same as with fresh minced garlic.
How do I know if my yeast is still good?
Fresh yeast should bubble and froth when mixed with warm water and sugar. If the mixture doesn’t foam within 10 minutes, your yeast may be expired or stored improperly and you should use new yeast for the best rise.
Is it necessary to knead the dough by hand?
You can absolutely use a stand mixer with a dough hook for kneading to save effort and time. Just mix on medium speed until smooth and elastic, usually about 6-8 minutes. Hand kneading, however, lets you feel the dough’s progress up close, which some find very satisfying.
Can I make garlic rolls dairy-free?
For dairy-free rolls, substitute the butter with a plant-based margarine or coconut oil of equal measure. The texture might vary slightly, but the rolls will still turn out soft and flavorful.
Why do my garlic rolls sometimes turn out dense?
Dense rolls are usually caused by under-kneading, not letting the dough rise fully, or using water that’s too hot or too cold, which can kill the yeast. Following each step carefully ensures light, fluffy rolls every time.
Final Thoughts
Making the Perfect Homemade Garlic Rolls Recipe is truly a joyous experience—from the moment you activate the yeast to pulling those golden, buttery treasures fresh out of the oven. These rolls are sure to become a beloved staple in your home, perfect for elevating any meal with their comforting aroma and tender crumb. I can’t wait for you to try this recipe and taste the delicious results that homemade really brings.
Print
Perfect Homemade Garlic Rolls Recipe
- Prep Time: 15 minutes
- Cook Time: 25 minutes
- Total Time: 1 hour 40 minutes
- Yield: 12 rolls
- Category: Bread
- Method: Baking
- Cuisine: American
Description
These Perfect Homemade Garlic Rolls are soft, fluffy, and bursting with savory garlic flavor. Made from scratch with a simple yeast dough, fresh garlic, and parsley, these rolls are ideal for any meal, whether as a side or a tasty snack. Brushed with garlic butter right out of the oven, they offer an irresistible aroma and taste that will delight your family and guests.
Ingredients
Dough
- 4 cups All-Purpose Flour (Sift before measuring)
- 2.25 teaspoons Active Dry Yeast (Ensure yeast is fresh)
- 1.5 cups Warm Water (Around 110°F / 43°C)
- 2 tablespoons Granulated Sugar (Nourishes the yeast)
- 1 teaspoon Salt (Enhances flavor)
- 0.5 cups Unsalted Butter (Melted, for dough and brushing)
Garlic & Garnish
- 4 cloves Garlic (Freshly minced)
- 2 tablespoons Chopped Fresh Parsley (Optional for garnish)
Instructions
- Activate Yeast: Combine warm water and sugar in a small bowl, sprinkle yeast on top, and let sit for 5-10 minutes until frothy to ensure the yeast is active.
- Mix Dough: In a large mixing bowl, combine flour and salt, create a well in the center and add the activated yeast mixture and melted butter. Mix until a shaggy dough forms.
- Knead Dough: On a floured surface, knead the dough for 8-10 minutes until smooth and elastic, which develops gluten structure for soft rolls.
- First Rise: Place dough in a greased bowl, cover it, and let it rise in a warm place for 1-1.5 hours until it has doubled in size.
- Add Garlic and Parsley: Punch down the risen dough, knead in the freshly minced garlic and chopped parsley evenly throughout the dough.
- Shape Rolls: Divide the dough into 12-15 equal pieces and shape each into a smooth ball. Arrange the rolls close together in a greased baking dish.
- Second Rise: Cover the rolls and let them rise again for 30-45 minutes until puffy and nearly doubled in size.
- Preheat Oven: During the last 15 minutes of the second rise, preheat your oven to 375°F (190°C) to ensure it’s ready for baking.
- Bake Rolls: Bake the risen rolls for 20-25 minutes or until golden brown on top and cooked through.
- Prepare Garlic Butter and Brush: While baking, melt the remaining butter and mix in additional minced garlic and a pinch of salt, then brush immediately over the hot rolls once they come out of the oven to infuse fresh garlic flavor.
- Serve: Allow the rolls to cool slightly before serving warm, making them perfect for enjoying fresh texture and aroma.
Notes
- Ensure water is not too hot when activating yeast, as temperatures above 120°F can kill the yeast.
- Kneading is crucial for developing the right dough texture; be patient to achieve elasticity.
- You can add more or less garlic according to your preference for stronger or milder garlic flavor.
- These rolls freeze well; store in an airtight container for up to 1 month and reheat before serving.
- For a dairy-free option, substitute butter with vegan butter or olive oil.

