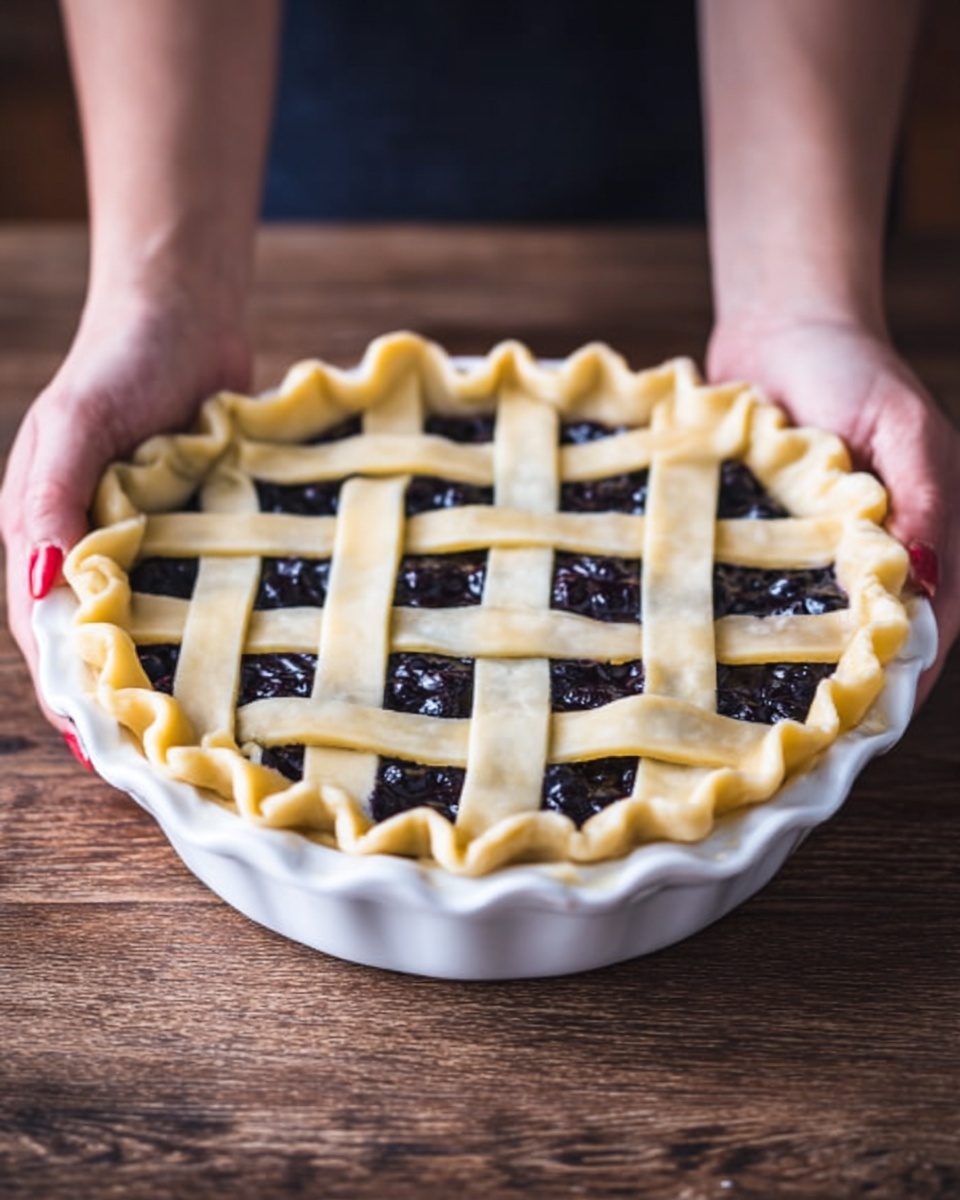
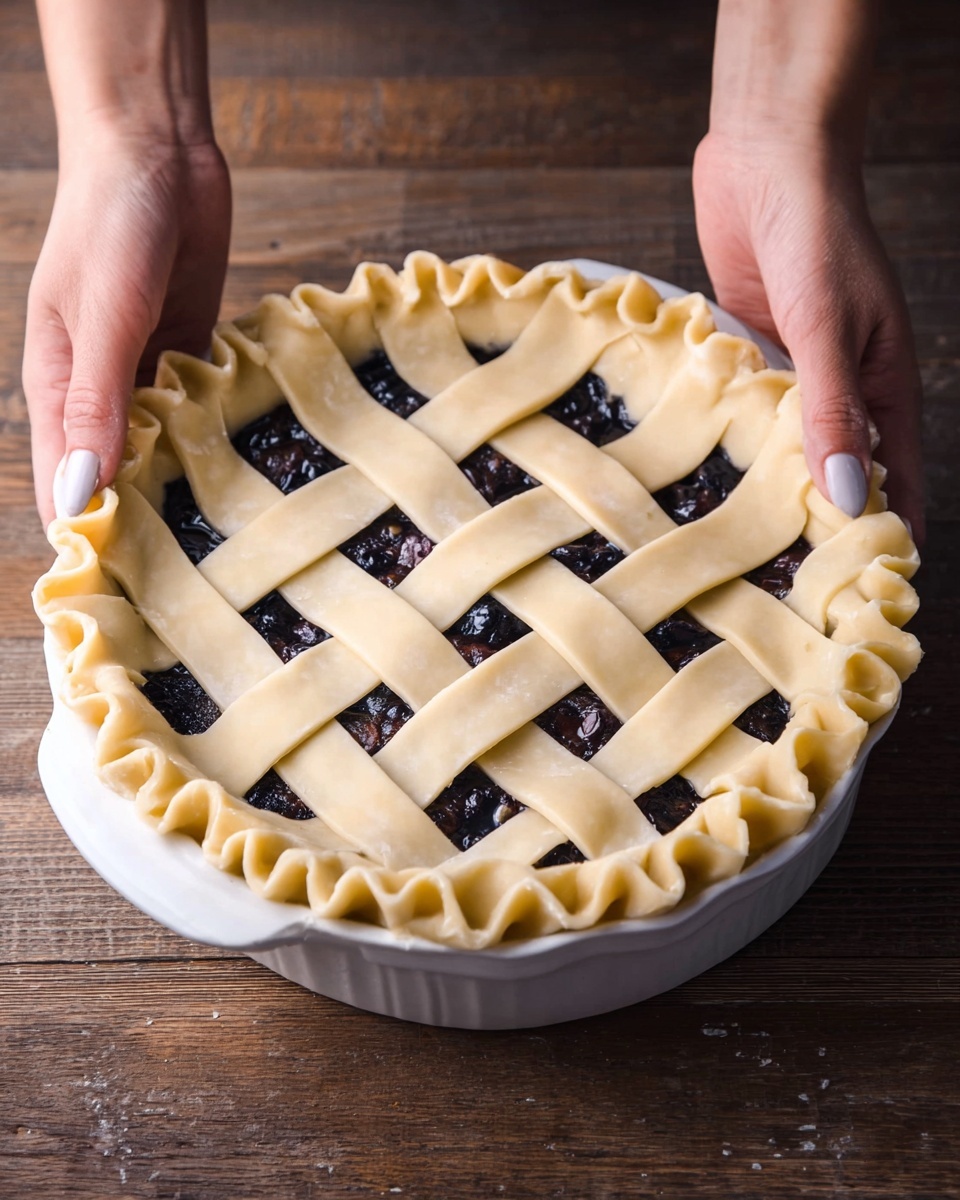
If you’ve ever admired those stunning pies with eye-catching tops, I’m about to share a gem with you that takes your baking game to a whole new level. Learning How to Make a Lattice Pie Crust Recipe is one of those essential kitchen skills that transforms an ordinary pie into a show-stopper. It’s surprisingly simpler than it looks, and once you master the technique, you’ll find yourself craving excuses to bake pie after pie, just to enjoy that gorgeous woven crust that’s as delicious as it is beautiful.

Ingredients You’ll Need
Before you dive into the weaving magic, let’s get your ingredient lineup ready. The beauty of this lattice pie crust lies in how simple the ingredients are—each one plays a crucial role in bringing you that flaky, buttery, golden-brown crust you’ve been dreaming of.
- All-purpose flour: The foundation of your crust, giving it structure and tenderness.
- Cold unsalted butter: Chilled butter creates the coveted flakiness when baked.
- Ice water: Just enough to bring the dough together without making it sticky.
- Salt: Enhances the flavor of your buttery crust.
How to Make How to Make a Lattice Pie Crust Recipe
Step 1: Prepare the Bottom Crust
Begin by rolling out the first dough disk. This effortless step sets the base for your pie, so be sure to gently line your pie dish with this dough. Keep the second disk well-chilled in the refrigerator until you’re ready to craft the lattice on top; that way, it will be easier to handle and cut.
Step 2: Roll Out the Lattice Dough
Lightly flour your work surface to prevent sticking. An excellent tip is to roll your dough out on the parchment paper you used earlier—it easily rubs off the dough and makes cleanup a breeze. For a 9-inch pie dish, roll the second dough disk into about a 12-inch diameter circle. It doesn’t need to be as wide as the bottom crust but ensure there’s enough dough to extend slightly beyond the rim for that classic crimped finish.
Step 3: Cut the Dough Into Strips
Cut the rolled dough evenly into strips—around 15 strips at ½-inch wide, or if you want bolder bands, about 10 strips at 1-inch wide. A pizza cutter is your best friend here; it not only speeds up the process but helps keep each strip perfectly uniform, which is key for the woven pattern.
Step 4: Add the Filling
Now, spoon your chosen pie filling into the prepared bottom crust. Whether it’s a fragrant apple mix, a luscious berry blend, or your favorite fruit medley, make sure it’s evenly distributed and ready to be crowned with that gorgeous lattice top.
Step 5: Lay the Vertical Strips
Carefully place half of your dough strips parallel to each other across the pie, spacing each about ½ inch apart. Position the longer strips in the center and shorter strips toward the edges—this helps the lattice drape beautifully across the pie.
Step 6: Weave the Lattice
Here’s the fun part that makes your pie truly stand out—fold back every other strip you just placed. Lay down one long strip of dough perpendicular to the first set, right across the center. Then unfold the strips over this new piece. Next, fold back the alternating strips running underneath the new strip and add another strip parallel to the second. Unfold the strips again. Rinse and repeat this weaving process until both sides of your pie are majestically covered with the lattice pattern. It’s almost like pie magic!
Step 7: Trim and Crimp the Edges
Grab your kitchen shears to trim off any excess dough, leaving a small border around the pie for neat crimping. Fold the extra dough over the pie’s edge and pinch it with your fingers to form a pretty, tight seal. You’ve officially become a pie weaving pro, and this step gives your pie that picture-perfect finish that makes it irresistible.
How to Serve How to Make a Lattice Pie Crust Recipe
Garnishes
A lattice crust looks stunning on its own but adding a light dusting of coarse sugar before baking can give your pie a sparkling, caramelized top. You might also consider brushing the crust with an egg wash to boost that golden tone that catches everyone’s eye.
Side Dishes
Serve your lattice-topped pie with a scoop of creamy vanilla ice cream or a dollop of freshly whipped cream. A warm slice paired with these cool, silky sides brings a harmonious balance that brightens up every bite.
Creative Ways to Present
For a festive touch, think about adding edible flowers or fresh mint leaves beside your slices. You can also use the lattice technique on mini pies or tarts for charming individual desserts that wow at gatherings.
Make Ahead and Storage
Storing Leftovers
After you’ve enjoyed your pie, wrap any leftovers tightly with plastic wrap or place them in an airtight container. Refrigerate for up to four days to keep that crust flaky and the filling fresh.
Freezing
If you want to save some pie for later, lattices freeze beautifully. Wrap your baked pie securely with foil and place it in the freezer for up to two months. Just thaw overnight in the refrigerator before reheating.
Reheating
To bring back that freshly baked feel, reheat slices in a 350°F oven for about 15 minutes. This revives the crust’s flakiness without drying out the filling.
FAQs
Can I make the lattice crust with gluten-free flour?
Absolutely! You can substitute all-purpose flour with a gluten-free blend designed for baking. Just keep in mind that the texture might be a tad different, but you will still achieve a delightful lattice crust.
How do I prevent the dough strips from sticking while weaving?
Keeping the dough chilled is key. Work quickly and, if needed, dust your rolling surface and pizza cutter with a little flour to keep the strips from sticking together during weaving.
Can I make the lattice crust ahead of time?
You sure can. Once you cut your dough strips, layer them gently with parchment and keep them tightly covered in the fridge for up to a day. Then pick up where you left off when ready to assemble your pie.
Why is the lattice crust so flaky?
The secret to flaky crust is cold butter incorporated just right so small pockets of fat melt during baking, creating those irresistible layers. The lattice pattern exposes more crust edges to the oven’s heat, encouraging even more crispiness.
What is the best tool to cut the dough into strips?
A pizza cutter is perfect for this task! It makes clean, straight cuts quickly and helps you get uniform strips that weave neatly and look professional.
Final Thoughts
There’s something undeniably satisfying about mastering How to Make a Lattice Pie Crust Recipe. This technique not only elevates your pies from homemade to downright captivating, but it also gives you the confidence to experiment and create while delighting friends and family. So dive in, have fun weaving, and get ready to impress everyone with your beautiful, delicious pies!
Print
How to Make a Lattice Pie Crust Recipe
- Prep Time: 10 minutes
- Cook Time: Varies depending on filling (not specified for crust assembly)
- Total Time: 10 minutes (crust assembly only; baking time depends on pie filling and recipe)
- Yield: 1 9-inch pie
- Category: Dessert
- Method: Baking
- Cuisine: American
Description
This recipe guides you through creating a beautiful and classic lattice pie crust, perfect for showcasing your favorite pie filling. The step-by-step instructions detail how to roll out your dough, cut it into strips, and weave a stunning lattice pattern, resulting in a perfectly sealed and visually appealing pie top.
Ingredients
Pie Crust Dough
- 2 disks of pie crust dough (store-bought or homemade)
- Flour for dusting
Pie Filling
- Pie filling of choice (quantity depends on recipe)
Instructions
- Prepare the bottom crust: Roll out the first dough disk and fit it carefully into your pie dish. Chill the second dough disk in the refrigerator until you are ready to make the lattice top.
- Roll out the lattice dough: Lightly flour your work surface—or use the parchment paper from earlier—to prevent sticking. Roll out the second dough disk to about 12 inches in diameter for a 9-inch pie dish, ensuring it’s wide enough to reach over the rim of your pie dish.
- Cut dough strips: Using a pizza cutter, slice the rolled dough evenly into approximately 15 strips about 1/2-inch wide, or alternatively 10 strips about 1 inch wide, depending on your preferred lattice size.
- Add the filling: Spoon your prepared pie filling evenly into the lined pie shell, spreading it out gently.
- Lay out half the strips: Arrange half of the dough strips parallel across the top of the pie, spacing them about 1/2 inch apart. Place longer strips near the center of the pie and shorter strips toward the edges.
- Weave the lattice: Fold back every other strip. Lay one dough strip perpendicular (over the center) to the strips on the pie, then unfold the folded strips over the new strip. Now fold back the strips that run underneath the new strip, place the next perpendicular strip, and unfold again. Repeat this weaving pattern until the lattice covers the pie fully on both sides.
- Trim and seal: Use kitchen shears to trim excess dough strips, leaving a small border around the edge of the pie. Fold the excess dough over the rim and crimp with your fingers to create a neat seal and decorative border.
Notes
- Chilling the dough helps maintain its shape when rolling and weaving.
- Use a pizza cutter for precise, uniform strips.
- The lattice weave adds not only charm but also allows steam to escape, keeping the crust crisp.
- If you’re new to weaving dough, refer back to the steps or a photo tutorial for guidance.
- You can customize the width and number of strips based on your visual preference.


