
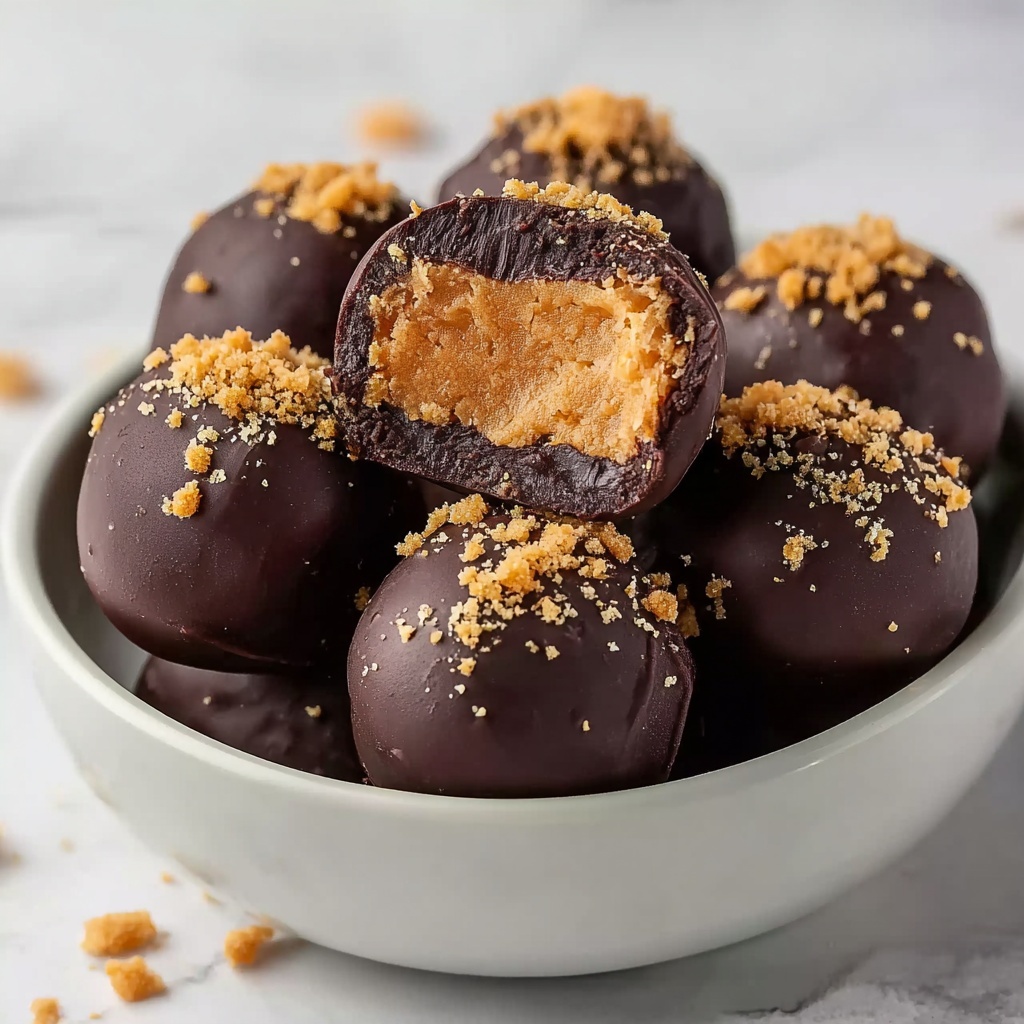
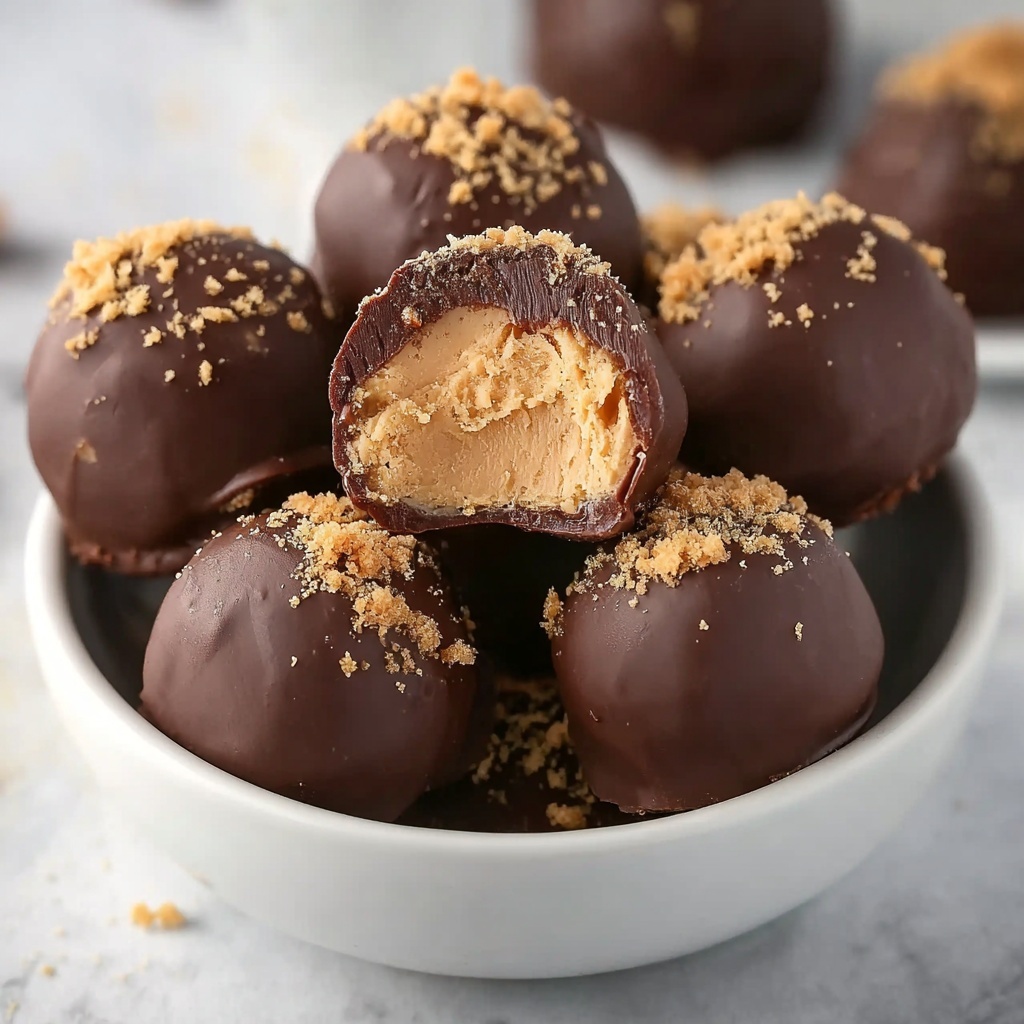
If you’re craving a sweet treat that’s quick to make, irresistible, and perfect for sharing, this Easy No-Bake Butterfinger Balls Recipe is your new best friend. Packed with crunchy Butterfinger candy bits and wrapped in silky chocolate, these little bites have a peanut buttery richness that keeps you coming back for more. They require no oven time and come together in under an hour, making them perfect for last-minute gatherings or whenever that sweet tooth calls. Trust me, once you try this recipe, these buttery, chocolate-covered balls will become a staple in your dessert rotation!
Ingredients You’ll Need
This recipe is delightfully straightforward, relying on a handful of simple ingredients that each play a special role in building the flavor, texture, and visual appeal of these Butterfinger balls. From the crunchy candy bits to the creamy peanut butter binding everything together, every component serves a delicious purpose.
- 2 cups crushed Butterfinger candy bars: The star ingredient that adds signature crispiness and that beloved butterscotch flavor.
- 1 cup creamy peanut butter: Binds the mixture with a rich, smooth texture and nutty taste.
- ½ cup unsalted butter, softened: Adds smoothness and helps the balls hold together.
- 2 cups powdered sugar: Sweetens and thickens the mixture perfectly without grittiness.
- 12 oz chocolate chips (milk or semi-sweet): Provides the luscious chocolate coating that makes these balls utterly decadent.
- 1 tbsp coconut oil or vegetable shortening (optional): Helps achieve a glossy, smooth chocolate finish when coating the balls.
How to Make Easy No-Bake Butterfinger Balls Recipe
Step 1: Crush the Butterfinger Candy Bars
Start by placing your Butterfinger candy bars in a sturdy zip-top bag. Grab a rolling pin and gently crush the candy bars into small, bite-sized pieces. If you’re craving a finer texture, a quick blitz in the food processor works wonders, ensuring every little crunch is evenly broken down. This step sets the foundation for that satisfying crunch in every bite.
Step 2: Mix the Base Ingredients
Next, combine those crushed Butterfingers with creamy peanut butter, softened butter, and powdered sugar in a large mixing bowl. Take your time mixing everything thoroughly until you achieve a smooth, well-incorporated mixture. The peanut butter and butter add creaminess, while the powdered sugar lends sweetness and structure.
Step 3: Shape the Mixture into Balls
Once the mixture feels just right, roll it into 1-inch balls using your hands. Don’t worry if they’re not perfectly round—homemade charm is the best kind of charm! Lay them out on a baking sheet lined with parchment paper, giving each enough space so they don’t stick together later.
Step 4: Chill to Firm Up
Pop your tray of freshly rolled balls into the refrigerator for about 30 minutes. This chill time is crucial because it firms up the mixture, making the chocolate-dipping process smoother and less messy.
Step 5: Melt the Chocolate
While the balls are chilling, melt your chocolate chips in a microwave-safe bowl. Heat them in 30-second intervals, stirring well after each round until the chocolate is completely smooth. If you want a glossy, thinner coating, stir in a tablespoon of coconut oil or vegetable shortening at this stage.
Step 6: Coat the Balls in Chocolate
Remove the chilled Butterfinger balls from the fridge. Using a fork or dipping tool, dunk each ball carefully into the melted chocolate, ensuring every nook and cranny is covered. Let the excess chocolate drip off before placing the coated ball back on the parchment-lined baking sheet. This step is where magic happens—the glossy chocolate shell seals in all that buttery, crispy goodness.
Step 7: Let the Chocolate Set
Allow the chocolate coating to harden naturally at room temperature or, if you’re in a hurry, place the baking sheet in the refrigerator for 15 minutes. Once the chocolate is set, these balls are ready to wow your taste buds!
How to Serve Easy No-Bake Butterfinger Balls Recipe
Garnishes
Enhance your presentation with a sprinkle of crushed Butterfinger bits or a light dusting of powdered sugar on top of each ball. You can also drizzle some contrasting white or dark chocolate over the top for an elegant touch that tastes as good as it looks.
Side Dishes
These Butterfinger balls pair beautifully with a hot cup of coffee or a creamy glass of milk. For a festive gathering, try serving them alongside fresh berries or a scoop of vanilla ice cream to balance the richness perfectly.
Creative Ways to Present
For parties or gift-giving, arrange the Butterfinger balls in mini cupcake liners and place them on a decorative platter. Wrap a few in colorful cellophane tied with a ribbon for adorable homemade gifts. You can even stack them in a neat pyramid for an impressive dessert centerpiece.
Make Ahead and Storage
Storing Leftovers
Place any leftover Butterfinger balls in an airtight container and store them in the refrigerator. They’ll stay fresh and delicious for up to one week, making them perfect for indulging anytime you want a sweet pick-me-up without extra prep.
Freezing
If you want to keep these treats longer, freeze them in a single layer on a baking sheet before transferring to a sealed container or freezer bag. Frozen Butterfinger balls can last up to 3 months and thaw quickly when moved back to the refrigerator.
Reheating
Since these are no-bake, reheating isn’t necessary. Just let frozen or refrigerated balls sit at room temperature for 10-15 minutes before serving so the chocolate softens slightly for the best eating experience.
FAQs
Can I use crunchy peanut butter instead of creamy?
Absolutely! Crunchy peanut butter will add a bit more texture inside these balls, which some people really enjoy. Just be mindful that the crunchiness could slightly alter how smoothly the mixture comes together.
Is it okay to substitute the Butterfinger bars with another candy?
You can experiment with other crunchy, caramel-filled candies, but Butterfinger bars have a unique flavor and texture that really make this recipe shine. Using something else might change the character of the dish significantly.
Can I make smaller or larger balls?
Yes, sizing is flexible! Just keep in mind that larger balls may need longer chilling time and could be a bit messier to dip, while smaller ones are perfect for bite-sized snacking and party trays.
What if I don’t have coconut oil or shortening for the chocolate coating?
No worries at all! The chocolate will still coat the balls nicely without these ingredients. The coconut oil or shortening just helps make the coating smoother and shinier.
Are these Butterfinger balls suitable for kids?
Definitely! This recipe is family-friendly and makes a great activity to do with kids, especially when it comes time to roll the mixture or dip the balls in chocolate. Just be mindful of allergies to peanuts and chocolate.
Final Thoughts
If you’re looking for a quick and fuss-free dessert that bursts with flavor and texture, this Easy No-Bake Butterfinger Balls Recipe is calling your name. It’s a wonderful way to enjoy the iconic taste of Butterfinger bars combined with creamy peanut butter and luscious chocolate, all without turning on your oven. Give this recipe a try, share it with loved ones, and watch how these irresistible bites become an instant favorite in your home!
Print
Easy No-Bake Butterfinger Balls Recipe
- Prep Time: 10 minutes
- Cook Time: 30 minutes (including chilling time)
- Total Time: 40 minutes
- Yield: 20-24 balls
- Category: Dessert
- Method: No-Cook
- Cuisine: American
Description
These Easy No-Bake Butterfinger Balls are a delicious and simple treat combining crunchy Butterfinger candy pieces with creamy peanut butter and a rich chocolate coating. Ready in just 40 minutes, these bite-sized sweets are perfect for parties, holidays, or an everyday indulgence without the need for baking.
Ingredients
Butterfinger Ball Mixture
- 2 cups crushed Butterfinger candy bars
- 1 cup creamy peanut butter
- ½ cup unsalted butter, softened
- 2 cups powdered sugar
Chocolate Coating
- 12 oz chocolate chips (milk or semi-sweet)
- 1 tbsp coconut oil or vegetable shortening (optional, for smooth chocolate coating)
Instructions
- Crush Butterfinger Bars: Place the Butterfinger candy bars in a zip-top bag and crush them into small pieces using a rolling pin for a chunky texture.
- Optional Finer Texture: Alternatively, use a food processor to pulse the candy bars for a finer consistency.
- Combine Ingredients: In a large mixing bowl, add the crushed Butterfingers, creamy peanut butter, softened butter, and powdered sugar.
- Mix Until Smooth: Stir and blend all ingredients thoroughly until the mixture is smooth and well combined.
- Shape Into Balls: Roll the mixture into approximately 1-inch diameter balls and place them evenly spaced on a parchment-lined baking sheet.
- Chill the Balls: Refrigerate the rolled balls for 30 minutes to let them firm up, making them easier to coat.
- Melt Chocolate: In a microwave-safe bowl, melt the chocolate chips in 30-second intervals, stirring between each interval until the chocolate is fully smooth.
- Enhance Chocolate Coating (Optional): Stir in 1 tablespoon of coconut oil or vegetable shortening to the melted chocolate for a thinner, glossier finish.
- Coat the Balls: Use a fork or dipping tool to dip each chilled ball into the melted chocolate, ensuring it is evenly coated.
- Remove Excess Chocolate: Let the excess chocolate drip off before placing the coated balls back onto the parchment paper.
- Harden the Coating: Allow the chocolate coating to set at room temperature or put the tray into the refrigerator for 15 minutes to speed up hardening.
- Serve and Enjoy: Once the chocolate has hardened, the Butterfinger balls are ready to be served and enjoyed.
Notes
- Use crunchy peanut butter for added texture if desired.
- Store the finished Butterfinger balls in an airtight container in the refrigerator for up to 1 week.
- Chocolate chips can be substituted with any melting chocolate of choice such as dark or white chocolate.
- Coconut oil or shortening is optional but helps achieve a smoother chocolate coating.
- For a firmer texture, chill the balls overnight before coating.

