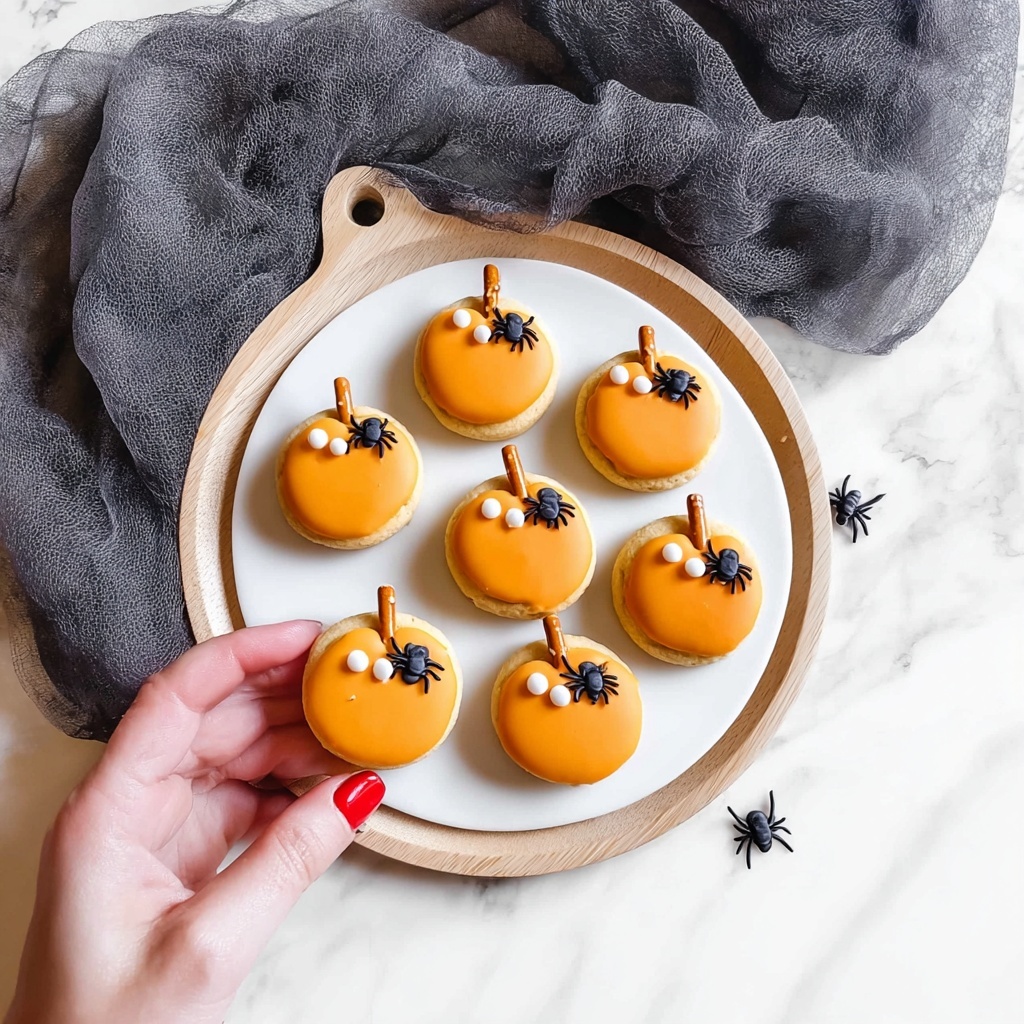
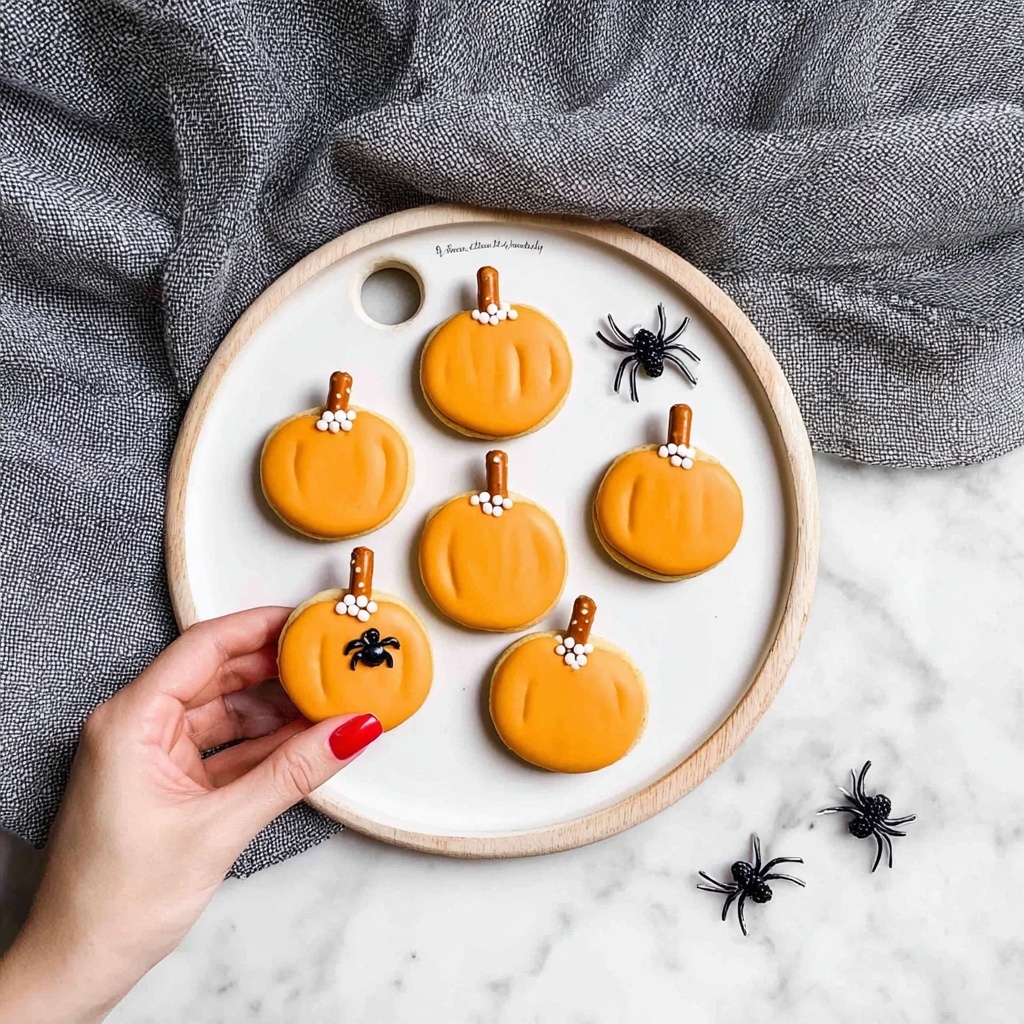
If you are looking for a delightful, eye-catching treat that’s as fun to make as it is to eat, then this Pumpkin Decorated Oreos Recipe is calling your name! These charming, festive cookies combine the creamy sweetness of Golden Oreos with vibrant orange candy melts, crunchy pretzel stems, and festive green sprinkles, bringing a slice of autumn whimsy to your kitchen. Whether you’re hosting a fall party or simply crave a cute seasonal snack, this recipe will quickly become a favorite to share with friends and family.
Ingredients You’ll Need
Ingredients You’ll Need
The magic behind these Pumpkin Decorated Oreos is all about using a handful of simple yet perfectly complementary ingredients. Each one plays its part to create a perfect blend of sweet, crunchy, and colorful elements that truly bring the pumpkin design to life.
- Golden Oreos: The light color makes for a perfect pumpkin canvas and adds a creamy texture inside.
- Orange candy melts (12 oz): Melted to drizzle or spread, these bring that signature pumpkin-orange hue and sweet flavor.
- Pretzel sticks: These form the crunchy, rustic pumpkin stems giving the cookies a fun texture contrast.
- Green sprinkles: Used as leafy details, these add a pop of color and a little crunch that complements the candy melts.
How to Make Pumpkin Decorated Oreos Recipe
Step 1: Coat the Oreos with Candy Melts
Start by placing your Golden Oreos on a clean sheet of baking parchment. Scoop a spoonful of your slightly cooled, melted orange candy melts over each cookie, spreading it gently to cover the top and a bit down the sides. This layer is crucial because it creates that smooth, pumpkin-like surface, setting the stage for your decorations to really pop.
Step 2: Add the Pretzel Stem and Green Leaves
Next, break off small pieces from the pretzel sticks to fashion little pumpkin stems. Press each stem gently into the top center of your coated Oreo. Then sprinkle the green sprinkles next to your stem pieces, mimicking the pumpkin leaves. This step adds an adorable touch and gives your cookies a realistic, seasonal appearance that’s sure to impress anyone who sees them.
Step 3: Let the Pumpkins Dry in Stages
Carefully transfer your decorated Oreos onto a fresh sheet of baking parchment. Allow them to set for about 5 to 10 minutes in this first placement to start firming up the edges. Then, move them gently again to a clean surface and let them dry for another 15 to 20 minutes. For the best-looking results with crisp edges, avoid handling the cookies until they are completely dry, which can take a few hours or ideally, overnight. Patience here really pays off!
How to Serve Pumpkin Decorated Oreos Recipe
Garnishes
While the pumpkin Oreos themselves are sweet and festive, pairing them with a small scattering of extra green sprinkles or a dusting of powdered sugar can elevate their presentation. Tiny edible gold stars also work wonders if you want to add a little sparkle without taking away from the pumpkin charm.
Side Dishes
These pumpkin Oreos pair beautifully with warm beverages like spiced chai tea, creamy pumpkin spice lattes, or even a simple glass of cold milk. For a fall-themed spread, include apple slices, caramel dip, or cinnamon roasted nuts to create a cozy pairing that complements the sweet and salty flavors.
Creative Ways to Present
Arrange your pumpkin-decorated Oreos on a rustic wooden board or a festive autumn-themed plate for a charming display. You can also tie mini cookie bags with raffia or twine and serve them as party favors or gifts. For a kids’ party, create a “Pumpkin Patch” cookie tray with mini pumpkin Oreos nestled in shredded green paper or edible grass, making the treat extra whimsical and playful.
Make Ahead and Storage
Storing Leftovers
Once fully dry, store your Pumpkin Decorated Oreos in an airtight container at room temperature. They keep best away from humidity to maintain that crisp candy coating and the perfect crunch. Stored correctly, they’ll stay delicious for up to 3 days, making them great for prepping ahead of your fall celebrations.
Freezing
While these cookies are best enjoyed fresh, you can freeze them for longer storage. Place them in a single layer on a baking sheet and freeze until firm before transferring them to a freezer-safe container or bag. Thaw at room temperature before serving, but be aware that some delicate candy melts or sprinkles may soften after freezing.
Reheating
Since these cookies don’t require baking, reheating isn’t necessary. If they have been stored in a cool place, bring them to room temperature so the candy melts soften slightly and reveal their wonderful texture and flavor. Avoid microwaving, which can melt the decorations and make the Oreos messy.
FAQs
Can I use regular Chocolate Oreos instead of Golden Oreos?
Golden Oreos work best for this Pumpkin Decorated Oreos Recipe because their light color makes the orange candy stand out beautifully. Using chocolate Oreos may dull the vibrant pumpkin look but will still taste delicious if you prefer them.
What if I don’t have pretzel sticks for the pumpkin stem?
If pretzel sticks aren’t available, small pieces of broken breadsticks or even candy sticks could work as a substitute. Just make sure they are sturdy enough to hold their shape on top of the cookie.
Can I use regular chocolate instead of candy melts?
Candy melts are preferred because they’re designed to harden smoothly at room temperature, giving you that polished pumpkin finish. While chocolate can work, it might not set as neatly and could be trickier to handle.
How long does it take for the candy melts to dry completely?
It can take a few hours up to overnight for them to fully harden, especially if you spread a thick layer. Patience is key to achieving those crisp, clean edges and a professional look.
Are these Pumpkin Decorated Oreos recipe suitable for kids to make?
Absolutely! This recipe is simple and safe, making it a fun fall craft and cooking activity for kids. Just supervise the candy melt melting process, and they’ll enjoy decorating their spooky sweet pumpkins.
Final Thoughts
This Pumpkin Decorated Oreos Recipe is such a joyful way to celebrate the flavors and colors of fall in a bite-sized treat. Once you see how quick and fun it is to turn simple Oreos into spiced-up pumpkin masterpieces, you’ll wonder how you ever enjoyed autumn without them. Give it a try, share them with loved ones, and watch your seasonal celebrations light up with smiles!
Print
Pumpkin Decorated Oreos Recipe
- Prep Time: 10 minutes
- Cook Time: 0 minutes
- Total Time: 10 minutes prep plus several hours to overnight drying
- Yield: 30 cookies
- Category: Dessert
- Method: No-Cook
- Cuisine: American
Description
These Pumpkin Decorated Oreos are a delightful and festive treat perfect for fall celebrations. Golden Oreo cookies are transformed into adorable pumpkin shapes using orange candy melts as the pumpkin body, pretzel sticks as stems, and green sprinkles as leaves. This no-bake, simple dessert is great for parties, Halloween, or Thanksgiving and provides a fun activity for all ages.
Ingredients
Cookies
- 1 package Golden Oreos (about 30 cookies)
Decoration
- 1 (12 oz) bag orange candy melts, melted and slightly cooled
- 15 pretzel sticks, broken into small pieces for stems
- Green sprinkles (large nonpareilles, leaf sprinkles, or green miniature M&Ms) for leaves
Instructions
- Prepare the base: Place an Oreo cookie on a clean sheet of baking parchment paper to create a work surface that prevents sticking.
- Coat with candy melts: Spoon a generous amount of melted orange candy melts over the top of the Oreo cookie, spreading it gently so it slightly drips down the sides, forming the pumpkin shape.
- Add the stem and leaves: Break a small piece off a pretzel stick to serve as the pumpkin stem. Press the pretzel piece gently into the candy melt atop the Oreo. Next to the stem, add green sprinkles to mimic pumpkin leaves for a decorative touch.
- Set and dry: Carefully transfer the decorated cookies to a clean sheet of parchment about 5–10 minutes after decorating, then again after 15–20 minutes to ensure clean edges around the base. Allow cookies to dry completely for several hours or overnight before handling to ensure the candy melts harden fully.
Notes
- Ensure candy melts are not too hot when applying, or they may melt the Oreos.
- Use parchment paper to prevent cookies from sticking while drying.
- Allow ample drying time for candy melts to harden fully; overnight is best.
- Oleoresin and sprinkles can be customized with different colors or shapes for creative variations.
- This recipe requires no baking and is ideal for quick, festive treats.

