
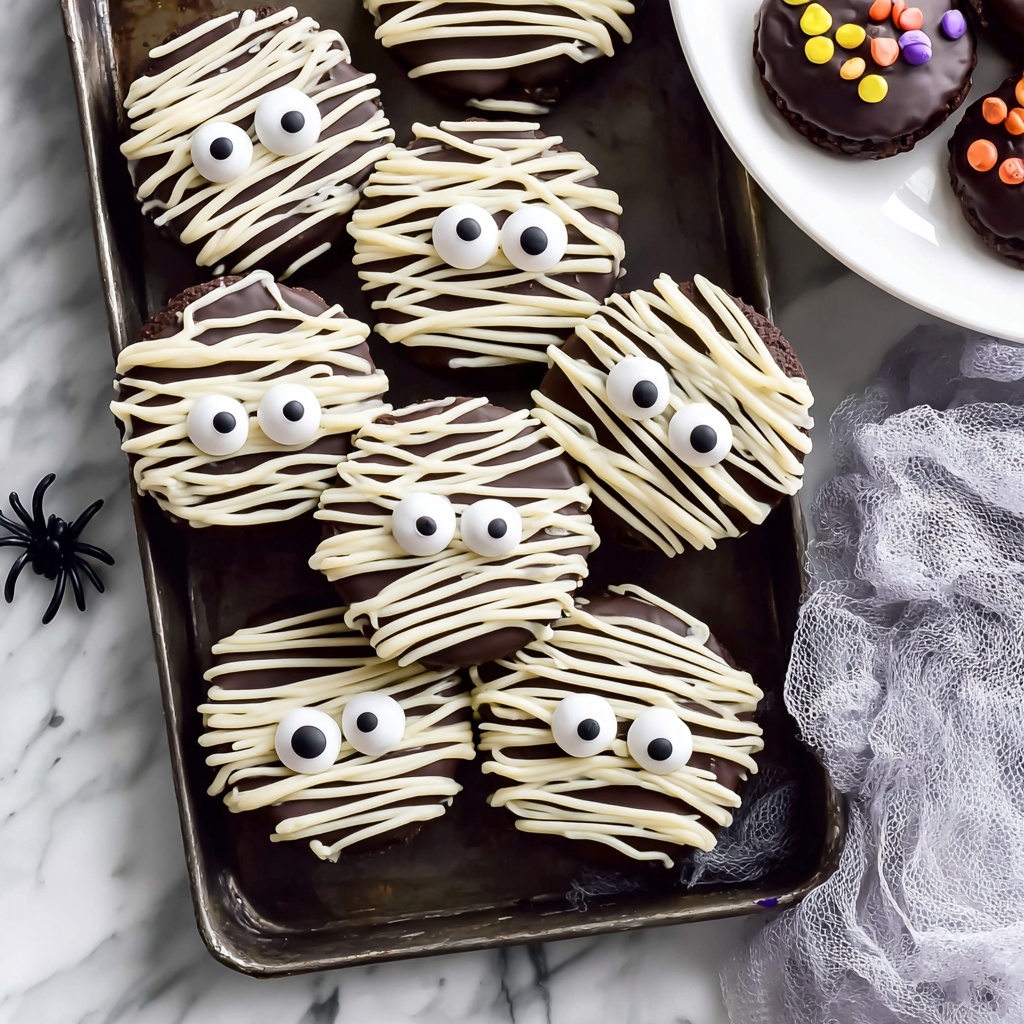
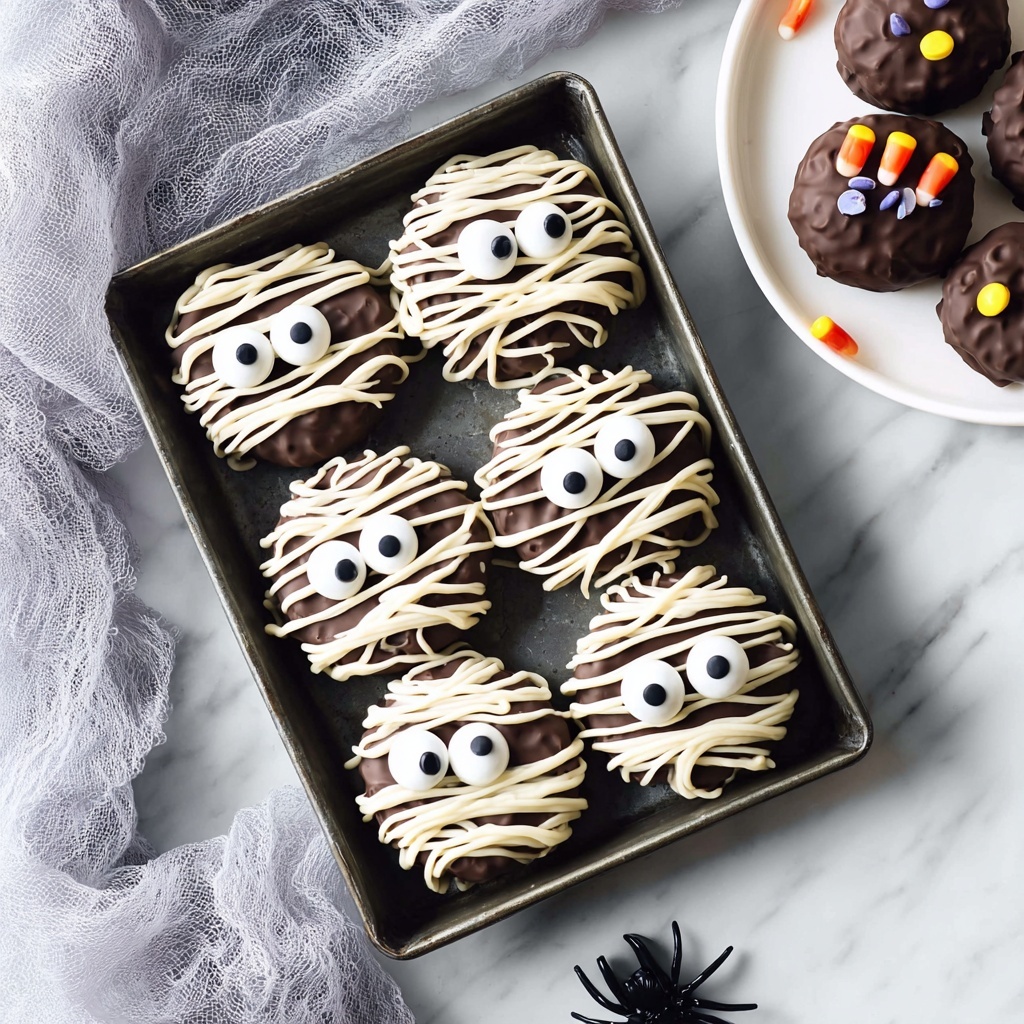
There is something irresistibly fun and festive about the Mummy Oreos Recipe that makes it a must-try for any Halloween party or spooky-themed gathering. These adorable treats take classic Oreo cookies and transform them into charming little mummies with silky white chocolate “bandages” and cute candy eyes. The best part is how simple yet eye-catching they are, perfect for impressing friends and family without a complicated process. If you love easy, creative desserts that bring smiles and a touch of whimsy, this Mummy Oreos Recipe is right up your alley.
Ingredients You’ll Need
The beauty of this recipe lies in using just a handful of ingredients, each playing an essential role in flavor, texture, and the overall spooky look. With Oreos for that classic crunch and rich cream filling, and white chocolate for that smooth, festive wrap effect, you’ll see how every element contributes to the magic.
- Oreos: Choose either regular or Double Stuf to add that iconic chocolate and cream combo.
- White chocolate or white candy melts: Melted perfectly, they create the mummy’s bandages that harden with a beautiful sheen.
- Edible candy eyes: These tiny details bring your mummies to life and add a playful personality to each cookie.
How to Make Mummy Oreos Recipe
Step 1: Prep Your White Chocolate
Start by melting your white chocolate or candy melts according to the package instructions. Pour the smooth, creamy chocolate into a piping bag fitted with a very thin tip. This setup will allow you to create delicate, thin strands that look just like mummy wrappings.
Step 2: Attach the Eyes
Place an Oreo cookie on a clean sheet of baking parchment. Dab a tiny bit of melted white chocolate on the cookie where you want each eye to sit, then gently press two candy eyes onto it. These eyes are what give your mummy its character, so take a moment to place them just right.
Step 3: Drizzle the “Bandages”
Using the piping bag, drizzle thin, irregular strands of white chocolate all over the cookie, crisscrossing to mimic the look of mummy wrappings. Don’t worry about perfection—some drips and unevenness make them look more authentic and handmade.
Step 4: Dry and Transfer with Care
After decorating, let the cookies set for about 15 minutes, then carefully move them to a fresh sheet of parchment paper to avoid smudging. Repeat this transfer again after 30 minutes to keep the edges clean. It’s best to resist touching them until they’re fully dry, which may take a few hours or even overnight for the sharpest effect.
Step 5: Add a Second Layer for Drama
Once the first drizzle layer has hardened, add another thin layer of white chocolate to give extra depth and texture to the mummy wrap look. This double layering helps the cookies stand out and adds a beautiful finish.
How to Serve Mummy Oreos Recipe
Garnishes
For a festive touch, sprinkle a little edible glitter or colored sugar around the cookies on the serving platter to catch the light and add sparkle. You can also place the mummies on little cupcake liners to keep them neat and ready to serve.
Side Dishes
Mummy Oreos make fantastic companions to warm drinks like hot cocoa or spiced apple cider. The rich chocolate and white chocolate flavor pairs beautifully with these cozy beverages, making for a hauntingly delicious treat spread.
Creative Ways to Present
Try arranging the mummies in a spooky graveyard scene with crushed chocolate cookies as “dirt” and pretzel sticks standing upright like tombstones. Alternatively, put a few in small clear bags tied with orange and black ribbons for easy party favors that guests will adore.
Make Ahead and Storage
Storing Leftovers
Once fully dried, Mummy Oreos can be stored in an airtight container at room temperature. This keeps them crisp and maintains the white chocolate’s glossy finish for up to a week, perfect for making ahead of your Halloween festivities.
Freezing
If you want to keep them longer, freeze the finished cookies in a single layer separated by parchment paper inside a sealed container. When you’re ready to enjoy them, thaw at room temperature for several hours to keep the texture intact.
Reheating
Mummy Oreos are best enjoyed cold or at room temperature, so reheating is not recommended as it may melt or dull the white chocolate decorations. Instead, simply let frozen ones thaw naturally to retain their crisp charm.
FAQs
Can I use other types of cookies besides Oreos?
Absolutely! While Oreos provide a classic flavor and sturdy base, feel free to experiment with sandwich cookies of similar size and shape to create your own mummy treats.
What if I don’t have edible candy eyes?
You can substitute with tiny dots of black icing piped carefully after the white chocolate dries or use small chocolate chips for eyes if you prefer a homemade touch.
Is white chocolate or candy melts better for this recipe?
Both work wonderfully. White chocolate offers a richer flavor but requires careful melting to prevent seizing. Candy melts are easier to handle and set quickly, making them great for beginners.
How thin should the chocolate drizzle be?
Try to keep the chocolate strands as thin as possible to resemble mummy bandages, but don’t worry if they vary slightly—this adds to the homemade charm.
Can I prepare these with kids?
Definitely! This recipe is family-friendly and especially fun for kids to decorate. Just supervise the use of hot melted chocolate for safety.
Final Thoughts
If you’re looking to add something adorable yet easy to your Halloween treat lineup, the Mummy Oreos Recipe is an absolute winner. It’s surprising how just a few ingredients and a little creativity can turn simple cookies into delightful edible mummies that charm everyone, young and old alike. So grab some Oreos, white chocolate, and candy eyes, and start creating your own spooky snack magic. Trust me, once you try these, they’ll become an annual tradition you can’t wait to make again!
Print
Mummy Oreos Recipe
- Prep Time: 10 minutes
- Cook Time: 0 minutes
- Total Time: 10 minutes prep + several hours drying (preferably overnight)
- Yield: 30 cookies
- Category: Dessert
- Method: No-Cook
- Cuisine: American
Description
Mummy Oreos are a fun and festive Halloween treat featuring classic Oreo cookies decorated with drizzled white chocolate to resemble spooky mummies. Edible candy eyes add a playful touch, making these no-bake snacks perfect for parties or themed gatherings. Simple to make and requiring no oven time, they combine creamy sweetness with a creative presentation.
Ingredients
Cookies
- 1 package Oreo cookies (14 oz regular or 15 oz double stuf)
Decoration
- 8 oz white chocolate for melting or white candy melts, melted and slightly cooled
- 60 edible candy eyes
Instructions
- Prepare White Chocolate: Place the melted white chocolate into a piping bag fitted with a very thin tip. This will allow you to create fine drizzles that resemble mummy wrappings.
- Apply Eyes: Lay an Oreo cookie on a clean sheet of baking parchment. Using a small dot of melted white chocolate as glue, attach two edible candy eyes onto each cookie.
- Drizzle Mummy Wrappings: Drizzle thin strands of white chocolate over the cookie surface to mimic the mummy’s fabric wrapping. Allow the chocolate to set and dry naturally.
- First Drying Phase: Carefully transfer the decorated cookies to a fresh sheet of baking parchment about 15 minutes after decorating to ensure crisp, clean edges. Repeat this transfer once more 30 minutes later. Avoid touching the cookies with your fingers during drying to maintain the design.
- Final Drying and Optional Second Layer: Let the cookies dry fully for several hours or preferably overnight. For a more authentic mummy look, drizzle a second layer of white chocolate over the dried first layer once it has fully set.
Notes
- Use white candy melts as an easy alternative to white chocolate; follow package instructions for melting.
- Ensure the melted chocolate is cooled slightly before piping to prevent melting the Oreo filling.
- Handle cookies carefully while wet chocolate is drying to maintain the design integrity.
- Store finished cookies in an airtight container at room temperature to keep them fresh.
- This recipe makes approximately 30 decorated cookies using one package of Oreos.

