
If you’ve been searching for the ultimate comfort food that wraps you in warm, cheesy goodness, then the Classic Cheesy Funeral Potatoes Recipe is exactly what you need to try next. This beloved casserole combines crispy golden hash browns, a rich creamy sauce loaded with cheddar cheese, and a satisfyingly crunchy cornflake topping. It’s the kind of dish that instantly transports you to cozy family gatherings and potlucks, making it one of those timeless recipes that feels like a warm hug on a plate.
Ingredients You’ll Need
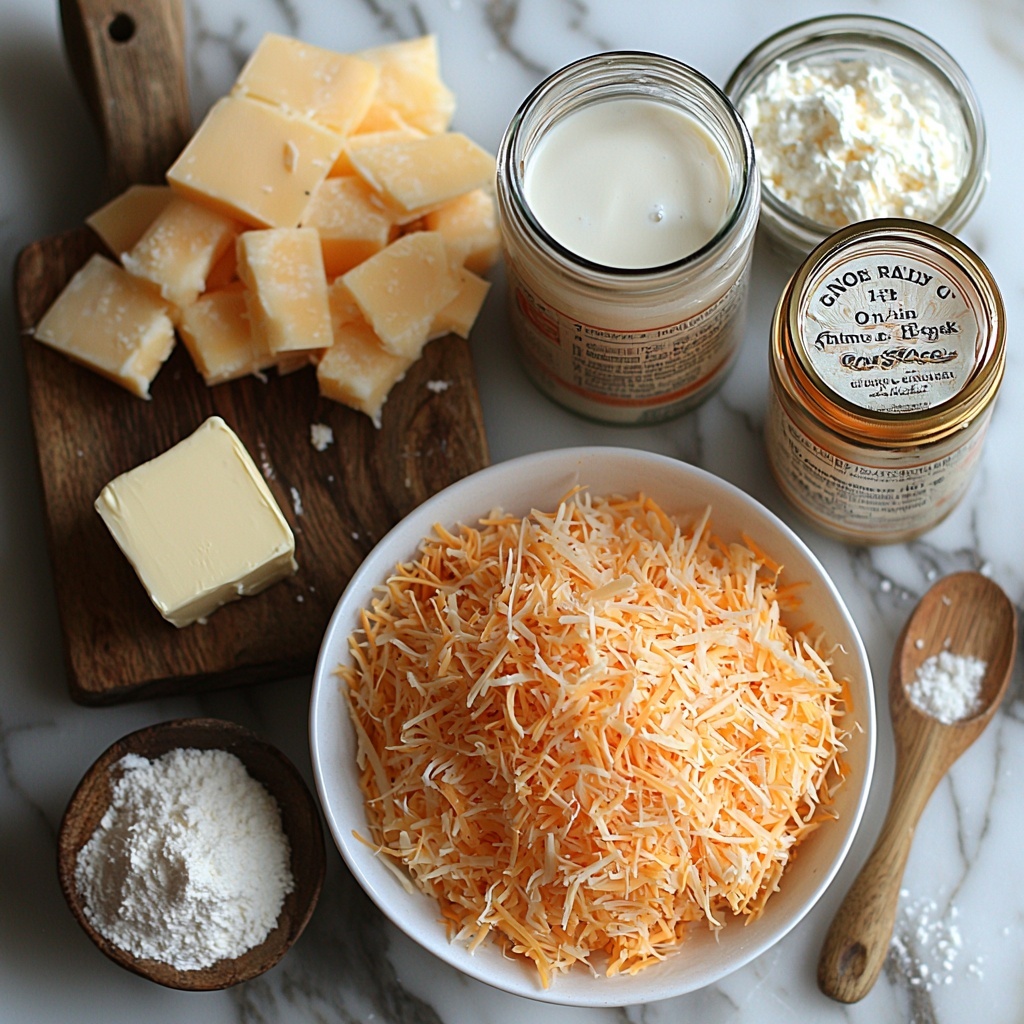
The magic of the Classic Cheesy Funeral Potatoes recipe lies in its simplicity. Each ingredient plays a crucial role—from the butter that lends richness and helps create a golden crust, to the hash browns that provide the hearty base. Every element blends to build layers of flavor and texture that everyone will love.
- Butter (1 stick, divided): Used to grease the pan and add a luscious richness to the sauce and cornflake topping.
- Frozen shredded hash browns (30 oz, thawed): The hearty and starchy foundation of the dish, delivering that satisfying potato texture.
- Medium onion (diced): Adds a subtle sweetness and depth of flavor once softened.
- All-purpose flour (1/4 cup): Thickens the creamy sauce ensuring it perfectly coats the potatoes.
- Milk (1 cup): Provides the creamy liquid necessary for the sauce’s smooth consistency.
- Condensed cream of chicken soup (2 cans, 10.5 oz each): Brings richness and savory comfort to the sauce.
- Shredded cheddar cheese (2 cups): Melts into the sauce creating that signature cheesy flavor we all crave.
- Sour cream (1 cup): Adds tanginess and creaminess, balancing the flavors beautifully.
- Corn flakes (3 cups, crushed): Topped on the dish to create a buttery, crispy crust.
- Salt and pepper (to taste): Essential seasonings that elevate every bite.
How to Make Classic Cheesy Funeral Potatoes Recipe
Step 1: Prepare Your Oven and Pan
Start by preheating your oven to 350 degrees F. Place 1 tablespoon of butter into your 9×13 casserole dish and set it in the oven as it warms up. This will melt the butter and greases the pan beautifully, preventing sticking and adding flavor to the crust.
Step 2: Sauté the Onions
Melt 5 tablespoons of butter in a large skillet over medium heat. Add the diced onion and cook for about 3 to 4 minutes until they become soft and translucent. This step brings out the natural sweetness and makes the base of your sauce incredibly flavorful.
Step 3: Make the Roux
Sprinkle the flour over the softened onions, stirring constantly for 2 minutes. Cooking the flour at this stage prevents any raw flour taste and helps thicken the sauce later.
Step 4: Whisk in Milk and Soup
Slowly pour in the milk, whisking continuously to avoid lumps. Once smooth, add both cans of condensed cream of chicken soup. Keep whisking until the sauce is thick and silky with no lumps in sight.
Step 5: Add Cheese and Sour Cream
Turn off the heat and stir in the sour cream and shredded cheddar cheese. Mix until the cheese melts completely and everything is evenly combined. Season with salt and pepper, then taste to adjust seasoning as needed.
Step 6: Combine with Hash Browns
Add the thawed hash browns to the sauce and gently fold them together in batches if necessary. This ensures every potato strip is coated in cheesy goodness. Once mixed, transfer the entire mixture into your buttered casserole dish.
Step 7: Prepare the Topping
Melt the remaining 2 tablespoons of butter and pour it over the crushed corn flakes. Stir well to coat every flake with butter, which will crisp up perfectly when baked. Sprinkle the buttery cornflakes evenly over the potatoes.
Step 8: Bake to Perfection
Cover the casserole with aluminum foil and bake for 25 minutes. Then, remove the foil and bake for another 15 to 20 minutes until the top is golden and crispy and the edges are bubbly. Let the dish rest for 15 minutes before serving to let everything set.
How to Serve Classic Cheesy Funeral Potatoes Recipe
Garnishes
Fresh herbs like chopped chives, parsley, or green onions add a lovely bright note on top of your baked funeral potatoes. Sprinkling a bit of extra shredded cheddar before serving can amp up the cheesiness, too.
Side Dishes
This dish pairs perfectly with almost anything! Think roasted meats like ham or turkey, simple green salads, or steamed vegetables. Its creamy richness balances well with fresh or acidic sides, helping create a well-rounded meal.
Creative Ways to Present
For a crowd, serve the funeral potatoes straight from the casserole dish for that homey feel. Or, for a fancier touch, spoon individual portions into ramekins and add extra garnishes. You could even turn leftovers into loaded potato cakes for a fun twist!
Make Ahead and Storage
Storing Leftovers
Carefully cover any leftovers with plastic wrap or foil and store in the refrigerator for up to 3 days. Reheat gently to maintain that creamy texture and avoid drying out the potatoes.
Freezing
This recipe freezes beautifully. After baking, let it cool completely, then cover tightly with foil and freeze for up to 3 months. When ready to enjoy, thaw overnight in the fridge before reheating.
Reheating
To reheat, bake covered at 350 degrees F until heated through, about 20-30 minutes. Removing the foil during the last 5-10 minutes will help bring back the crunchy topping.
FAQs
Can I use fresh potatoes instead of frozen hash browns?
Absolutely! You can shred raw potatoes yourself, but be sure to squeeze out excess moisture so your casserole isn’t watery. Using frozen hash browns is just more convenient.
Is there a vegetarian version of this recipe?
Yes, swapping out the cream of chicken soup with a cream of mushroom or vegetable soup works well. Just make sure the substitute has similar thickness for the sauce.
Can I make this recipe dairy-free?
For a dairy-free version, try using dairy-free butter, milk alternatives, and cheese substitutes. The texture and flavor will be a bit different but still delicious.
How can I make the topping extra crunchy?
Mixing melted butter thoroughly with the cornflakes and broiling the casserole for the last 2-3 minutes can boost that golden crispiness.
Why is it called “funeral potatoes”?
The name comes from its traditional presence at church gatherings and funerals in parts of the US, especially the Midwest. It’s a comforting dish often brought to support grieving families.
Final Thoughts
If you want a dish that’s truly heartwarming and guaranteed to bring smiles, you need to make this Classic Cheesy Funeral Potatoes Recipe soon. It’s effortless to prepare yet irresistibly tasty, filling your kitchen with mouthwatering aromas and your table with undeniable comfort. Trust me, once you try it, this casserole will become one of your favorite go-to recipes for every special occasion or whenever a little cozy indulgence is in order.
Print
Classic Cheesy Funeral Potatoes Recipe
- Prep Time: 20 minutes
- Cook Time: 55 minutes
- Total Time: 1 hour 15 minutes
- Yield: 12 servings
- Category: Casserole
- Method: Baking
- Cuisine: American
Description
Classic Cheesy Funeral Potatoes is a comforting casserole dish featuring shredded hash browns baked in a creamy, cheesy sauce topped with buttery crushed corn flakes for a crunchy finish. This hearty dish is perfect for family gatherings or potlucks, delivering a nostalgic taste of creamy cheese, tender potatoes, and savory onion flavors.
Ingredients
Main Ingredients
- 1 stick of butter (divided)
- 30 oz frozen shredded hash browns (thawed)
- 1 medium onion (diced)
- 1/4 cup all purpose flour
- 1 cup milk
- 2 – 10.5 oz cans condensed cream of chicken soup
- 2 cups shredded cheddar cheese
- 1 cup sour cream
- 3 cups corn flakes (crushed)
- Salt and Pepper to taste
Instructions
- Prepare the baking dish and onion: Preheat oven to 350°F (175°C). Place 1 tablespoon of butter in a 9×13 inch casserole dish and put it in the oven as it heats to melt the butter, which will be used to grease the pan. Meanwhile, melt 5 tablespoons of butter in a large deep skillet over medium heat. Add the diced onion and cook until softened, about 3-4 minutes.
- Add flour: Sprinkle the 1/4 cup of flour over the softened onions in the skillet. Cook for an additional 2 minutes while stirring to remove the raw flour taste.
- Make the sauce: Slowly whisk in 1 cup of milk gradually until smooth and lump-free. Then add both cans of condensed cream of chicken soup, whisking until the mixture is well combined and smooth without lumps.
- Incorporate sour cream and cheese: Remove the skillet from heat. Stir in 1 cup of sour cream and 2 cups of shredded cheddar cheese until the cheese melts and the mixture is creamy. Season with salt and pepper to taste, and adjust seasoning if needed.
- Mix hash browns: Add the thawed shredded hash browns in two batches to the sauce, stirring gently until fully coated. Transfer this mixture to the buttered casserole dish.
- Prepare topping: Melt the remaining 2 tablespoons of butter and pour over the crushed 3 cups of corn flakes. Stir to coat the flakes evenly. Sprinkle the buttered corn flakes evenly over the potato mixture in the casserole dish.
- Bake the casserole: Cover the casserole dish with aluminum foil and bake for 25 minutes. Remove the foil and continue baking for another 15-20 minutes until the top is golden brown and the edges are bubbly.
- Rest and serve: Remove the casserole from the oven and allow it to sit for 15 minutes before serving. This lets the dish set and cool slightly for best texture and flavor.
Notes
- Use a large deep skillet to comfortably mix the sauce and hash browns.
- Crushing the corn flakes finely helps create a more even crispy topping.
- Make sure the hash browns are thawed before mixing for even cooking.
- You can substitute cream of mushroom soup for cream of chicken for a different flavor.
- Letting the casserole rest after baking helps it firm up and makes it easier to serve.
- Store leftovers covered in the refrigerator and consume within 3-4 days.


