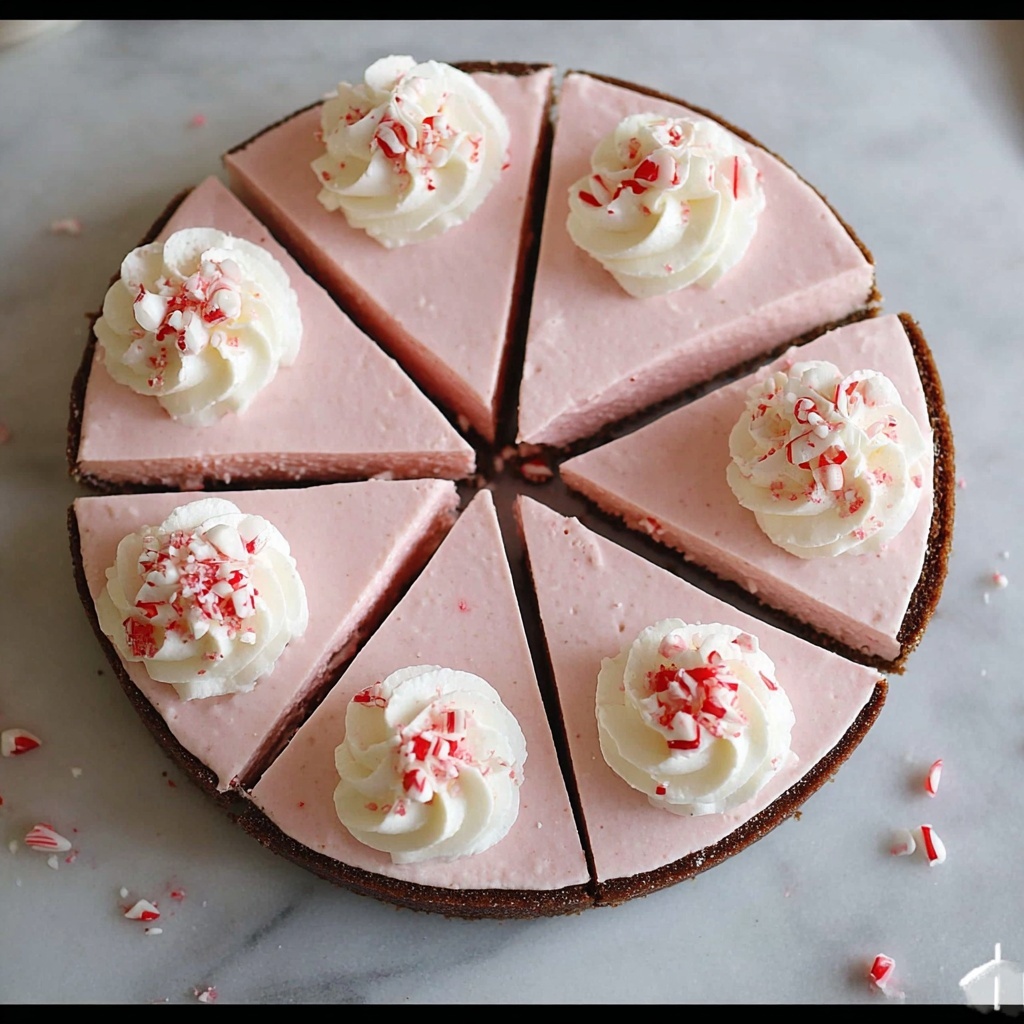
Nothing captures the spirit of the season quite like the Holiday Bliss Christmas Peppermint Pie Recipe. This delightful dessert is a perfect blend of creamy peppermint filling nestled in a rich chocolate cookie crust, making it a festive treat that’s as beautiful as it is delicious. Whether you’re looking to wow guests at your holiday gathering or simply craving a sweet and refreshing Christmas classic, this pie brings the magic and joy of the holidays right to your table. With its smooth texture, peppermint zing, and charming red-and-white colors, this pie embodies the essence of holiday bliss in every bite.
Ingredients You’ll Need
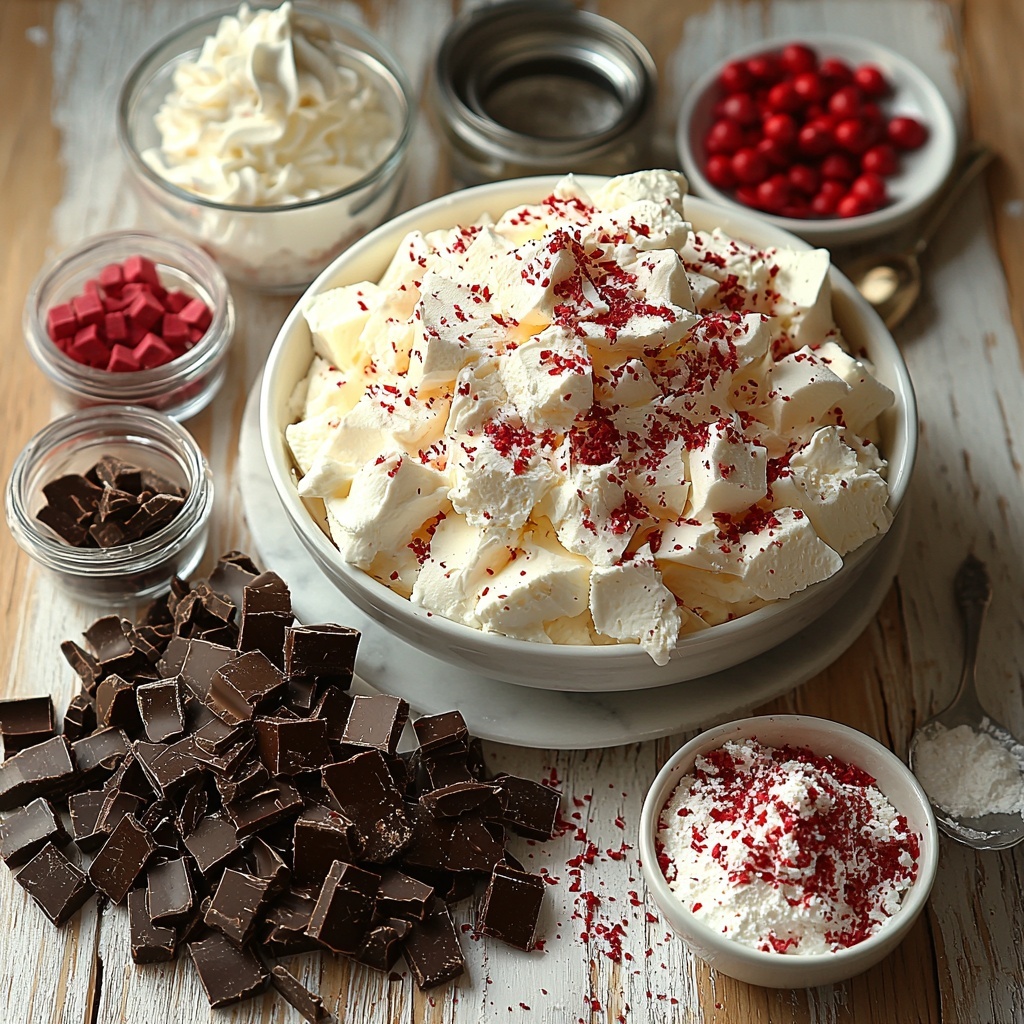
Each ingredient in this Holiday Bliss Christmas Peppermint Pie Recipe is thoughtfully chosen for how it contributes to the overall taste and texture. From the chocolate crust’s crunchy base to the fluffy, minty filling, these ingredients come together to create a show-stopping holiday dessert that’s surprisingly simple to make.
- Chocolate cookie crust: Provides a rich, crunchy foundation that balances the creamy filling perfectly.
- Cream cheese (8 ounces, softened): Adds tanginess and creaminess to the filling for a luscious texture.
- Powdered sugar (1 cup): Sweetens the filling evenly for that perfect peppermint pie sweetness.
- Peppermint extract (1 teaspoon): Infuses the pie with its signature refreshing mint flavor.
- Red food coloring (2 to 3 drops, optional): Gives the filling a festive red tint that’s so fun for the holidays.
- Whipped topping (8 ounces, thawed): Lightens and smooths the filling, making it airy and soft.
- Crushed peppermint candies (½ cup plus extra for garnish): Adds a delightful crunch and festive flair both inside and on top.
- Extra whipped topping: For a decadent finishing touch that invites you to dive right in.
How to Make Holiday Bliss Christmas Peppermint Pie Recipe
Step 1: Prepare the Crust
Start by combining your crushed chocolate cookies with melted butter until the mixture resembles damp sand. Press this mixture firmly into the bottom and sides of a 9-inch pie pan. This crust sets the stage with its deep chocolate flavor and a satisfying crunch. Pop it in the fridge to chill while you whip up the luscious filling.
Step 2: Beat the Cream Cheese Smooth
Take the softened cream cheese and beat it in a large bowl until it’s silky smooth and fluffy. This step is key to avoiding lumps and ensuring your filling has that dreamy, creamy consistency.
Step 3: Mix in Sugar, Peppermint, and Color
Add the powdered sugar and peppermint extract to your smooth cream cheese, mixing thoroughly until everything is perfectly combined. If you’re feeling festive, stir in 2 to 3 drops of red food coloring. This little splash of color instantly brightens the filling, making it picture-perfect for Christmas.
Step 4: Fold in Whipped Topping
Gently fold in the thawed whipped topping with care, so the filling remains light and airy. This step creates that irresistible fluffiness that will make every spoonful melt on your tongue.
Step 5: Add Peppermint Candies and Assemble
Sprinkle in the crushed peppermint candies into the mixture, folding them in just enough to distribute their festive crunch without losing that soft texture. Then scoop the filling onto the chilled crust, spreading it evenly to cover the whole pie. Cover and let the pie chill for at least four hours, or better yet, overnight. This resting time lets the flavors blend and the texture set beautifully.
Step 6: Finish and Chill
Before serving, generously top with extra whipped topping and sprinkle additional crushed peppermint candies for a stunning finish that’s as delicious as it is festive. Keep the pie refrigerated until it’s time to slice and serve.
How to Serve Holiday Bliss Christmas Peppermint Pie Recipe
Garnishes
There’s nothing quite like the look of extra whipped topping crowned with peppermint candy bits to create an inviting dessert centerpiece. Fresh peppermint leaves or a drizzle of chocolate syrup can also add an elegant touch, making the pie look as irresistible as it tastes.
Side Dishes
This peppermint pie pairs beautifully with simple sides like a scoop of vanilla ice cream or a warm cup of rich hot chocolate. The cool mint flavors contrast nicely with a velvety hot drink and provide a satisfying balance to the chocolate crust.
Creative Ways to Present
Try serving individual slices with a sprig of rosemary or a candy cane for a festive garnish that doubles as decor. You can also plate the pie with scattered crushed peppermint candies around the edge for added crunch and seasonal charm. Presentation is everything when sharing this Holiday Bliss Christmas Peppermint Pie Recipe with loved ones!
Make Ahead and Storage
Storing Leftovers
Store any leftover pie in an airtight container in the refrigerator. It will keep fantastic for up to four days, maintaining its fresh peppermint flavor and creamy texture.
Freezing
You can freeze this pie for longer storage by wrapping it tightly in plastic wrap and aluminum foil. Freeze for up to one month, then thaw in the fridge overnight before serving to bring back that perfect consistency.
Reheating
Since this is a chilled dessert, reheating is not recommended. Serve it cold to enjoy the full peppermint freshness and velvety texture that make the Holiday Bliss Christmas Peppermint Pie Recipe so special.
FAQs
Can I make the crust from scratch?
Absolutely! While a pre-made chocolate cookie crust is convenient, you can easily crush your favorite chocolate cookies and combine them with melted butter to form a delicious homemade crust.
Can I substitute peppermint extract with something else?
If you don’t have peppermint extract on hand, you might try a small amount of mint syrup, but peppermint extract gives the clean, sharp flavor that’s key to this pie’s signature taste.
How long should I chill the pie before serving?
To develop the best texture and let flavors meld beautifully, chill the pie for at least four hours. Overnight chilling yields a firmer, more sliceable pie.
Can I use fresh peppermint instead of crushed candies?
Fresh peppermint leaves add a nice aroma but won’t provide the same crunch or sweetness that crushed peppermint candies bring. For the classic texture and festive look, candy works best.
Is this pie suitable for kids?
Definitely! The flavors are mild and sweet, and the colorful presentation tends to be a big hit with children during holiday celebrations.
Final Thoughts
The Holiday Bliss Christmas Peppermint Pie Recipe is one of those festive treats that brings people together and sparks smiles all around the table. Its perfect balance of creamy mint filling and chocolatey crust makes it a holiday must-have that’s as fun to make as it is to eat. I encourage you to give this recipe a try, and watch it become your new favorite Christmas tradition that everyone looks forward to each year!
Print
Holiday Bliss Christmas Peppermint Pie Recipe
- Prep Time: 20 minutes
- Cook Time: 0 minutes
- Total Time: 4 hours 20 minutes
- Yield: 8 servings
- Category: Dessert
- Method: No-Cook
- Cuisine: American
- Diet: Vegetarian
Description
This Holiday Bliss Christmas Peppermint Pie is a festive and refreshing no-bake dessert perfect for the holiday season. Featuring a chocolate cookie crust filled with a creamy peppermint-flavored filling, it is topped with whipped cream and crushed peppermint candies for a delightful minty crunch. Easy to prepare and beautifully vibrant with optional red food coloring, this pie brings holiday cheer to any gathering.
Ingredients
Crust
- 1 pre-made chocolate cookie crust (or 1 ½ cups crushed chocolate cookies + 5 tablespoons melted butter)
Filling
- 8 ounces cream cheese, softened
- 1 cup powdered sugar
- 1 teaspoon peppermint extract
- 2 to 3 drops red food coloring (optional)
- 8 ounces whipped topping, thawed
- ½ cup crushed peppermint candies (plus more for garnish)
Topping
- Extra whipped topping for topping
Instructions
- Prepare the crust: In a medium bowl, combine crushed chocolate cookies with melted butter if making the crust from scratch. Press the mixture firmly into the bottom and up the sides of a 9-inch pie pan. Chill the crust in the refrigerator while you prepare the filling to set.
- Beat the cream cheese: Place softened cream cheese in a large mixing bowl and beat until smooth and fluffy, ensuring no lumps remain for a creamy texture.
- Add sugar and flavoring: Add powdered sugar and peppermint extract to the cream cheese. Mix until fully combined into a smooth mixture. If desired, incorporate red food coloring, a few drops at a time, until the filling reaches your preferred festive shade of pink or red.
- Fold in whipped topping: Gently fold the thawed whipped topping into the cream cheese mixture until the filling is light, airy, and evenly blended without deflating the whipped topping’s fluffiness.
- Fill the crust: Spoon the peppermint filling into the chilled chocolate cookie crust. Spread the filling evenly with a spatula for a smooth surface.
- Chill: Cover the pie tightly with plastic wrap or foil and refrigerate for at least 4 hours, or preferably overnight. This chilling time allows the pie to firm up and the flavors to meld for the best texture.
- Add toppings before serving: Just before serving, spread extra whipped topping over the pie and sprinkle with additional crushed peppermint candies to garnish and add a festive crunch.
- Serve chilled: Slice the pie into 8 servings and enjoy this cool, creamy, peppermint-flavored holiday treat.
Notes
- Use a pre-made chocolate cookie crust for convenience or make your own with crushed cookies and butter.
- Adjust peppermint extract quantity to taste if you prefer a stronger or milder mint flavor.
- Red food coloring is optional but adds a festive holiday color to the filling.
- For best results, refrigerate overnight to allow the pie to set completely.
- This pie is best served cold straight from the refrigerator.
- Store any leftovers covered in the refrigerator for up to 3 days.

