
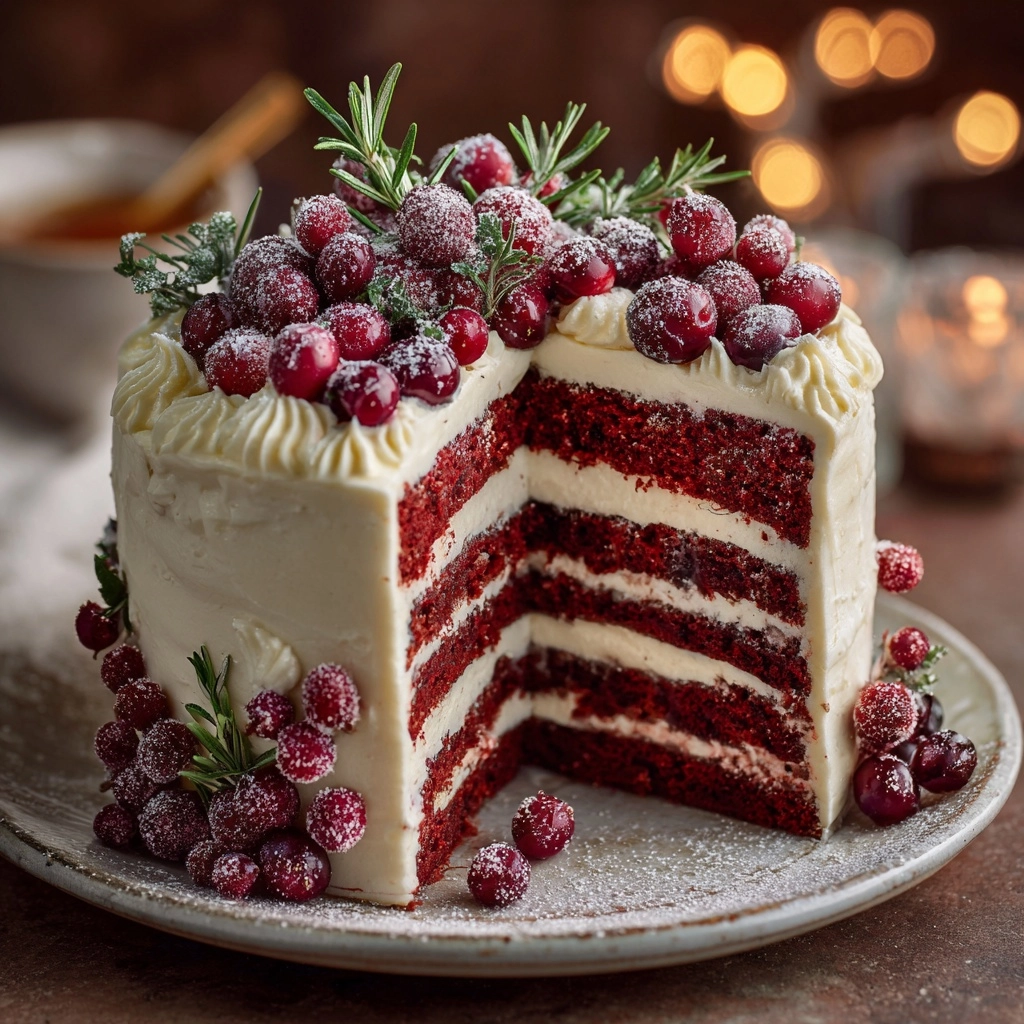
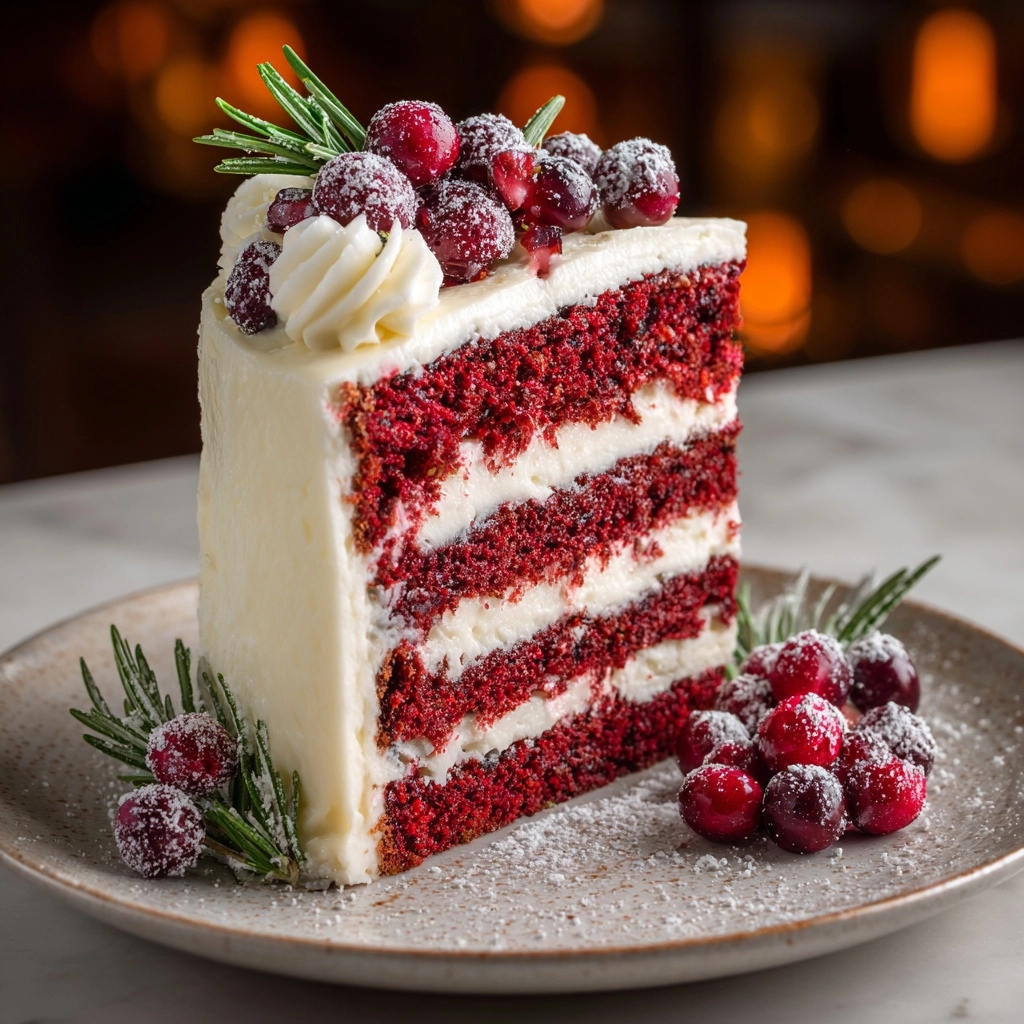
The Red Velvet Tree Cake is a showstopping holiday centerpiece that marries the rich, cocoa-kissed flavors of classic red velvet with the playful, festive shape of a Christmas tree. This cake is not just dessert — it’s a delightful seasonal celebration that brightens up any dessert table with its eye-catching red crumb, luscious cream cheese frosting, and sparkling sprinkles. Whether for a family gathering or a cozy winter brunch, this Red Velvet Tree Cake truly delivers both beauty and a soft, moist crumb in every bite.
Ingredients You’ll Need
Gather these simple pantry staples and a few festive touches, and you’ll be ready to bake your own Red Velvet Tree Cake in no time. Each ingredient plays a special role in creating the cake’s tender texture, vivid color, and signature tangy sweetness.
- All-purpose flour: The sturdy backbone of the cake, giving structure and a soft crumb.
- Granulated sugar: Provides sweetness, balance, and helps create that irresistible velvety texture.
- Baking soda: Adds lift and fluffiness — don’t skip it for that perfectly airy crumb!
- Cocoa powder: A little goes a long way to give subtle chocolate undertones, as every red velvet cake should.
- Salt: Just a pinch sharpens flavors and balances the sweetness.
- Vegetable oil: Makes the cake ultra-moist and tender, even after chilling.
- Buttermilk (room temperature): Adds tang and custardy richness, helping develop that classic red velvet flavor.
- Large eggs: Bind everything together and lend richness for a plush cake interior.
- Red food coloring: The unmistakable star here — brings that bold holiday hue to life!
- White vinegar: This unexpected ingredient lifts the cake and helps the color pop.
- Vanilla extract: Adds pure, fragrant warmth behind the scenes.
- Cream cheese (for frosting): You can’t have red velvet without this creamy, tangy classic topping!
- Butter (for frosting): Gives extra silkiness and flavor to the frosting.
- Powdered sugar (for frosting): Whips up into a smooth, pillowy cloud.
- Festive sprinkles or decorations (optional): Bring your cake to life with a little holiday sparkle.
- Nonstick spray or butter (for greasing): Essential for easy cake removal and preserving those tree-shaped edges.
How to Make Red Velvet Tree Cake
Step 1: Prep Your Pan and Oven
Set yourself up for cake-baking success by preheating your oven to 350°F (175°C) and generously greasing your tree-shaped cake pan. A quick dusting of flour on top of the grease can help unmold the cake even more easily, preserving every festive detail.
Step 2: Whisk Dry Ingredients
In a large mixing bowl, combine the flour, granulated sugar, baking soda, cocoa powder, and salt. Give it a good whisk until everything is evenly distributed — this makes sure your Red Velvet Tree Cake bakes up evenly, with no pockets of dry ingredients.
Step 3: Mix Wet Ingredients
Grab another bowl and whisk together vegetable oil, buttermilk, eggs, red food coloring, white vinegar, and vanilla extract until everything is silky and smooth. That brilliant red will instantly lift your spirits!
Step 4: Combine Batter
Slowly pour the wet ingredients into the dry, stirring gently until just combined. The batter should be smooth and glossy without overmixing — overworking can make the cake tough, so stay gentle here.
Step 5: Fill and Bake
Pour your batter into the prepared tree-shaped pan, spreading it evenly into all the points and crevices. Give the pan a gentle tap on the counter to release any air bubbles, then pop it into the oven. Bake for 35 to 40 minutes, or until a toothpick inserted in the center comes out clean.
Step 6: Cool Completely
Let the cake cool in its pan for about 10 minutes — this helps it firm up and makes unmolding a breeze. Invert your cake carefully onto a wire rack to finish cooling completely. Patience here pays off with a perfect, non-soggy cake!
Step 7: Make the Cream Cheese Frosting
While your cake cools, beat together softened cream cheese and butter until light and fluffy. Gradually add powdered sugar and vanilla, beating until your mixture is smooth and dreamy. This tangy, sweet frosting is the hallmark of red velvet — don’t be shy with it!
Step 8: Frost and Decorate
Once the cake is completely cool, lavish it with a generous layer of cream cheese frosting. Swirl, pipe, or smooth as you please, then decorate with festive sprinkles or edible glitter to create your own magical Red Velvet Tree Cake masterpiece.
How to Serve Red Velvet Tree Cake
Garnishes
Dress up your Red Velvet Tree Cake with sparkling festive sprinkles, shimmery colored sugars, or a dusting of edible glitter for that signature holiday sparkle. If you’re feeling extra creative, add little candy ornaments or a sprinkling of coconut snow — every finishing touch makes your cake more enchanting.
Side Dishes
A slice of this cake pairs perfectly with a mug of hot cocoa or some spiced chai. For a more decadent dessert table, serve it alongside bowls of fresh berries, vanilla bean ice cream, or even warm caramel sauce for dipping.
Creative Ways to Present
Turn your Red Velvet Tree Cake into the centerpiece by nestling it on a cake stand surrounded by mini evergreen sprigs, cranberries, or twinkling string lights. For a kids’ party, use cookie cutters to cut tree shapes from a sheet cake and let everyone decorate their own mini cake!
Make Ahead and Storage
Storing Leftovers
Store leftover Red Velvet Tree Cake tightly covered in the refrigerator for up to 3 days. The cream cheese frosting actually keeps the cake nice and moist — in fact, the flavors meld and improve by the next day!
Freezing
To freeze, wrap unfrosted slices or a whole cake tightly in plastic wrap and foil, then freeze for up to 2 months. You can also freeze individual frosted slices — simply thaw in the fridge overnight before serving.
Reheating
If you like your cake just a little warm, let a slice sit at room temperature for 20 minutes or give it a quick (10-second) zap in the microwave. This refreshes the crumb and softens the frosting for an extra-luscious bite.
FAQs
Can I use a regular cake pan if I don’t have a tree-shaped mold?
Absolutely! Use a standard bundt, tube, or even a rectangular pan, then freehand a tree shape with a serrated knife once cooled. Or, get creative with cupcake trees or sheet cake cutouts for a playful twist.
Do I have to use buttermilk?
Buttermilk gives authentic flavor and tenderness, but if you don’t have it, simply add 1 tablespoon of lemon juice or vinegar to a cup of milk and let it sit for 5 minutes as a quick substitute.
Can I color the frosting green for a more “tree-like” look?
Definitely! Add a drop or two of green gel food coloring to your cream cheese frosting for a lush tree effect, then pipe it on with a star tip to mimic pine needles.
Is the Red Velvet Tree Cake suitable for making ahead?
Yes! The cake tastes even better a day or two after baking, and you can frost it just before serving for maximum freshness. Store covered in the refrigerator until ready to enjoy.
Can I make this Red Velvet Tree Cake gluten-free?
Swap the all-purpose flour for a cup-for-cup gluten-free baking blend. Check all other ingredients for gluten (especially sprinkles and decorations) and you’ll have a festive gluten-free red velvet holiday treat.
Final Thoughts
This Red Velvet Tree Cake is pure, edible holiday magic — fun to bake, delightful to share, and guaranteed to put a smile on every face at the table. Give it a try this season and create your own festive tradition!
Print
Red Velvet Tree Cake Recipe
- Prep Time: 25 minutes
- Cook Time: 40 minutes
- Total Time: 1 hour 5 minutes
- Yield: 12 servings
- Category: Dessert
- Method: Baking
- Cuisine: American
- Diet: Vegetarian
Description
Celebrate the holiday season with this festive Red Velvet Tree Cake. This eye-catching dessert is sure to impress your guests with its rich red color and delicious cream cheese frosting. Perfect for Christmas or any special occasion!
Ingredients
Dry Ingredients:
- 2 1/2 cups all-purpose flour
- 1 1/2 cups granulated sugar
- 1 tsp baking soda
- 1 tsp cocoa powder
- 1/2 tsp salt
Wet Ingredients:
- 1 1/2 cups vegetable oil
- 1 cup buttermilk (room temperature)
- 2 large eggs
- 2 tbsp red food coloring
- 1 tsp white vinegar
- 2 tsp vanilla extract
Cream Cheese Frosting:
- 8 oz cream cheese
- 1/4 cup butter
- 2 cups powdered sugar
- 1 tsp vanilla extract
Additional:
- Festive sprinkles or decorations (optional)
- Nonstick spray or butter (for greasing)
Instructions
- Preheat Oven: Preheat oven to 350°F (175°C) and grease a tree-shaped cake pan or bundt/tube pan.
- Mix Dry Ingredients: Whisk together flour, sugar, baking soda, cocoa powder, and salt in a large bowl.
- Combine Wet Ingredients: In another bowl, mix oil, buttermilk, eggs, food coloring, vinegar, and vanilla.
- Combine Wet and Dry: Slowly add wet ingredients to dry, mixing until smooth.
- Bake: Pour batter into pan and bake for 35-40 minutes until a toothpick comes out clean.
- Cool and Frost: Cool cake, then frost with cream cheese frosting and decorate with sprinkles.
Notes
- You can use a silicone tree mold or carve a tree shape from a sheet cake.
- For extra flair, add edible glitter or colored sugar.
- Cake can be made 1 day ahead and stored covered in the refrigerator.
Nutrition
- Serving Size: 1 slice
- Calories: 430
- Sugar: 35 g
- Sodium: 280 mg
- Fat: 25 g
- Saturated Fat: 6 g
- Unsaturated Fat: 17 g
- Trans Fat: 0.5 g
- Carbohydrates: 48 g
- Fiber: 1 g
- Protein: 4 g
- Cholesterol: 40 mg
