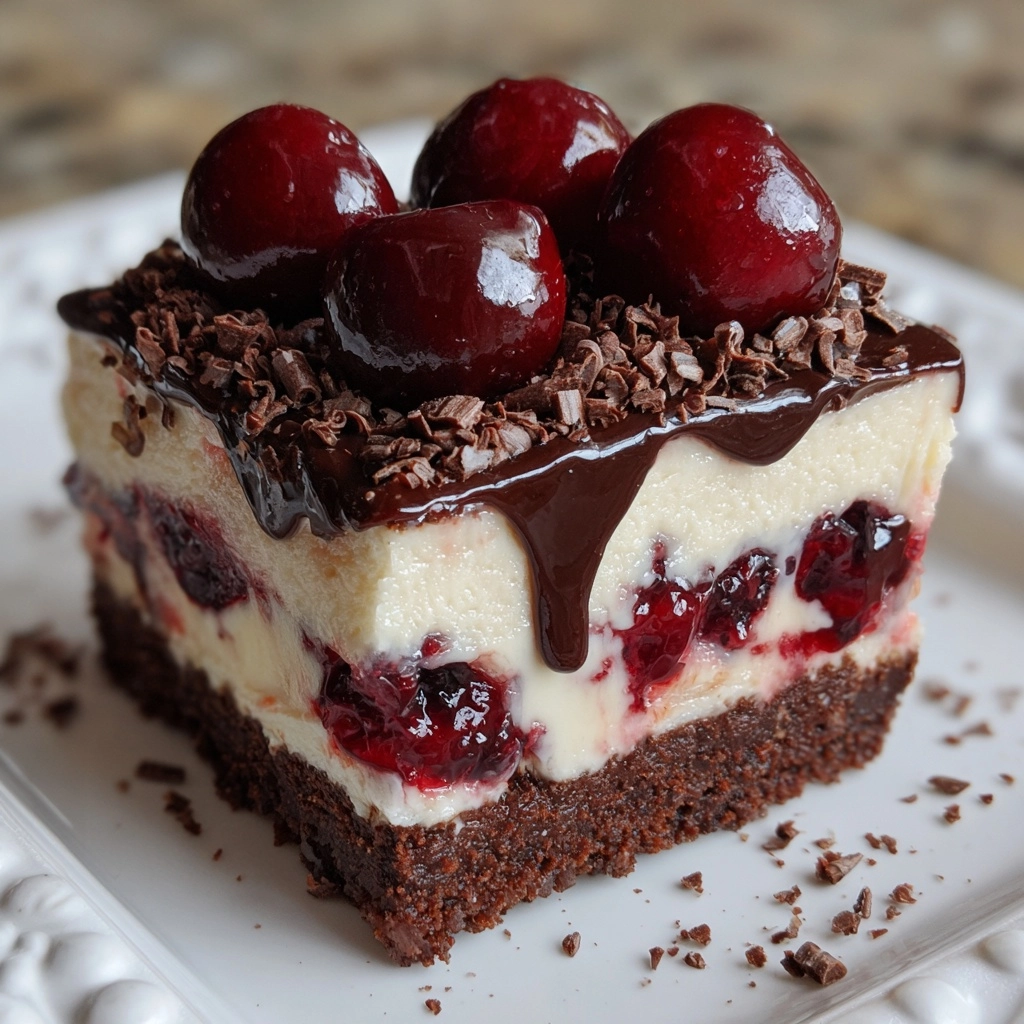
If you adore the irresistible combo of chocolate and cherry, wait until you try these Chocolate Cherry Cheesecake Bars! Each square delivers a mashup of velvety cheesecake, luscious swirls of cherry, and a crisp, chocolatey crust that’s the stuff of dessert dreams. Best of all, you won’t need to fuss with a water bath or finicky springform pans—just mix, bake, and chill for a treat that brings joyful flavor (and those show-stopping marbled layers) to any table. Whether you’re making them for a gathering or a cozy night in, these bars are bound to disappear fast.
Ingredients You’ll Need
Gathering the right ingredients is a breeze, and each one has a crucial role in building the layers of flavor and perfect texture in these Chocolate Cherry Cheesecake Bars. Don’t skip any: from crumbly cookie crust to creamy filling and tangy fruit, every bite depends on them!
- Chocolate cookie crumbs: These provide a rich, chocolatey base, setting the foundation for every glorious layer above.
- Unsalted butter (melted): Butter binds the crust and gives it that luscious, just-right snap when you bite in.
- Cream cheese (softened): The main event—creamy, tangy, and essential for creating that signature cheesecake texture.
- Granulated sugar: Sweetens the filling and enhances the natural tartness of the cherries.
- Large eggs: Crucial for setting the cheesecake, eggs also add richness and help everything hold together without cracking.
- Vanilla extract: Even a teaspoon lifts the entire bar with warm, fragrant notes.
- Sour cream: Adds an extra layer of creaminess and a whisper of tang that balances the chocolate and cherry sweetness.
- Cherry pie filling: The ultimate shortcut for that juicy cherry flavor and gorgeous pops of vibrant color throughout the bars.
- Semi-sweet chocolate chips: Stud the creamy filling for little bites of melted chocolate magic in every slice.
How to Make Chocolate Cherry Cheesecake Bars
Step 1: Prepare Your Pan and Crust
Start by preheating your oven to 325°F and lining an 8×8-inch baking pan with parchment paper, letting the edges hang over for easy lifting later. In a small bowl, mix the chocolate cookie crumbs and melted butter together until every crumb is glossy and moistened. Press this mixture firmly into the bottom of your prepared pan, creating an even layer—really pack it in for a sturdy crust. For an extra-crispy result, pop it in the oven by itself for 8 minutes while you prep the filling, though this is optional.
Step 2: Make the Cheesecake Filling
In a large bowl, beat the softened cream cheese and sugar together until entirely smooth, creamy, and free of lumps. Take your time here—well-mixed cream cheese is the secret to a luscious filling. Next, add your eggs, one at a time, beating well after each to keep the mixture velvety and emulsified. Blend in the vanilla extract and sour cream, which adds a nice tang and silkiness to the filling.
Step 3: Fold in Cherries and Chocolate
Gently fold the cherry pie filling and semi-sweet chocolate chips into the cheesecake mixture, being careful not to overmix. You’ll want lovely streaks of cherry and studded chocolate throughout the batter. These pockets give each bite of your Chocolate Cherry Cheesecake Bars a burst of fruit and a hit of chocolate—pure bliss!
Step 4: Assemble and Bake
Pour the cheesecake filling over your prepped crust, using a spatula to smooth it into every corner. Give the pan a gentle tap on the counter to pop any air bubbles, then transfer to the oven and bake for 35–40 minutes. You’re looking for just-set edges and a slightly jiggly center—don’t worry if it looks a bit wobbly. It will firm up beautifully as it chills.
Step 5: Chill and Slice
Allow your bars to cool completely at room temperature, then refrigerate for at least 3 hours (overnight is even better) before slicing. Chilling is the not-so-secret key to clean, elegant bars that slice like a dream. If you love a bit of extra cherry, spoon a dollop of pie filling on top just before serving. Enjoy every sensational bite!
How to Serve Chocolate Cherry Cheesecake Bars

Garnishes
For a wow-worthy finish, top your Chocolate Cherry Cheesecake Bars with a spoonful of extra cherry pie filling right before serving. A drizzle of melted chocolate, a dusting of powdered sugar, or even a swirl of whipped cream can take things up a delicious notch, giving each bar a perfectly polished look.
Side Dishes
These bars shine on their own, but if you’re serving them for a special event, pair with fresh berries, a citrusy fruit salad, or even a scoop of vanilla ice cream. The tart fruit and creamy notes play so well together, and the contrast is nothing short of delightful.
Creative Ways to Present
Slice your Chocolate Cherry Cheesecake Bars into dainty squares for an elegant dessert tray or stack a few with parchment for a pretty picnic treat. For a party, try inserting a popsicle stick in each (after chilling) to make cute cheesecake pops everyone will want to grab.
Make Ahead and Storage
Storing Leftovers
Keep any leftover bars in an airtight container in the refrigerator, where they’ll stay delicious for up to 5 days. Place a sheet of parchment or wax paper between layers to prevent sticking and keep those layers looking pretty.
Freezing
If you want to save your Chocolate Cherry Cheesecake Bars for later, pop them in the freezer! Wrap each bar tightly in plastic wrap, then store in a freezer-safe bag or container for up to 2 months. Thaw in the fridge overnight and they’ll be just as dreamy as the day you made them.
Reheating
There’s no need to reheat these bars—they’re meant to be enjoyed chilled! If you prefer a softer bite, let them sit at room temperature for about 15 minutes before serving to take the chill off.
FAQs
Can I use fresh cherries instead of pie filling?
Absolutely! Cook down fresh or frozen cherries with a bit of sugar to create your own homemade pie filling. This adds a vibrant, tart flavor and bursts of real fruit that really shine in these cheesecake bars.
Can I double the recipe for a larger crowd?
Yes, you can double the ingredients and bake in a 9×13-inch pan. Keep an eye on the baking time; you may need a few extra minutes. Test for doneness by gently jiggling the center just like the smaller batch.
How do I get clean slices?
Chill the bars thoroughly, then use a sharp knife dipped in hot water, wiping between cuts. This ensures tidy, café-worthy squares every time!
Can I make these gluten-free?
Totally! Simply substitute your favorite gluten-free chocolate cookies for the crust. All other ingredients are naturally gluten-free, making this an easy swap.
What’s the best way to transport these cheesecake bars?
Chill the bars well, slice, and place in a single layer in a sturdy container. If stacking, separate layers with parchment paper to keep them looking fresh and gorgeous on arrival.
Final Thoughts
If you’re craving a dessert that’s equal parts stunning and satisfying, these Chocolate Cherry Cheesecake Bars check every box. They’re easy enough for a beginner but impressive enough to dazzle at any gathering. Give them a try—you just might discover your new favorite treat!
Print
Chocolate Cherry Cheesecake Bars Recipe
- Prep Time: 15 minutes
- Cook Time: 40 minutes
- Total Time: 55 minutes (plus chilling)
- Yield: 9 bars
- Category: Dessert
- Method: Baking
- Cuisine: American
- Diet: Vegetarian
Description
Indulge in the perfect combination of rich chocolate, creamy cheesecake, and sweet cherries with these delectable Chocolate Cherry Cheesecake Bars. A delightful treat for any occasion!
Ingredients
Crust:
- 1 1/2 cups chocolate cookie crumbs
- 1/4 cup unsalted butter, melted
Cheesecake Filling:
- 16 oz cream cheese, softened
- 2/3 cup granulated sugar
- 2 large eggs
- 1 teaspoon vanilla extract
- 1/4 cup sour cream
- 1 cup cherry pie filling, plus more for topping if desired
- 1/2 cup semi-sweet chocolate chips
Instructions
- Preheat Oven: Preheat the oven to 325°F and line an 8×8-inch baking pan with parchment paper.
- Prepare Crust: Mix chocolate cookie crumbs and melted butter in a small bowl. Press into the bottom of the pan to form the crust.
- Make Filling: Beat cream cheese and sugar until smooth. Add eggs, one at a time, then mix in vanilla and sour cream. Fold in cherry filling and chocolate chips.
- Bake: Pour the filling over the crust and bake for 35–40 minutes until set.
- Cool and Chill: Let the bars cool, then refrigerate for at least 3 hours before slicing. Top with additional cherry filling if desired.
Notes
- For a crunchier crust, bake alone for 8 minutes before adding filling.
- You can use fresh or cooked down cherries as a pie filling alternative.
- Bars are best chilled overnight for clean slices.
Nutrition
- Serving Size: 1 bar
- Calories: 320
- Sugar: 22g
- Sodium: 160mg
- Fat: 22g
- Saturated Fat: 13g
- Unsaturated Fat: 7g
- Trans Fat: 0g
- Carbohydrates: 26g
- Fiber: 1g
- Protein: 4g
- Cholesterol: 70mg
