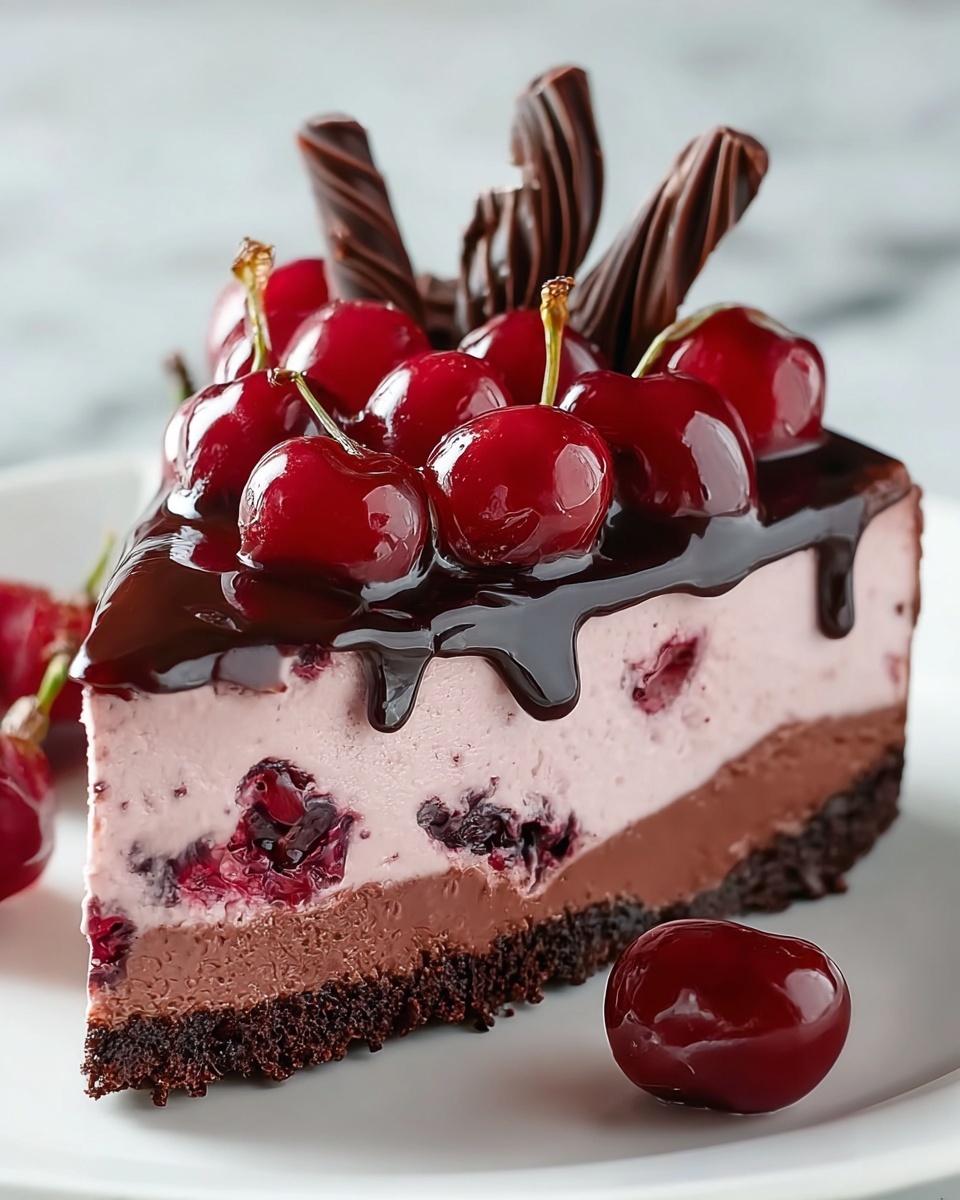
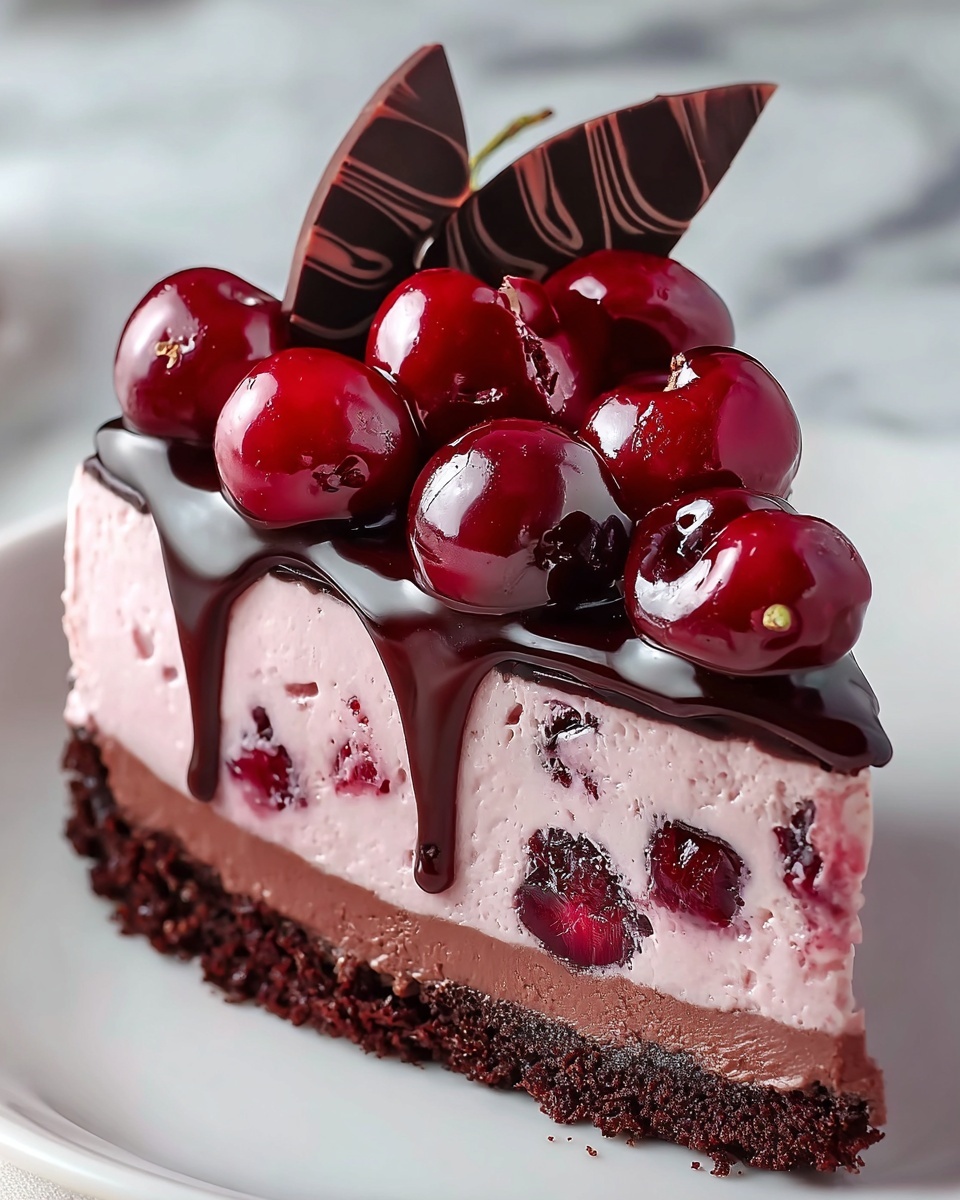
If you’re craving a dessert that combines rich, velvety chocolate with the sweet burst of cherries, this Chocolate Cherry No-Bake Cheesecake Recipe is going to be your new best friend. With its luscious, creamy filling atop a crunchy chocolate crust and topped with vibrant cherry pie filling, this cheesecake offers the perfect balance of flavors and textures — all without needing to fire up the oven. It’s a dessert that’s as impressive-looking as it is easy to make, perfect for any occasion where you want to wow guests or simply treat yourself to a slice of pure delight.
Ingredients You’ll Need
The beauty of this Chocolate Cherry No-Bake Cheesecake Recipe is how the few simple ingredients each play a crucial role in creating that irresistible harmony of taste and texture. From the buttery chocolate crust to the airy, chocolate-infused filling and bright cherry topping, every component works together to make this cheesecake unforgettable.
- Chocolate cookie crumbs (1 1/2 cups): These finely crushed cookies create a rich and sturdy base with a chocolaty crunch.
- Unsalted butter (1/4 cup, melted): Melting the butter helps bind the cookie crumbs into a solid, sliceable crust.
- Cream cheese (16 ounces, softened): The heart of the filling, delivering that creamy, tangy flavor.
- Powdered sugar (1 cup): Adds smooth sweetness that blends flawlessly into the filling.
- Vanilla extract (1 teaspoon): A hint of warmth and fragrance to elevate the overall flavor.
- Heavy whipping cream (1 1/4 cups): Whipped to stiff peaks for that light, airy texture that makes the filling so dreamy.
- Semi-sweet chocolate chips (1/2 cup, melted): Melted and folded in for a luscious chocolate punch.
- Cherry pie filling (1 1/2 cups): The luscious, ruby-red topping that adds fruity brightness and beautiful contrast.
- Optional chocolate shavings or curls: Perfect for a pretty finishing touch and extra chocolate indulgence.
How to Make Chocolate Cherry No-Bake Cheesecake Recipe
Step 1: Prepare the Crust
Start by mixing the chocolate cookie crumbs with the melted butter until every bit is coated and crumbly but holds together when pressed. Press this mixture evenly into the bottom of a 9-inch springform pan, making sure it’s firm and compact. This step creates the foundation of your cheesecake, giving it that satisfying crunch under every creamy bite. Pop the pan into the fridge to chill while you prepare the filling.
Step 2: Make the Cheesecake Filling
In a large bowl, beat the softened cream cheese with powdered sugar and vanilla extract until the mixture is perfectly smooth and creamy. This creamy base is what makes the cheesecake so dreamy and indulgent. Take a separate bowl and whip the heavy cream until stiff peaks form — this whipped cream is the secret to lightening the dense cream cheese and making the filling airy and luscious.
Step 3: Combine and Add Chocolate
Gently fold the whipped cream into the cream cheese mixture until fully integrated — this ensures you keep that fluffy texture. Next, slowly fold in the melted chocolate chips that have cooled slightly; this infuses the filling with silky chocolate flavor without losing its light texture. The balance here is key to getting that perfect cheesecake consistency.
Step 4: Assemble the Layers
Spoon the chocolate cheesecake filling over the chilled crust, smoothing out the top carefully. Then, evenly spread the cherry pie filling on top of the cheesecake layer. This final layer brings a burst of juicy, sweet-tart flavor and a beautiful reddish pop that makes your dessert as eye-catching as it is delicious. Cover the cheesecake with plastic wrap and refrigerate it for at least 6 hours, or ideally overnight, to let the flavors meld and the filling set.
How to Serve Chocolate Cherry No-Bake Cheesecake Recipe

Garnishes
To make your cheesecake presentation truly shine, sprinkle some chocolate shavings or curls on top right before serving. This adds not only visual appeal but a satisfying texture that complements the smooth cheesecake and glossy cherries. Fresh cherries or a dusting of powdered sugar also make beautiful, tasty garnishes.
Side Dishes
This cheesecake pairs wonderfully with fresh berries or a simple dollop of whipped cream to balance its richness. For a more decadent twist, serve alongside a scoop of vanilla bean ice cream or a drizzle of cherry or chocolate sauce for extra indulgence. Coffee or a deep red wine can also perfectly complement the flavors on your plate.
Creative Ways to Present
If you want to impress guests, try serving the cheesecake in individual glass jars layered with graham cracker crumbs and cherry topping for a portable, pretty dessert. Another fun idea is to use mini springform pans for personal-sized cheesecakes that look exquisite on a dessert buffet. Whatever your style, this chocolate cherry no-bake cheesecake offers a stunning centerpiece.
Make Ahead and Storage
Storing Leftovers
Once assembled, this cheesecake keeps beautifully in the refrigerator, covered tightly with plastic wrap or stored in an airtight container. It will stay fresh and delicious for up to 4 days, making it a perfect make-ahead dessert for busy weekends or dinner parties.
Freezing
To freeze, wrap the cheesecake securely with plastic wrap and then a layer of foil to prevent freezer burn. When wrapped properly, it can be frozen for up to 1 month. Thaw in the refrigerator overnight before serving to preserve the creamy texture and vibrant cherry topping.
Reheating
This cheesecake is best served chilled and does not require reheating. If you prefer it slightly less cold, simply let it sit at room temperature for 15–20 minutes before slicing and serving for the best flavor experience.
FAQs
Can I use fresh cherries instead of cherry pie filling?
Absolutely! Fresh cherries can make the topping even more vibrant and natural. Just toss them with a little sugar and a splash of lemon juice to mimic that sweet-tart pie filling flavor.
Is it possible to make this cheesecake dairy-free or vegan?
With some ingredient swaps like dairy-free cream cheese, coconut cream, and vegan butter, you can adapt this recipe to be dairy-free or vegan. Just make sure to use high-quality substitutes to keep the texture and flavor delightful.
How long does the cheesecake need to chill?
For the best texture and flavor, chill it for at least 6 hours or preferably overnight. This gives the filling time to fully set and the flavors to meld beautifully.
Can I make this recipe gluten-free?
Yes! Use gluten-free chocolate cookies for the crust, and the rest of the ingredients are naturally gluten-free. This makes a fantastic dessert option for those avoiding gluten.
Why does the filling need whipped cream folded in?
Folding in whipped cream lightens the dense cream cheese mixture without deflating it, creating a soft, airy texture that feels indulgent but not heavy — perfect for a no-bake cheesecake.
Final Thoughts
This Chocolate Cherry No-Bake Cheesecake Recipe truly feels like a dessert hug — rich yet light, chocolaty yet fruity. It’s one of those recipes you’ll find yourself coming back to again and again because it’s straightforward, stunning, and absolutely scrumptious. Go ahead and treat yourself to a slice or two; trust me, this cheesecake will be a highlight on your dessert table and a new classic in your recipe box!
Print
Chocolate Cherry No-Bake Cheesecake Recipe
- Prep Time: 20 minutes
- Cook Time: 0 minutes
- Total Time: 6 hours 20 minutes
- Yield: 10 servings
- Category: Dessert
- Method: No-Cook
- Cuisine: American
- Diet: Vegetarian
Description
This Chocolate Cherry No-Bake Cheesecake is a luscious and easy-to-make dessert featuring a rich chocolate cookie crust, creamy chocolate-infused cheesecake filling, and a vibrant cherry topping. Perfect for any occasion, it requires no baking and is chilled to set, providing a smooth, decadent treat with a balance of sweet, tangy, and chocolate flavors.
Ingredients
Crust
- 1 1/2 cups chocolate cookie crumbs (such as Oreo, finely crushed)
- 1/4 cup unsalted butter (melted)
Filling
- 16 ounces cream cheese (softened)
- 1 cup powdered sugar
- 1 teaspoon vanilla extract
- 1 1/4 cups heavy whipping cream
- 1/2 cup semi-sweet chocolate chips (melted and slightly cooled)
Topping
- 1 1/2 cups cherry pie filling
- Additional chocolate shavings or curls for garnish (optional)
Instructions
- Prepare the crust: In a medium bowl, mix the chocolate cookie crumbs and melted butter until well combined. Press the mixture firmly into the bottom of a 9-inch springform pan to form an even crust layer. Place in the refrigerator to chill while preparing the filling.
- Make the cheesecake filling: In a large bowl, beat the softened cream cheese, powdered sugar, and vanilla extract together until smooth and creamy. In a separate bowl, whip the heavy cream until stiff peaks form, then gently fold the whipped cream into the cream cheese mixture until fully incorporated.
- Add chocolate: Fold the melted and slightly cooled semi-sweet chocolate chips into the cream cheese mixture, mixing gently until the filling is smooth and uniformly colored.
- Assemble the cheesecake: Spoon the cheesecake filling evenly over the chilled crust and smooth the top with a spatula. Spread the cherry pie filling evenly over the top layer of cheesecake.
- Chill to set: Cover the assembled cheesecake and refrigerate for at least 6 hours or preferably overnight to allow it to fully set and develop flavor.
- Garnish and serve: Before serving, optionally garnish the cheesecake with chocolate shavings or curls for an elegant finish. Slice and enjoy chilled.
Notes
- For a richer chocolate flavor, add 2 tablespoons of cocoa powder to the crust mixture before pressing.
- You can substitute canned cherry pie filling with homemade cherry compote for a fresher taste.
- This cheesecake maintains its texture best when chilled overnight.
- Use a springform pan to easily remove the cheesecake without damaging its shape.


