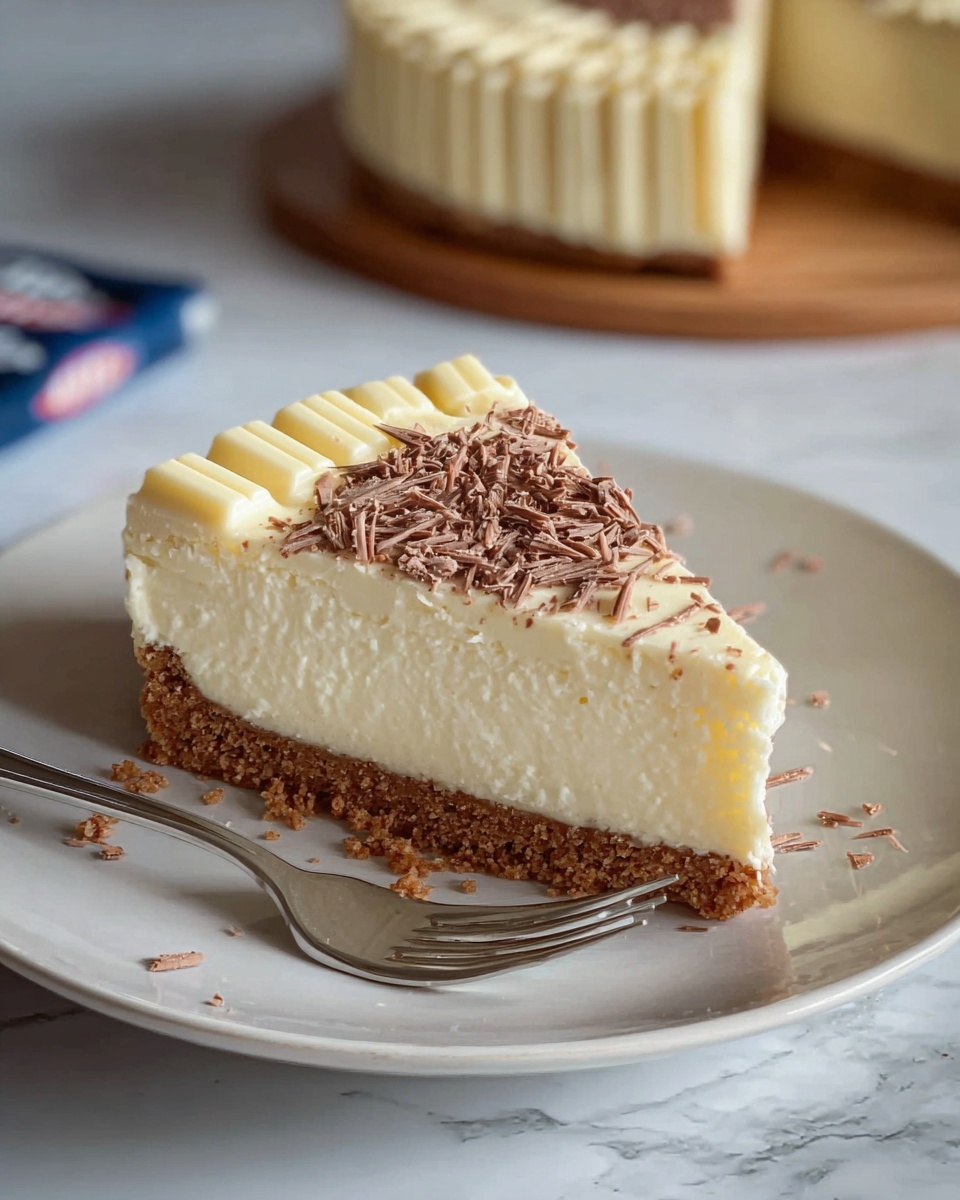
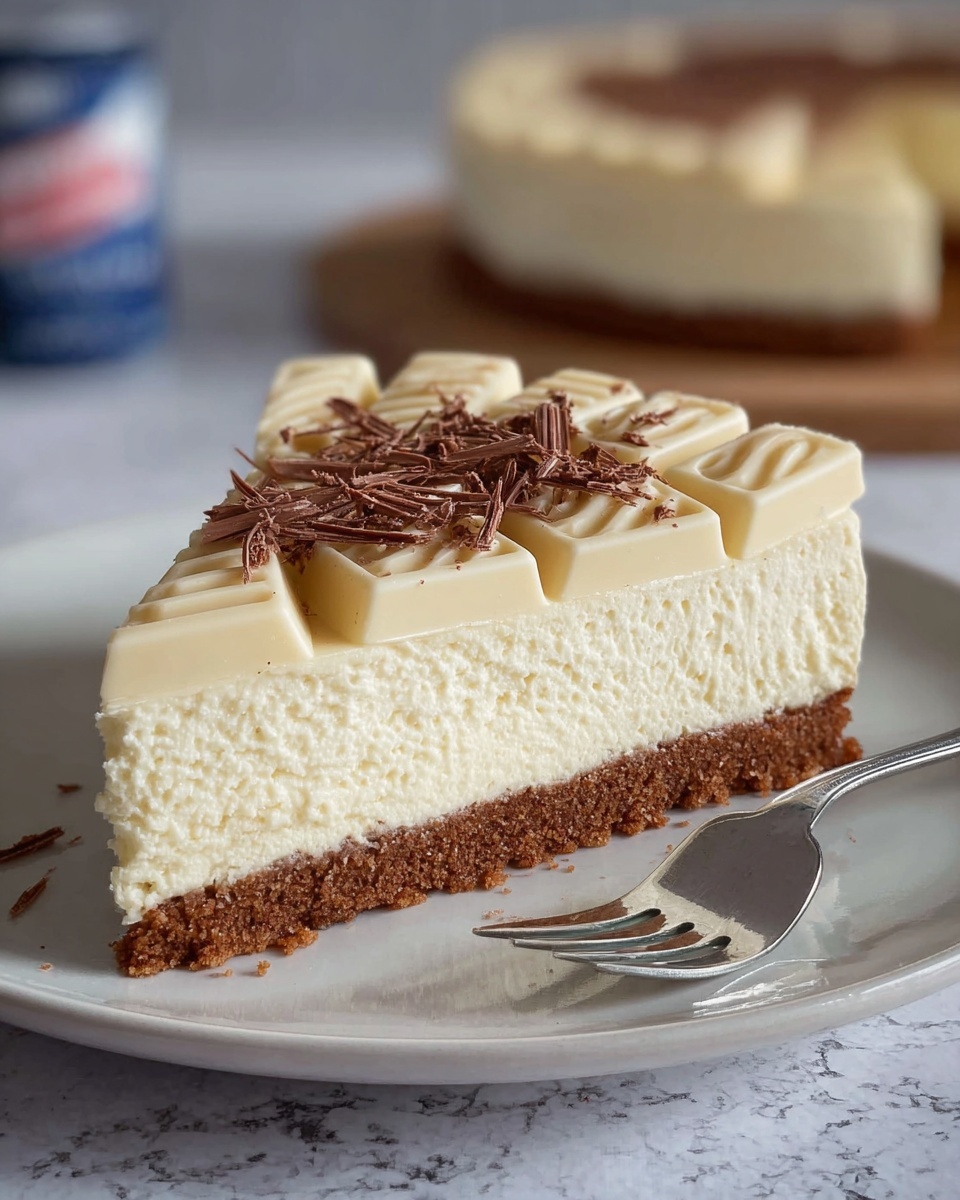
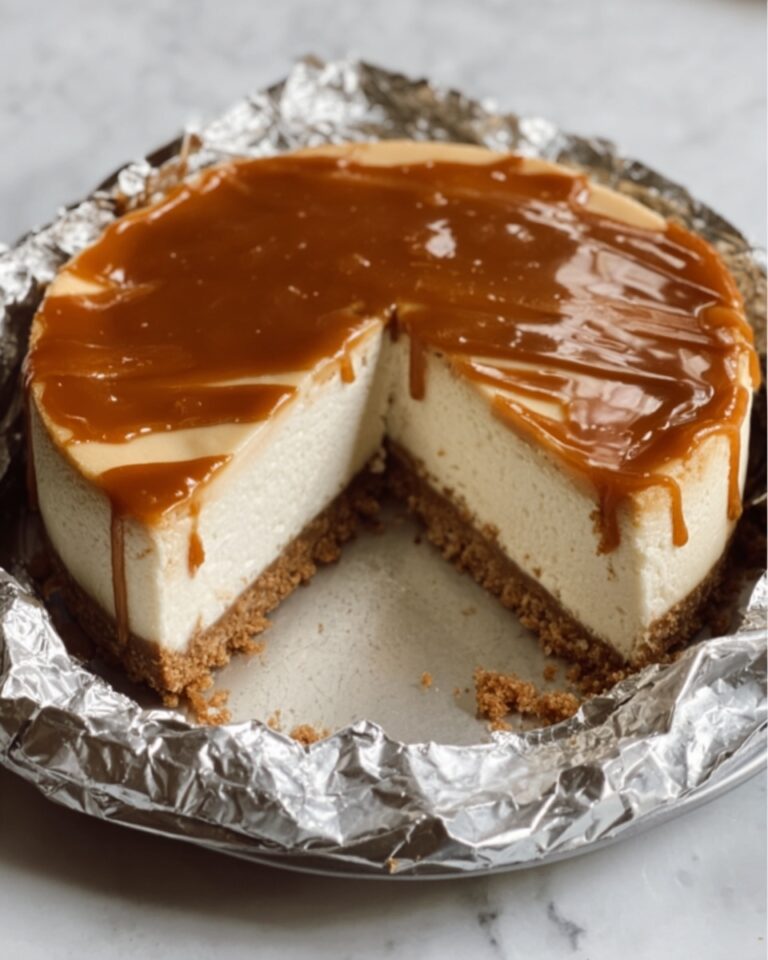
If you are a fan of creamy, dreamy desserts that come together effortlessly, you’re going to adore this Milky Bar No-Bake Cheesecake Recipe. This luscious treat combines the rich, velvety texture of cream cheese with the unmistakable sweet charm of Milky Bar white chocolate, all set atop a buttery digestive biscuit base. It’s a perfect no-bake dessert that feels indulgent yet approachable, making it your next go-to for celebrations or whenever a sweet craving strikes. Trust me, once you try this, it will hold a special place in your dessert repertoire!
Ingredients You’ll Need
These ingredients are deceptively simple but absolutely essential to achieving the perfect balance of flavor and texture in this cheesecake. Each item brings something unique to the table—from the crumbly base to the creamy filling and the irresistible Milky Bar white chocolate flavor that shines through in every bite.
- 200g digestive biscuits: Provides a sturdy yet crumbly base with a classic slightly sweet flavor that pairs beautifully with white chocolate.
- 100g unsalted butter, melted: Helps bind the biscuit crumbs together while adding richness without overpowering the other ingredients.
- 300g Milky Bar white chocolate, broken into pieces: The star ingredient that infuses the cheesecake with its signature creamy sweetness and smooth texture.
- 500g full-fat cream cheese, softened: Delivers that classic cheesecake creaminess and tang, balancing the sweetness perfectly.
- 100g powdered sugar: Adds the right level of sweetness and ensures a silky, lump-free filling.
- 300ml double cream: Whipped to soft peaks, it introduces lightness and airy texture to the creamy filling.
- 1 teaspoon vanilla extract: Enhances the flavor profile with warm, floral notes, rounding out the richness.
- Extra grated Milky Bar or white chocolate curls (optional): For that beautiful finishing touch that makes the cheesecake irresistible and elegant.
How to Make Milky Bar No-Bake Cheesecake Recipe
Step 1: Prepare the Base
Begin by greasing and lining the base of an 8-inch springform tin to ensure easy removal later. Next, mix the crushed digestive biscuits thoroughly with the melted butter until the crumbs are evenly coated, which helps the base stick together firmly. Press this mixture into the base of the tin with a flat surface or the back of a spoon to create a compact, even layer. Pop this into the fridge for at least 30 minutes so it can set properly, giving you a solid foundation that’s delightfully crumbly yet stable.
Step 2: Melt the Milky Bar Chocolate
Gently melt the Milky Bar pieces using either a microwave in short bursts (stirring in between) or a double boiler method to avoid scorching. Once melted, allow the chocolate to cool slightly—this step is important so it doesn’t curdle the cream cheese mixture when you add it later. The melted Milky Bar is what elevates this no-bake cheesecake into a dream of sweet, smooth luxury.
Step 3: Make the Filling
In a large bowl, beat together the softened cream cheese, powdered sugar, and vanilla extract until completely smooth and lump-free. Then pour in the slightly cooled melted Milky Bar and blend well to combine. Separately, whip the double cream to soft peaks—this will add the necessary lightness to your cheesecake filling. Gently fold the whipped cream into the cream cheese mixture, taking care not to deflate it. This folding technique keeps the filling airy and silky, creating that melt-in-your-mouth sensation.
Step 4: Assemble and Chill
Pour the luscious filling over your chilled biscuit base, spreading it evenly with a spatula to smooth the top. Cover the cheesecake and refrigerate for a minimum of 6 hours, or best of all, overnight. This setting time lets the flavors meld and the filling firm up into a wonderfully sliceable treat. The result? A velvety, milky-white cheesecake that slices effortlessly and tastes like a dream come true!
How to Serve Milky Bar No-Bake Cheesecake Recipe

Garnishes
Adding garnishes can elevate this simple cheesecake into a showstopper. Sprinkle some extra grated Milky Bar or white chocolate curls on top for a beautiful, textured finish that also adds an extra touch of sweetness. For a pop of color, fresh berries like raspberries or strawberries pair exceptionally well, offering a subtle tartness that compliments the creamy sweetness perfectly.
Side Dishes
This cheesecake is rich and luxurious, so it’s fabulous on its own or alongside light accompaniments like a fresh berry compote or a drizzle of tangy passion fruit sauce. A cup of well-brewed coffee or a glass of dessert wine also enhances the indulgent experience without overwhelming the delicate white chocolate flavor.
Creative Ways to Present
Consider presenting individual servings in pretty glasses or small jars for a fun twist that’s perfect for parties. Layering the crushed biscuits, filling, and chocolate curls can make for an elegant parfait-style treat. You can also pipe the filling on top in swirls before chilling for a decorative effect that wows every guest at the table.
Make Ahead and Storage
Storing Leftovers
One of the best things about this Milky Bar No-Bake Cheesecake Recipe is that leftovers store beautifully. Cover the cheesecake tightly with plastic wrap or keep it in an airtight container in the refrigerator. Properly stored, it will stay fresh and delicious for up to 3 days, which means you can enjoy this sweet treat without any daily prep.
Freezing
If you want to save some cheesecake for later, you can freeze it. Wrap the whole cake or individual slices in plastic wrap and foil to prevent freezer burn. When you’re ready to indulge again, thaw it overnight in the refrigerator. Freezing might slightly change the texture, making it a bit denser, but the flavor remains wonderfully intact.
Reheating
Since this is a no-bake cheesecake, reheating is not necessary or recommended. It’s best served chilled to enjoy its creamy texture and cool, refreshing taste that only this Milky Bar No-Bake Cheesecake Recipe delivers so perfectly.
FAQs
Can I use a different type of biscuit for the base?
Absolutely! While digestive biscuits provide a wonderful classic flavor and texture, graham crackers or even white chocolate cookies make excellent alternatives if you want your base to be a touch sweeter or with a different crunch.
What if I don’t have double cream, can I substitute it?
You can use heavy cream as a substitute if double cream isn’t available. The key is to whip it to soft peaks for the right airy texture. Avoid using single cream or whipping cream with lower fat content as it won’t hold the peaks as well.
Can I make this cheesecake vegan or dairy-free?
This particular recipe relies heavily on dairy ingredients for its creamy texture. However, with some experimentation using dairy-free cream cheese, plant-based whipping creams, and vegan white chocolate alternatives, you could craft a similar no-bake cheesecake that suits your needs.
How long does it take for the cheesecake to set properly?
For the best results, refrigerate the cheesecake for at least 6 hours, but overnight chilling is ideal. This long chill allows the filling to firm up beautifully and the flavors to meld together wonderfully.
Can I prepare this dessert ahead of a party?
Definitely! The Milky Bar No-Bake Cheesecake Recipe is perfect for making 1–2 days in advance. It saves you time on the day, and in fact, the flavors improve with a little extra resting in the fridge.
Final Thoughts
If you’re looking for a dessert that feels truly special without the fuss, you simply must try this Milky Bar No-Bake Cheesecake Recipe. It’s a comforting, indulgent treat that blends the nostalgic sweetness of Milky Bar with creamy cheesecake goodness. Whether for a celebration or a weekend treat, this recipe is a guaranteed crowd-pleaser and a delicious way to brighten any day!
Print
Milky Bar No-Bake Cheesecake Recipe
- Prep Time: 25 minutes
- Cook Time: 0 minutes
- Total Time: 6 hours 25 minutes
- Yield: 10 servings
- Category: Dessert
- Method: No-Cook
- Cuisine: British
- Diet: Vegetarian
Description
This Milky Bar No-Bake Cheesecake is a creamy and indulgent dessert combining a crunchy digestive biscuit base with a smooth white chocolate and cream cheese filling. Perfect for easy preparation, it requires no baking and only chilling time to set, making it an ideal treat for any occasion.
Ingredients
Base
- 200g digestive biscuits, crushed
- 100g unsalted butter, melted
Filling
- 300g Milky Bar white chocolate, broken into pieces
- 500g full-fat cream cheese, softened
- 100g powdered sugar
- 300ml double cream
- 1 teaspoon vanilla extract
Topping (Optional)
- Extra grated Milky Bar or white chocolate curls for topping
Instructions
- Prepare the base: Grease and line the base of an 8-inch springform tin. In a bowl, mix the crushed digestive biscuits with the melted butter until fully combined. Press the mixture firmly into the base of the tin to create an even layer. Chill in the fridge for at least 30 minutes to set.
- Melt the chocolate: Gently melt the Milky Bar white chocolate using a microwave in short bursts or over a double boiler. Allow it to cool slightly while you prepare the filling.
- Make the filling: In a large bowl, beat the softened cream cheese with powdered sugar and vanilla extract until smooth and creamy. Gradually add the melted chocolate and mix thoroughly to combine.
- Whip the cream: In a separate cold bowl, whip the double cream until it forms soft peaks, being careful not to overwhip.
- Combine mixtures: Gently fold the whipped cream into the cream cheese and chocolate mixture, using a spatula to maintain the airy texture without deflating the cream.
- Assemble the cheesecake: Spoon the creamy filling evenly over the chilled biscuit base and smooth the top with a spatula.
- Chill to set: Refrigerate the cheesecake for at least 6 hours, preferably overnight, to allow it to fully set and develop flavors.
- Serve and garnish: Before serving, decorate the cheesecake with extra grated Milky Bar or white chocolate curls if desired for an elegant finish.
Notes
- For a firmer set, chill the cheesecake overnight.
- You can substitute digestive biscuits with graham crackers or a white chocolate cookie base for extra sweetness.
- This cheesecake can be made 1–2 days ahead and kept refrigerated to maintain freshness.


