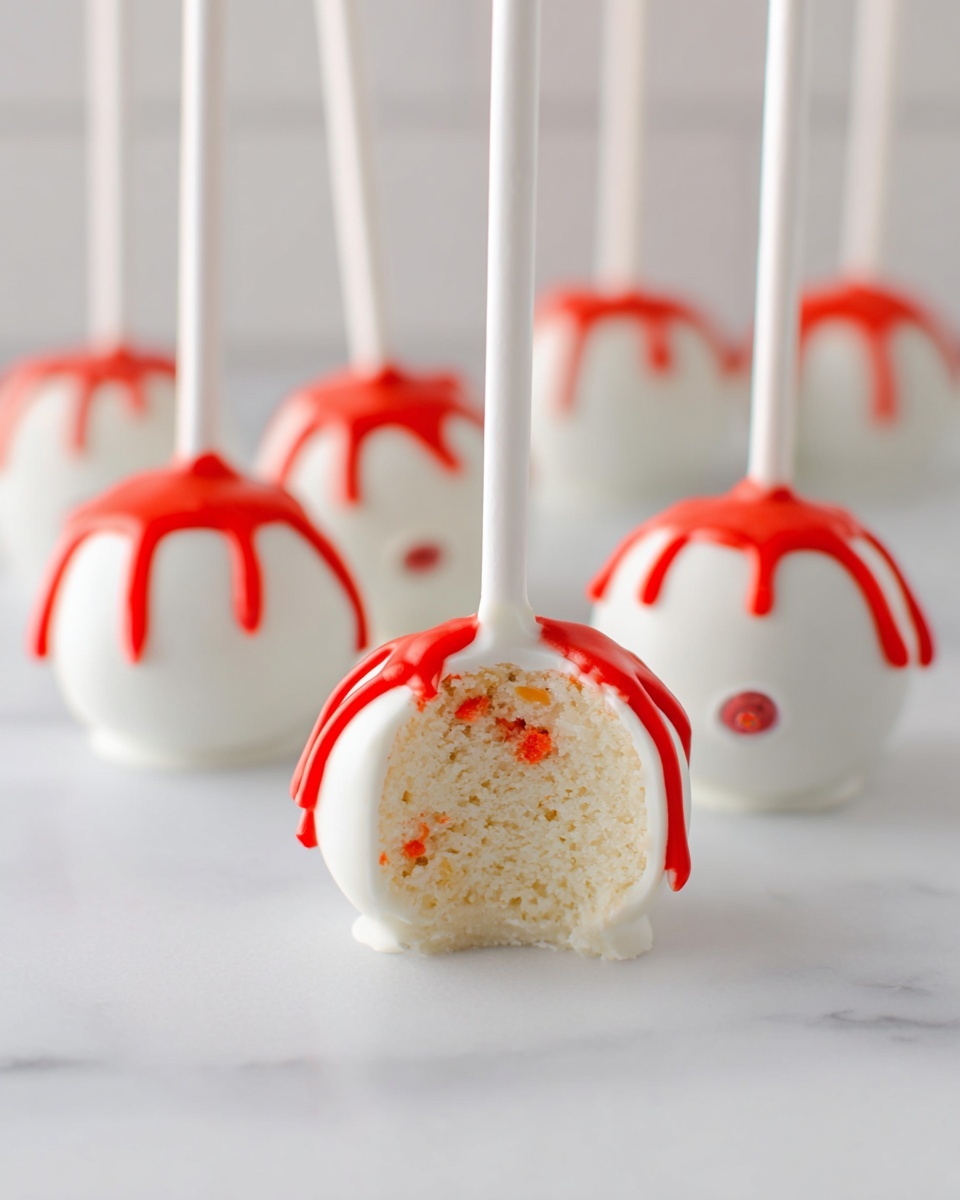
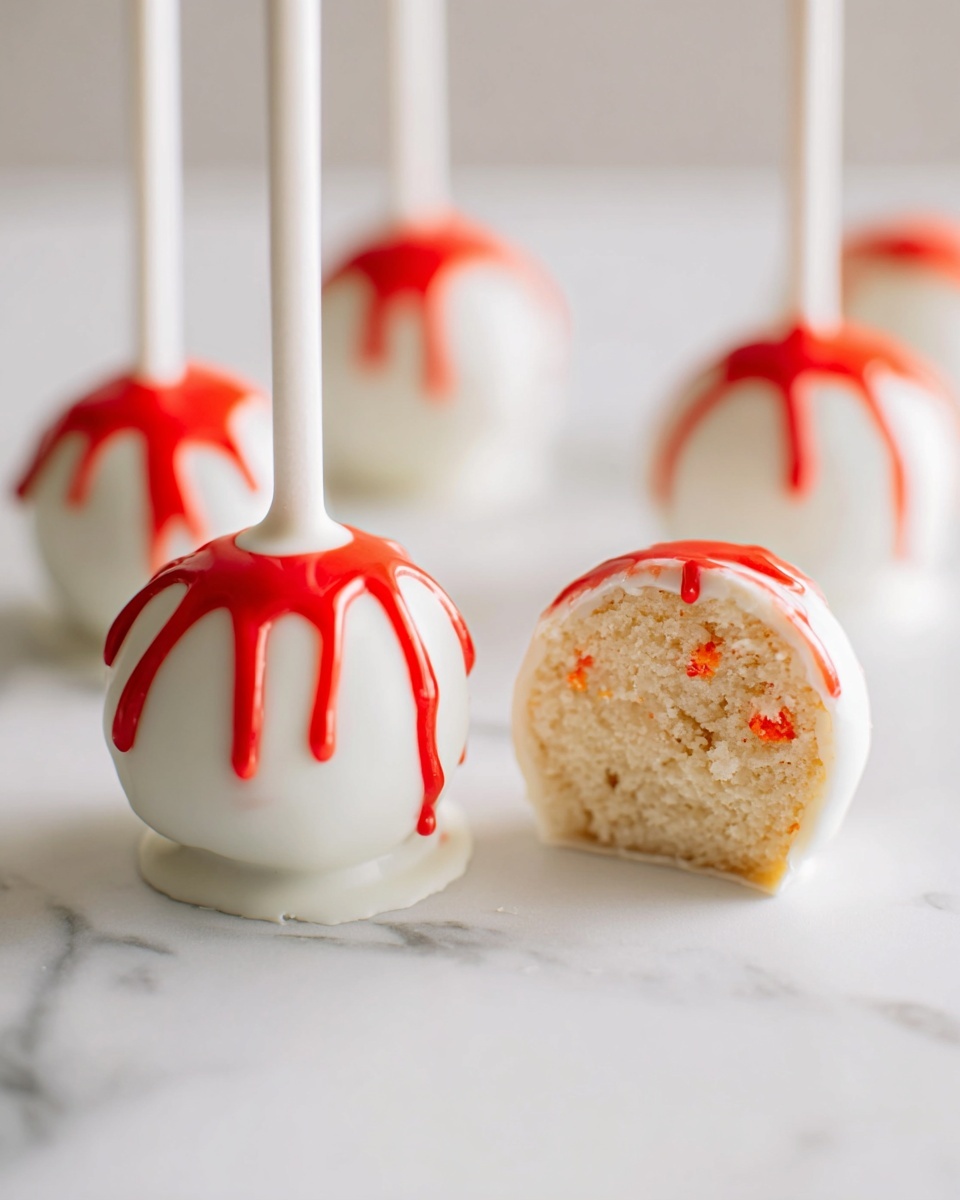
If you’re looking to wow your guests with a delightfully spooky treat this season, you’ve just found your new favorite. The Bloody Halloween Cake Pops Recipe brings together the perfect combination of rich sweetness and eerie charm. These cake pops not only look like something out of a Halloween haunted house but taste absolutely heavenly, with soft cookie crumbs blended seamlessly with creamy cheese and enveloped in vibrant white candy coating splattered with “bloody” red icing. Get ready to impress with this show-stopping recipe that’s as fun to make as it is to eat!

Ingredients You’ll Need
Getting the ingredients right is the first step to creating fantastic cake pops that balance texture, flavor, and appearance perfectly. Every ingredient here plays a crucial role—from the cookie crumbs that form the base to the candy melts that provide a beautiful, glossy finish ready for the spooky touches.
- 10 Lofthouse Cookies with Icing: These soft, sweet cookies crumble easily and add a buttery flavor base that’s ideal for cake pops.
- 8 oz. Cream Cheese: Acts as the binding agent, lending a smooth, tangy creaminess that complements the cookie crumbs perfectly.
- 10 Cake Pop Sticks: Essential for holding your creations with ease and turning the cake balls into irresistible lollipops.
- 12 oz Bright White Candy Melts: Their vibrant color offers a striking canvas for your red “blood” drips and ensures a firm, crackly coating.
- Red Gel Icing: This icing brings that dramatic bloody effect to your cake pops, transforming them into perfectly spooky bites.
How to Make Bloody Halloween Cake Pops Recipe
Step 1: Crumble the Cookies
Start by placing all the Lofthouse cookies into your stand mixer fitted with the paddle attachment. Turn the mixer on high speed and let it work its magic until the cookies turn into fine crumbs, resembling cake-like texture. This crumbly base creates the perfect structure for your cake pops.
Step 2: Blend in the Cream Cheese
Swap out the paddle attachment for the regular mixer attachment, then add the cream cheese to the cookie crumbs. Mix on high until the mixture is smooth and uniform. The cream cheese not only binds the crumbs but also adds a luxurious tang that elevates the flavor.
Step 3: Shape and Chill
Using a tablespoon, scoop out portions of the dough onto parchment paper. Roll each portion into a tight ball and place them on the sheet. Pop the tray into your freezer for 1 to 2 hours—this chilling step makes the cake pops easier to dip and helps them hold their shape.
Step 4: Prepare the Candy Coating
Melt the bright white candy melts in a large bowl or heatproof measuring cup. Heat them in 45-second intervals, stirring well between each, until completely smooth. This shiny coating will provide the perfect eerie white background for your bloody decorations.
Step 5: Insert Sticks
Dip the tip of each cake pop stick into the melted candy and then gently insert it halfway into each chilled cake ball. This little extra layer of candy acts like glue, securing the stick in place. Let them sit for a few minutes until the candy sets hard.
Step 6: Dip the Cake Pops
Fully dip each cake ball into the white candy melts, ensuring a smooth, even coating. Allow the excess candy to drip back into the bowl, then place the pops upright into a styrofoam block or cake pop stand. Let them dry completely before proceeding.
Step 7: Add the Bloody Drips
Once the candy coating is hardened, use red gel icing to create dramatic bloody drips dripping down from the top of each cake pop and along the sticks. This step adds the perfect spooky finishing touch that brings the whole concept of the Bloody Halloween Cake Pops Recipe to life.
Step 8: Serve and Enjoy
Your spooky treats are ready to be the centerpiece of any Halloween celebration. Arrange them on a platter, grab your favorite ghoulish accessories, and get ready for compliments and delighted screams alike!
How to Serve Bloody Halloween Cake Pops Recipe
Garnishes
Enhance the visual impact of your cake pops by garnishing your serving platter with Halloween-themed decorations such as fake spider webs, plastic spiders, or orange and black confetti. You can also sprinkle crushed Oreo crumbs around the base to resemble dirt or charred ground, adding to the spooky ambiance.
Side Dishes
Complement the cake pops with other festive finger foods like caramel popcorn, pumpkin-shaped sugar cookies, or even some Halloween-colored fruit skewers. These pairings offer variety while keeping the theme fun and cohesive, making your dessert corner a full-on haunting delight.
Creative Ways to Present
For a truly memorable presentation, display your Bloody Halloween Cake Pops Recipe in a hollowed-out pumpkin or arrange them standing in a coffin-shaped box filled with black tissue paper. Adding a fog machine or LED tea lights nearby will create an eerie glow that sets the ultimate party mood.
Make Ahead and Storage
Storing Leftovers
If you have any of these delicious cake pops left over, store them in an airtight container in the refrigerator. This will keep the candy coating firm and preserve the freshness of the creamy interior for about 3–5 days.
Freezing
You can freeze these cake pops for longer storage. Place them in a single layer on a baking sheet to freeze until solid, then transfer to a freezer-safe container. When kept frozen, they maintain flavor and texture for up to 2 months.
Reheating
To enjoy frozen cake pops, let them thaw in the refrigerator overnight, then bring them to room temperature before serving. No microwave heating is necessary, as that might melt the candy coating and spoil the look.
FAQs
Can I use other cookies besides Lofthouse cookies?
Absolutely! While Lofthouse cookies provide a soft texture and sweet flavor ideal for these pops, you can experiment with sugar cookies or even chocolate chip cookies for a twist. Just make sure the cookies crumble finely and work well when mixed with cream cheese.
What if I don’t have a stand mixer?
You can mix the cookie crumbs and cream cheese by hand using a sturdy spoon or spatula. It might take a little extra elbow grease to get a smooth mixture, but it’s definitely doable.
Can I use chocolate candy melts instead of white?
You can, though white candy melts create the best canvas for the red “bloody” icing to stand out. Dark melts might hide the dramatic effects, but if you prefer chocolate flavor, feel free to experiment!
How do I prevent cake pops from falling off the sticks?
Dipping the stick tips into melted candy before inserting them into the cake balls helps secure them. Also, chilling the balls well before insertion ensures they are firm enough to stay put.
Is red gel icing the only option for the blood effect?
Not at all! You can use red tinted piping gel, melted red candy melts, or even red food coloring mixed with corn syrup. Just make sure the “blood” effect looks thick and dripping to really capture that spooky vibe.
Final Thoughts
There’s something magical about these little pops of festive fright that brings Halloween parties to life, and nothing beats creating them with your own hands using this delightful Bloody Halloween Cake Pops Recipe. Whether you’re hosting kids, adults, or both, these treats bring together spooky style and irresistible flavor with every bite. So grab your ingredients, roll up your sleeves, and get ready to make a chillingly delicious impression at your next bash!
Print
Bloody Halloween Cake Pops Recipe
- Prep Time: 20 minutes
- Cook Time: 1 hour
- Total Time: 1 hour 20 minutes
- Yield: 10 Cake Pops
- Category: Dessert
- Method: No-Cook
- Cuisine: American
Description
These Bloody Halloween Cake Pops are a spooky and delicious treat perfect for Halloween parties. Made with Lofthouse cookies blended with cream cheese, then coated in bright white candy melts and decorated with red gel icing to resemble bloody drips, these cake pops combine creamy texture with festive flair for a fun and easy dessert.
Ingredients
Base
- 10 Lofthouse Cookies with Icing
- 8 oz. Cream Cheese
Coating and Decoration
- 10 Cake Pop Sticks
- 12 oz Bright White Candy Melts
- Red Gel Icing
Instructions
- Prepare Cake Crumb Mixture: Add the Lofthouse cookies to your stand mixer fitted with the paddle attachment. Mix on high speed until the cookies break down into fine crumbs resembling cake crumbs.
- Incorporate Cream Cheese: Swap the paddle for the mixing attachment if needed, add the cream cheese to the crumbs, and continue mixing on high until the mixture is smooth and uniform in texture.
- Form Cake Balls: Scoop tablespoon-sized amounts of the dough onto parchment paper. Roll each scoop into a ball shape and place them on the parchment. Freeze the cake balls for 1 to 2 hours so they set firmly.
- Melt Candy Coating: In a large bowl or measuring cup, melt the bright white candy melts by heating in 45-second intervals, stirring in between until the candy is fully smooth and melted.
- Insert Sticks: Dip the tip of each cake pop stick into the melted candy melts, then quickly push the stick into the center of each frozen cake ball. Let them set to secure the stick in place.
- Coat Cake Pops: Fully dip each cake ball into the melted candy coating to cover completely. Stand the coated cake pops upright in a styrofoam block to allow the coating to harden and dry.
- Add Bloody Decoration: Once the candy coating is hardened, use red gel icing to carefully create bloody drip effects around the lollipop sticks to enhance the Halloween spooky theme.
- Serve and Enjoy: Present these bloody Halloween cake pops at your next party for a fun and eerie sweet treat that guests will love.
Notes
- Freezing the cake balls before dipping helps them hold shape and prevents the coating from cracking.
- Use gel icing for more precise and vibrant decorations compared to regular icing.
- Store the cake pops in an airtight container at room temperature or refrigerate for longer freshness.
- Bright white candy melts work best for a clean canvas to show off the red gel icing “blood” drips.
- Ensure candy melts are not overheated to avoid scorching and a thick, clumpy texture.


