
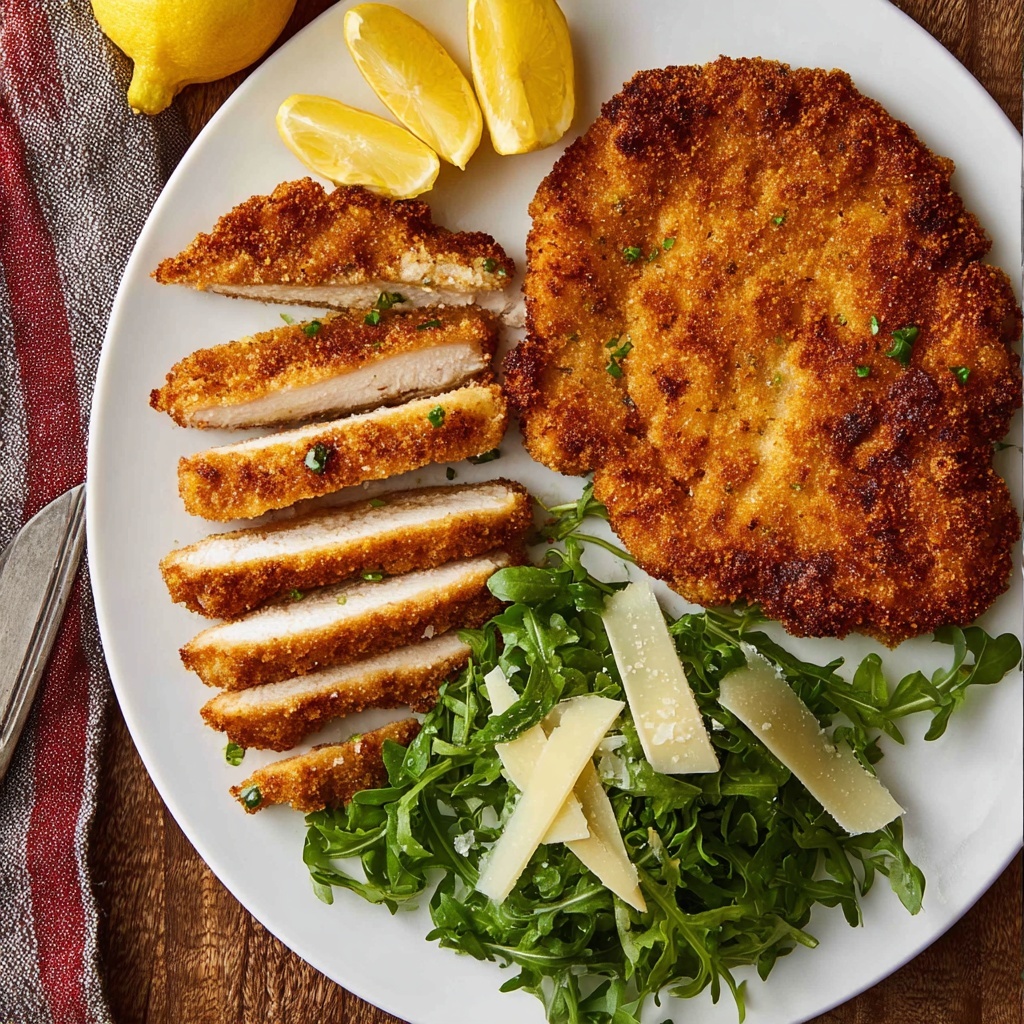
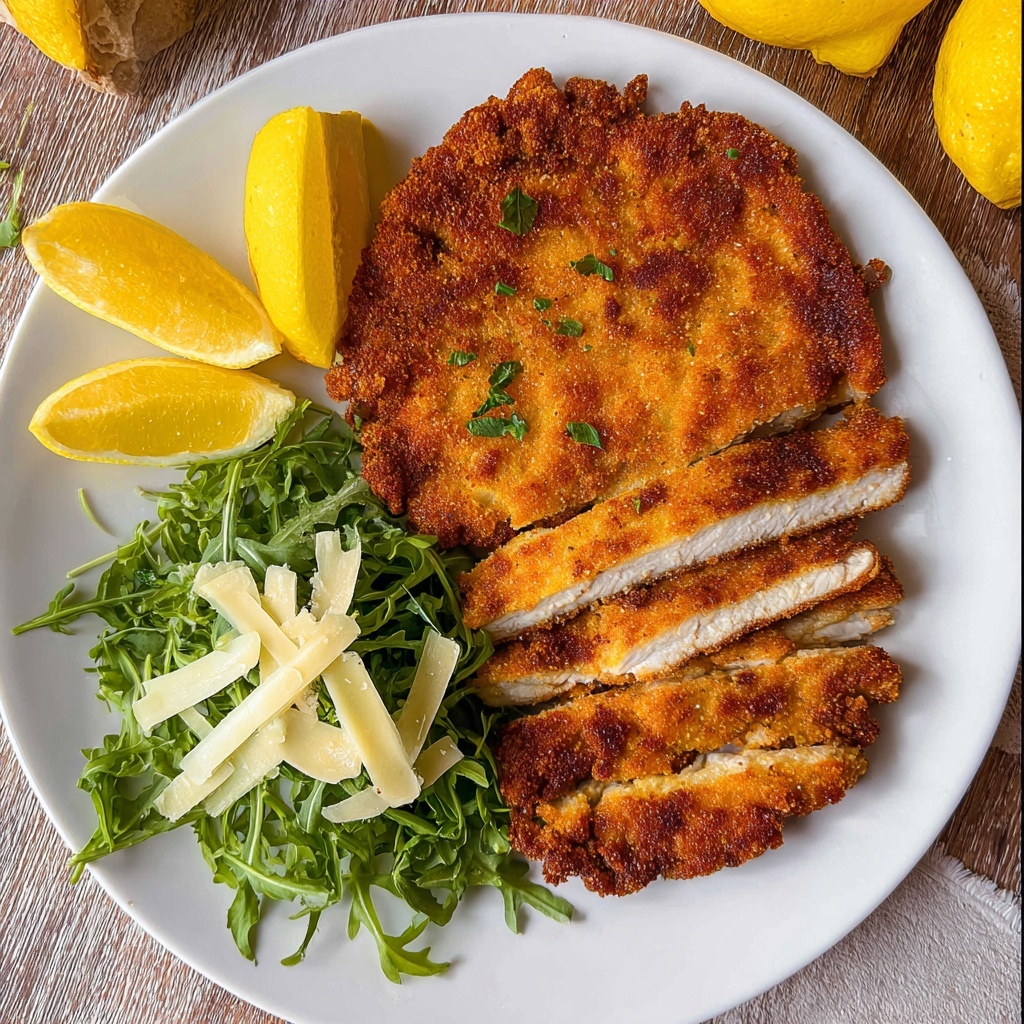
The Chicken Milanese Recipe is an absolute classic that transforms simple chicken breasts into a crispy, golden delight bursting with flavor. This dish brings a perfect harmony of textures and bright accents, making it ideal for a weeknight dinner or a special occasion with friends. With its perfectly breaded exterior and juicy interior, every bite feels like a warm hug from an old favorite. Trust me, once you get the hang of this recipe, it will become a staple in your culinary repertoire.
Ingredients You’ll Need
The beauty of this Chicken Milanese Recipe lies in its straightforward ingredients that come together to create something truly special. Each component plays a crucial role, whether it’s the flour providing a base layer, the eggs helping with adhesion, or the Italian breadcrumbs delivering that irresistible crunchy texture and savory flavor.
- 2 large eggs: Essential for creating a sticky surface so the breadcrumbs cling perfectly to the chicken.
- 1 teaspoon kosher salt: Enhances the natural flavors of the chicken and the coating.
- ½ teaspoon black pepper: Adds a subtle spicy note to balance the dish.
- 1 cup all-purpose flour: Creates the first layer for that crisp bite and helps lock in moisture.
- 1 ½ cups Italian breadcrumbs: The star ingredient that gives the chicken its signature crunchy, herby exterior.
- 2 boneless, skinless chicken breasts (halved and lightly pounded): Tenderizes the meat and ensures quick, even cooking.
- Vegetable oil (for frying): The medium for achieving a golden, crunchy crust without overwhelming the chicken.
- Lemon wedges (for serving): Adds a refreshing brightness that cuts through the richness of the fried coating.
How to Make Chicken Milanese Recipe
Step 1: Prepare the Egg Wash
Start by beating the eggs in a shallow dish until they’re fully blended. This simple step is crucial because the eggs act as the “glue” that helps the breadcrumbs stick firmly to the chicken, ensuring a lovely crust with every bite.
Step 2: Season and Flour the Chicken
Next, place the flour in a separate shallow dish, seasoning it with kosher salt and black pepper. Whisk the flour and seasonings together to create a flavorful base layer that locks in the chicken’s juices while providing contrast to the crispy breadcrumb coating.
Step 3: Prepare the Breadcrumb Station
Pour the Italian breadcrumbs into a third shallow dish. These breadcrumbs are infused with herbs and spices, making them perfect for giving the Chicken Milanese Recipe that classic, savory crunch.
Step 4: Dredge the Chicken in Flour
Take each chicken cutlet one at a time and dredge it thoroughly in the seasoned flour. Make sure every nook and cranny is coated, and shake off any excess flour to avoid clumps forming during frying.
Step 5: Dip into Egg, Then Coat with Breadcrumbs
After flouring, dip each chicken piece into the beaten eggs. Then press the chicken firmly into the breadcrumbs until it’s completely covered. This two-step coating guarantees an extra crispy texture that won’t fall apart.
Step 6: Heat the Oil
Pour about ¼ inch of vegetable oil into a large skillet and warm it over medium heat. This amount is perfect for shallow frying, allowing the chicken to crisp up evenly and absorb just the right amount of oil.
Step 7: Fry Until Golden and Crispy
Fry the breaded chicken cutlets in batches, placing two pieces at a time in the skillet. Cook for 3-4 minutes on each side or until the chicken is golden brown and crispy. Use a meat thermometer to check the internal temperature reaches 165°F (74°C) for safe consumption.
Step 8: Drain Excess Oil
Transfer the cooked chicken onto a plate lined with paper towels. This step is essential for soaking up any extra oil, keeping your Chicken Milanese Recipe wonderfully crisp and light instead of greasy.
Step 9: Serve and Enjoy
Serve your chicken immediately, accompanied by fresh lemon wedges. The citrus adds a zesty brightness that perfectly complements the crunchy coating and tender meat underneath. It’s truly a winning combination!
How to Serve Chicken Milanese Recipe
Garnishes
A squeeze of fresh lemon over the top is non-negotiable—it brightens up the whole dish and adds a fresh pop that cuts through the richness. Sprinkle a little chopped flat-leaf parsley for a splash of color and light herbal aroma.
Side Dishes
Classic sides like a simple arugula salad dressed in lemon vinaigrette or roasted vegetables balance the dish with fresh, green notes. For a heartier accompaniment, creamy mashed potatoes or a light pasta tossed in olive oil and garlic work beautifully.
Creative Ways to Present
For a fun twist, stack the Chicken Milanese Recipe slices and top them with a heaping spoonful of marinara sauce and melted mozzarella to make a chicken parmigiana-inspired dish. Alternatively, slice the chicken and serve atop a bed of mixed greens with shaved Parmesan and a drizzle of balsamic glaze for a lighter yet elegant meal.
Make Ahead and Storage
Storing Leftovers
Leftover Chicken Milanese can be stored in an airtight container in the refrigerator for up to 3 days. To preserve that crispy coating, place paper towels between layers of chicken pieces to absorb moisture.
Freezing
If you want to keep some for later, you can freeze the cooked chicken in a single layer on a baking sheet until firm, then transfer to a freezer bag. It will keep well for up to 2 months. Just remember to thaw overnight in the fridge for best texture.
Reheating
To bring back the crunch, reheat leftover or frozen Chicken Milanese in a preheated oven at 375°F (190°C) on a wire rack over a baking sheet for about 10-15 minutes. Avoid the microwave if possible, as it can make the coating soggy.
FAQs
Can I use chicken thighs instead of breasts for Chicken Milanese Recipe?
Absolutely! Boneless, skinless chicken thighs can be used and will add extra juiciness and flavor, though results may vary slightly in texture compared to using breasts.
What type of breadcrumbs works best?
Italian seasoned breadcrumbs add the most flavor and texture for this recipe, but plain breadcrumbs with added herbs also work well in a pinch.
Is it necessary to pound the chicken thin?
Yes, lightly pounding the chicken ensures even cooking and helps the coating stick better, resulting in a tender interior and crispy outside.
Can I bake instead of fry the Chicken Milanese?
You can bake the breaded chicken at 425°F (220°C) for about 20 minutes, flipping halfway through, for a lower-fat version. However, frying produces the crunchiest coating.
How do I know when the chicken is cooked through?
The chicken is fully cooked when the internal temperature reaches 165°F (74°C). Cutting into the thickest part to check that juices run clear is also a reliable method.
Final Thoughts
If you’re looking to add a dish to your weeknight lineup that’s simple, crispy, and always hits the spot, the Chicken Milanese Recipe is your new best friend. It’s a wonderfully approachable recipe that feels fancy without any fuss, and it’s guaranteed to bring smiles to your table. Give it a try—you’ll be amazed at how such humble ingredients come together to create something so delicious!
Print
Chicken Milanese Recipe
- Prep Time: 20 minutes
- Cook Time: 15 minutes
- Total Time: 35 minutes
- Yield: 4 servings
- Category: Main Course
- Method: Frying
- Cuisine: Italian
Description
Chicken Milanese is a classic Italian dish featuring tender chicken breasts breaded in seasoned flour, dipped in eggs, coated with Italian breadcrumbs, and pan-fried to a golden, crispy perfection. This quick and easy recipe yields a flavorful and crunchy chicken cutlet, perfect for a comforting weeknight dinner or an elegant meal served with fresh lemon wedges.
Ingredients
For the Chicken Milanese
- 2 large eggs
- 1 teaspoon kosher salt (or to taste)
- ½ teaspoon black pepper (or to taste)
- 1 cup all-purpose flour
- 1 ½ cups Italian breadcrumbs
- 2 boneless, skinless chicken breasts (halved and lightly pounded)
- Vegetable oil (for frying, about ¼ inch depth)
- Lemon wedges (for serving)
Instructions
- Prepare the eggs: Beat the eggs in a shallow dish until fully blended, making sure the yolks and whites are completely combined for even coating.
- Season the flour: Place the all-purpose flour in a separate shallow dish and season it with kosher salt and black pepper. Whisk to evenly distribute the seasonings throughout the flour.
- Set up the breadcrumbs: Pour the Italian breadcrumbs into a third shallow dish, ready for coating the chicken.
- Dredge the chicken in flour: Working one piece of chicken at a time, coat each cutlet thoroughly in the seasoned flour. Shake off any excess flour to prevent clumping.
- Dip in egg wash: Dip each floured chicken cutlet into the beaten eggs, ensuring it is fully covered for the breadcrumbs to adhere well.
- Coat with breadcrumbs: Press the egg-coated chicken firmly into the Italian breadcrumbs until fully coated on all sides. Repeat this process for all chicken cutlets to ensure a crispy crust.
- Heat the oil: In a large skillet, pour about ¼ inch of vegetable oil and heat it over medium heat until hot but not smoking, ideal for frying.
- Fry the chicken: Carefully place the breaded chicken cutlets into the hot oil, cooking in batches—two cutlets at a time to avoid overcrowding the pan. Fry for 3 to 4 minutes on each side until the coating turns golden brown and crisp. Check that the internal temperature reaches 165°F (74°C) to ensure doneness.
- Drain excess oil: Transfer the cooked chicken onto a plate lined with paper towels to absorb any extra oil, keeping the crust crispy and light.
- Serve: Serve the Chicken Milanese immediately while hot, accompanied by fresh lemon wedges to add a bright, tangy flavor that complements the dish perfectly. Enjoy your meal!
Notes
- Lightly pounding the chicken breasts ensures even thickness for uniform cooking.
- Use fresh Italian breadcrumbs for the best texture and flavor. Panko breadcrumbs can be used for an extra crispy crust.
- Maintain medium heat while frying to avoid burning the breadcrumbs while ensuring the chicken cooks through.
- Serve with a simple arugula salad or roasted vegetables for a complete meal.
- Leftovers can be reheated in an oven or air fryer to maintain crispiness.


