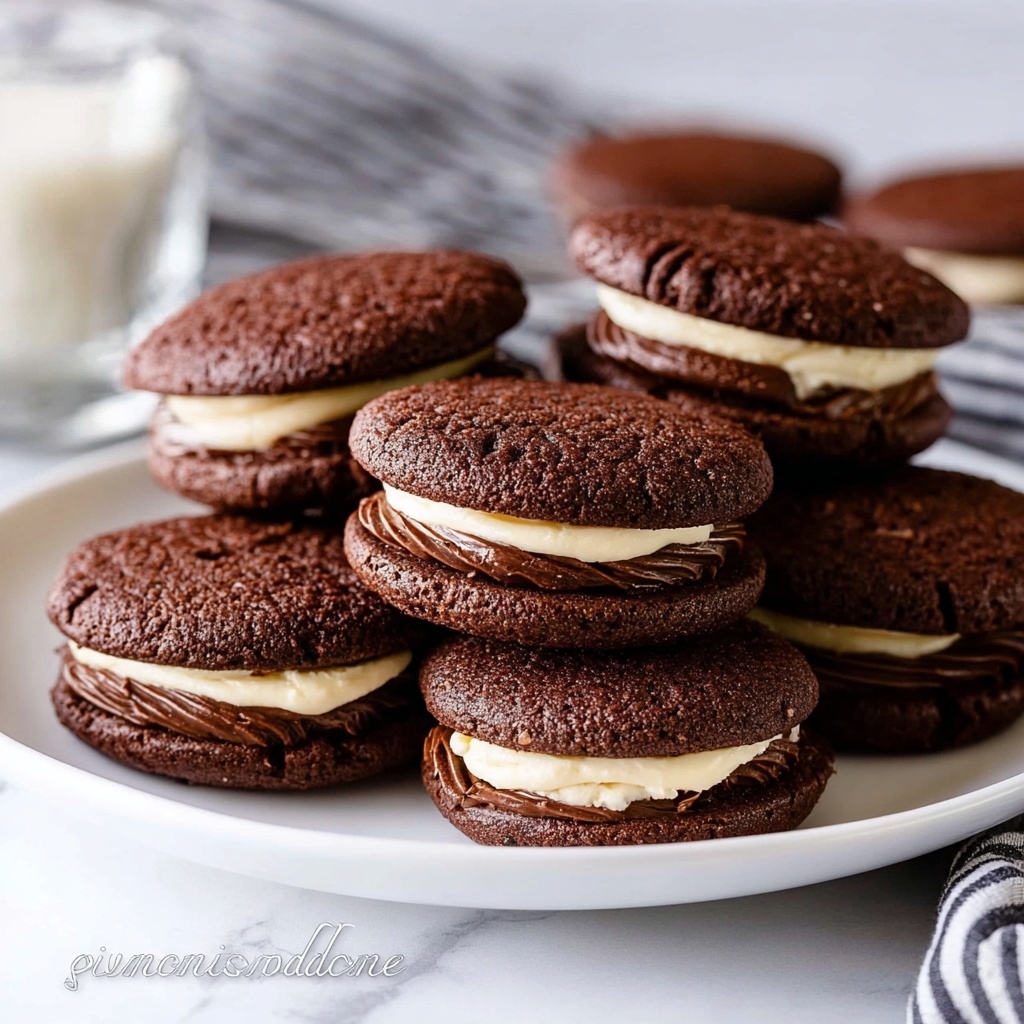
If you’ve ever dreamt of biting into a cookie that perfectly balances rich chocolate flavor with a creamy, dreamy vanilla center, then you are going to fall head over heels for this Chocolate Sandwich Cookies with Vanilla Buttercream Recipe. This delightful treat combines tender, chocolatey cookies with a luscious, velvety buttercream filling, creating the perfect harmony of texture and taste. Whether you’re craving a special homemade dessert or a show-stopping cookie to impress your friends, this recipe is both approachable and utterly delicious, promising smiles with every bite.

Ingredients You’ll Need
Gathering the right ingredients is the first step to baking these irresistible Chocolate Sandwich Cookies with Vanilla Buttercream Recipe. Each element plays a crucial role—from the cocoa powder that brings deep chocolate flavor to the butter for that soft, melt-in-your-mouth texture, and of course, the vanilla that infuses the buttercream with its signature warmth.
- All-purpose flour: Provides structure to the cookies while keeping them tender.
- Unsweetened cocoa powder: Delivers intense chocolate taste and a rich color.
- Baking soda: Helps the cookies rise just enough without becoming cakey.
- Salt: Enhances all the flavors and balances the sweetness.
- Unsalted butter (divided): Adds creaminess and richness, crucial for both the cookie and buttercream.
- Brown sugar: Gives a subtle molasses flavor and keeps the cookies moist.
- Granulated sugar: For sweetness and a slight crunch.
- Large eggs: Bind ingredients together and add tenderness.
- Vanilla extract (divided): Brings out the warmth and depth in both the cookie dough and buttercream.
- Powdered sugar: Essential for a smooth, fluffy buttercream filling.
- Heavy cream: Lightens the buttercream, making it silky and easy to spread.
- Chocolate sprinkles or shavings (optional): For an extra touch of chocolate flair and festive presentation.
How to Make Chocolate Sandwich Cookies with Vanilla Buttercream Recipe
Step 1: Mix the Dry Ingredients
Begin by whisking together the all-purpose flour, unsweetened cocoa powder, baking soda, and salt in a medium bowl. This step ensures all your dry ingredients are evenly combined, laying the foundation for an evenly textured chocolate cookie with just the right hint of saltiness to balance the sweetness.
Step 2: Cream the Butter and Sugars
In a large mixing bowl, cream your softened unsalted butter with both brown and granulated sugar until the mixture is light and fluffy. This typically takes about 2 to 3 minutes and is vital for incorporating air—your secret weapon for tender, soft cookies.
Step 3: Add Eggs and Vanilla
Next, add the eggs one at a time, beating well after each addition to ensure the mixture comes together smoothly. Finish by mixing in the vanilla extract, which will begin infusing your dough with that warm, comforting aroma.
Step 4: Combine Wet and Dry Ingredients
Gradually add the dry mixture to the wet ingredients, mixing on low speed just until a soft dough forms. Be careful not to overmix here—overworking the dough can lead to tougher cookies, and we’re aiming for tender and melt-in-your-mouth.
Step 5: Chill the Dough
Cover your dough and place it in the refrigerator for at least one hour. Chilling firms up the dough, making it easier to handle and helping the cookies maintain their shape during baking.
Step 6: Prepare for Baking
Preheat the oven to 350°F (175°C) and line your baking sheets with parchment paper. This simple step prevents sticking and promotes even baking so your cookies will come out perfectly crisp on the edges.
Step 7: Shape the Cookies
Scoop tablespoon-sized portions of dough, roll them into balls, and place them spaced about 2 inches apart on your prepared baking sheets. Flatten each ball slightly to encourage a nice, uniform cookie shape and even baking.
Step 8: Bake the Cookies
Bake for 8 to 10 minutes. Keep an eye on them—the edges should be set while the centers still appear soft. This is exactly what gives your cookies that delightful chewy texture once cooled.
Step 9: Cool Cookies Completely
Let the cookies cool on the baking sheet for 5 minutes before transferring them to a wire rack to cool fully. This prevents breakage and prepares them perfectly for the heavenly vanilla buttercream filling.
Step 10: Make the Vanilla Buttercream
Beat softened butter until smooth and creamy. Gradually add powdered sugar, then mix in vanilla extract and heavy cream, beating until the buttercream is light, fluffy, and easy to spread or pipe. This vanilla buttercream is what makes this recipe truly special, crafting a luscious contrast to the rich chocolate cookies.
Step 11: Assemble the Sandwich Cookies
Spread or pipe the buttercream onto the flat side of half of the cooled cookies. Then gently top each with a remaining cookie, pressing lightly to create charming little sandwich cookies.
Step 12: Add Optional Garnishes
If you want to add a fun finishing touch, roll the edges of your sandwich cookies in chocolate sprinkles or shavings. The extra texture and appearance will dazzle anyone you share these with.
How to Serve Chocolate Sandwich Cookies with Vanilla Buttercream Recipe
Garnishes
To elevate the presentation, consider adding a sprinkle of powdered sugar, edible glitter, or even a drizzle of melted chocolate over the sandwiches. These small touches make serving these cookies feel extra special and add delightful texture contrasts.
Side Dishes
Pair these cookies with a tall glass of cold milk, a cup of rich coffee, or perhaps a creamy hot chocolate for a dessert spread that’s nothing short of paradise. The creamy vanilla buttercream pairs beautifully with warm drinks and classic sides.
Creative Ways to Present
Stack the cookies on a pretty cake stand, arrange them in a decorative tin as gifts, or serve them on a colorful platter sprinkled with extra chocolate shavings. Presenting them with care turns an everyday treat into an unforgettable experience.
Make Ahead and Storage
Storing Leftovers
Keep your leftover cookies fresh by storing them in an airtight container at room temperature for up to 3 days. This keeps the cookies soft and the buttercream luscious without drying out.
Freezing
If you want to save these beauties for later, freeze the assembled sandwiches in a single layer on a baking sheet. Once frozen, transfer them to a freezer-safe container or bag and store for up to one month. Thaw at room temperature before serving to enjoy that freshly baked taste.
Reheating
Chocolate Sandwich Cookies with Vanilla Buttercream Recipe are best served at room temperature, so reheating isn’t typically necessary. However, if you want to gently warm them, leave them out to sit for about 15 minutes—this will slightly soften the buttercream, making each bite heavenly.
FAQs
Can I use a different type of cocoa powder?
Absolutely! Natural or Dutch-processed cocoa powder can be used, but keep in mind Dutch-processed cocoa is less acidic and might result in a slightly different flavor and darker color.
Is it okay to substitute margarine for butter?
While you can substitute margarine, real unsalted butter is highly recommended for the best flavor and texture, especially for the buttercream, which relies on butter’s creamy consistency.
Can I make these cookies gluten-free?
Yes, by swapping the all-purpose flour with a gluten-free baking blend designed for cookies, you can enjoy these treats without gluten. Just make sure your blend includes xanthan gum for the right texture.
How long do these cookies stay fresh?
Stored properly at room temperature in an airtight container, these cookies stay fresh for about 3 days. Beyond that, you might notice the buttercream starts to soften or the cookies become less tender.
Can I add flavors to the buttercream?
Definitely! Feel free to experiment with almond, lemon, or even a hint of espresso extract to customize the buttercream to your liking while still following the Chocolate Sandwich Cookies with Vanilla Buttercream Recipe foundation.
Final Thoughts
This Chocolate Sandwich Cookies with Vanilla Buttercream Recipe is a true treasure for anyone who loves rich, flavorful cookies with a soft, creamy center. Baking them is as rewarding as eating them, and sharing them will surely make you everyone’s favorite baker. So why wait? Roll up your sleeves, gather your ingredients, and dive right into crafting these irresistible homemade delights that are destined to become a cherished classic in your kitchen.
Print
Chocolate Sandwich Cookies with Vanilla Buttercream Recipe
- Prep Time: 20 minutes
- Cook Time: 10 minutes
- Total Time: 1 hour 30 minutes
- Yield: 16 servings
- Category: Dessert
- Method: Baking
- Cuisine: American
Description
Delightfully rich and fudgy Chocolate Sandwich Cookies with a smooth, creamy vanilla buttercream filling. These classic treats feature a soft cocoa-flavored cookie exterior and a sweet, fluffy buttercream center, perfect for parties, gatherings, or satisfying your chocolate craving.
Ingredients
For the Cookies:
- 1 ¾ cups all-purpose flour
- ¾ cup unsweetened cocoa powder
- 1 teaspoon baking soda
- ½ teaspoon salt
- 1 cup unsalted butter, softened
- ¾ cup brown sugar
- ½ cup granulated sugar
- 2 large eggs
- 2 teaspoons vanilla extract
For the Buttercream Filling:
- ½ cup unsalted butter, softened
- 2 cups powdered sugar
- 1 teaspoon vanilla extract
- 2 tablespoons heavy cream
- ¼ cup chocolate sprinkles or shavings (optional)
Instructions
- Mix Dry Ingredients: In a medium bowl, whisk together the all-purpose flour, unsweetened cocoa powder, baking soda, and salt until well combined.
- Cream Butter and Sugars: In a large mixing bowl, beat the softened unsalted butter with brown sugar and granulated sugar for about 2-3 minutes until the mixture is light and fluffy.
- Add Eggs and Vanilla: Add the eggs one at a time into the creamed butter and sugar, beating well after each addition. Stir in the vanilla extract evenly.
- Combine Wet and Dry Ingredients: Gradually add the dry ingredients to the wet ingredients while mixing on low speed. Mix just until a soft dough forms, being careful not to overmix.
- Chill Dough: Cover the dough tightly and refrigerate for at least 1 hour to firm up, which helps in shaping the cookies.
- Preheat Oven and Prepare Baking Sheets: Preheat the oven to 350°F (175°C). Line baking sheets with parchment paper to prevent sticking.
- Shape Cookies: Scoop 1-tablespoon portions of the chilled dough, roll each into a ball, and then flatten slightly. Place the cookies about 2 inches apart on the prepared baking sheets.
- Bake Cookies: Bake in the preheated oven for 8 to 10 minutes, or until the edges are set but the centers remain soft.
- Cool Cookies: Allow cookies to cool on the baking sheet for 5 minutes before transferring them to a wire rack to cool completely.
- Prepare Buttercream Filling: Beat the softened butter until smooth and creamy. Gradually add powdered sugar, then vanilla extract and heavy cream. Beat the mixture on medium speed until light and fluffy.
- Assemble Sandwiches: Spread or pipe the buttercream onto the flat side of half of the cookies. Place a second cookie on top of each filled cookie and gently press together to sandwich.
- Optional Decoration: For an extra festive touch, roll the edges of the assembled cookies in chocolate sprinkles or shavings.
Notes
- Chilling the dough is crucial to prevent cookies from spreading too much while baking.
- Do not overbake to keep the cookies soft and chewy in the center.
- Buttercream can be flavored with a bit of espresso powder or more vanilla for variation.
- For a gluten-free version, substitute the all-purpose flour with a gluten-free flour blend.
- Cookies can be stored in an airtight container at room temperature for up to 5 days or frozen for up to 1 month.


