
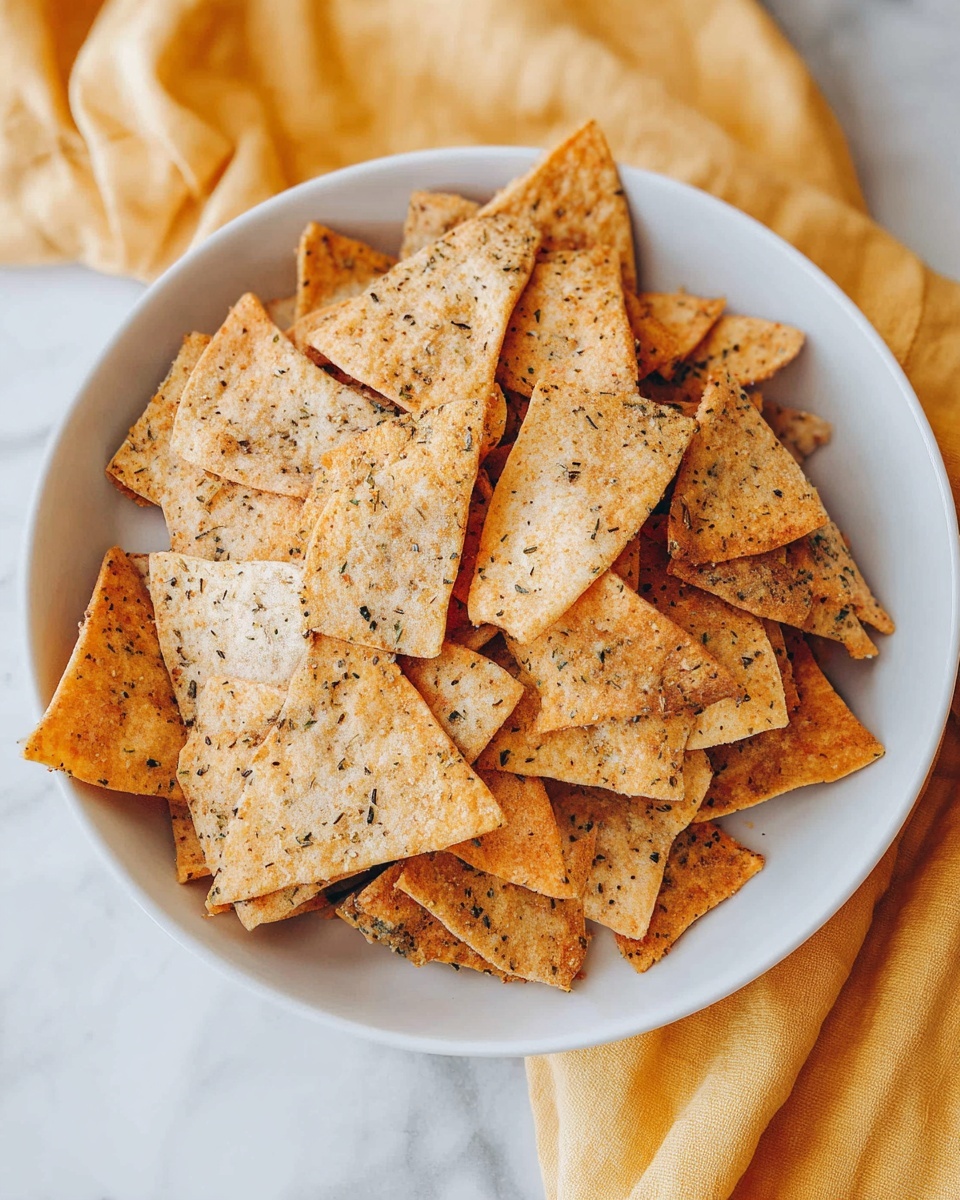
If you love a crunchy, flavorful snack that’s perfect for dipping or munching on its own, this Garlic Herb Pita Chips Recipe is going to become your new obsession. These pita chips are irresistibly crispy with a perfect balance of garlic, herbs, and just a touch of salt, making them an excellent alternative to store-bought chips. Whether you’re serving them at a party or enjoying a cozy night in, these homemade chips have that amazing fresh-baked warmth and a burst of flavor that keeps you reaching for more.
Ingredients You’ll Need
This Garlic Herb Pita Chips Recipe comes together with just a handful of simple ingredients, yet each one plays a crucial role in delivering incredible taste and texture. From the golden pita breads to the aromatic herbs and silky olive oil, these essentials transform everyday bread into a crunchy, flavor-packed treat.
- 4 pita breads (preferably pocket-style, 6-8” diameter): The sturdy base of these chips that crisps beautifully when baked.
- 1/4 cup extra virgin olive oil: Adds richness and helps the seasonings cling for maximum flavor.
- 1 tsp dried basil: Brings an earthy, slightly sweet herbal note that’s super inviting.
- 1/2 tsp dried oregano: Adds a classic Mediterranean touch that pairs perfectly with the garlic.
- 1/2 tsp garlic powder: Infuses every bite with that beloved, savory garlic punch.
- 1/4 tsp fine sea salt: Enhances all the other flavors and balances the herbs beautifully.
How to Make Garlic Herb Pita Chips Recipe
Step 1: Prepare Your Seasoned Olive Oil
Start by preheating your oven to 400˚F. While it’s warming up, combine the extra virgin olive oil with dried basil, oregano, garlic powder, and fine sea salt in a measuring cup or small bowl. Stir everything together until the seasonings are evenly distributed, creating a flavorful herb-infused oil that will coat the pita chips perfectly.
Step 2: Cut the Pita Breads into Triangles
Take your pita breads and slice them into wedges—about 8 to 10 triangles per 8-inch pita works great. Using a pizza cutter makes this super quick and neat, giving you those classic chip shapes that are perfect for dipping or nibbling.
Step 3: Toss Pita Triangles with the Herb Oil
Place all your pita triangles in a large mixing bowl. Pour the seasoned olive oil over them and toss gently with your hands to ensure each piece is fully coated. This step is key to getting that irresistible herby crunch on every chip.
Step 4: Bake until Crispy and Golden
Arrange the coated pita chips in a single layer on a large baking sheet or two smaller ones if needed. Bake at 400˚F for 8 to 12 minutes, flipping the chips halfway through to promote even browning. Keep an eye on them—the chips should become crispy, golden, and perfectly firm when ready.
How to Serve Garlic Herb Pita Chips Recipe

Garnishes
Sprinkle a few fresh herbs like chopped parsley or a light dusting of Parmesan cheese on your warm pita chips to add an extra pop of flavor and a touch of elegance. A squeeze of lemon juice right before serving can brighten the herbs and give a fresh zing that’s delightful.
Side Dishes
These Garlic Herb Pita Chips go wonderfully alongside dips such as hummus, tzatziki, or a rich olive tapenade. They also make a great crunchy companion to Greek salads or grilled meats, adding texture and that flavorful bite to your meal.
Creative Ways to Present
Try serving your pita chips in a rustic wooden bowl lined with parchment paper for a casual gathering. For parties, arrange them artfully on a charcuterie board with cheeses, olives, and fresh veggies. You could even sprinkle some flavored sea salts or chili flakes over the chips before baking for a fun twist.
Make Ahead and Storage
Storing Leftovers
If you have any leftover pita chips, store them in an airtight container at room temperature. They maintain their crunchiness well for up to 3 days, so you can enjoy that fresh-baked flavor even after making them in advance.
Freezing
While these chips are best enjoyed fresh, you can freeze them by spreading them out on a baking sheet, freezing until solid, then transferring to a freezer-safe bag. When you’re ready, simply re-crisp them in the oven for a few minutes to bring back that just-baked crunch.
Reheating
To revive your pita chips, pop them in a preheated oven at 350˚F for about 5 minutes. This will warm them through and re-crisp the edges without drying them out or burning.
FAQs
Can I use whole wheat pita bread for this Garlic Herb Pita Chips Recipe?
Absolutely! Whole wheat pita adds a nuttier flavor and extra fiber while still crisping up beautifully in the oven.
What if I don’t have dried herbs? Can I use fresh instead?
Fresh herbs can be used, but since they contain more moisture, you may want to reduce oil slightly and add them after baking to avoid soggy chips.
Can I make this recipe without olive oil?
Olive oil is key for flavor and crispness, but you could try using melted butter or a neutral oil like avocado oil if you prefer a different taste.
How thin should the pita triangles be for the best crunch?
Cut the pita into standard wedge shapes about 1/4 inch thick; pocket-style pitas naturally provide the perfect thickness when sliced.
Are these pita chips suitable for dipping into hot soups?
They are! Their sturdy crispiness holds up well when dipped into hot soups without becoming soggy immediately.
Final Thoughts
I can’t recommend this Garlic Herb Pita Chips Recipe enough if you’re craving a homemade crunchy snack with that perfect balance of herbs and garlic. It’s quick, easy, and incredibly satisfying to make your own pita chips fresh in the oven. Give it a try and watch these chips steal the show at your next snack time or gathering!
Print
Garlic Herb Pita Chips Recipe
- Prep Time: 10 minutes
- Cook Time: 8-12 minutes
- Total Time: 20 minutes
- Yield: 8 servings
- Category: Snack
- Method: Baking
- Cuisine: Mediterranean
- Diet: Vegetarian
Description
Crispy, flavorful pita chips made by baking pocket-style pita bread wedges tossed in olive oil and herbs until golden and crunchy. Perfect as a snack or for dipping.
Ingredients
Ingredients
- 4 pita breads (preferably pocket-style, 6-8” diameter)
- 1/4 cup extra virgin olive oil
- 1 tsp dried basil
- 1/2 tsp dried oregano
- 1/2 tsp garlic powder
- 1/4 tsp fine sea salt
Instructions
- Preheat and prepare oil mixture: Preheat oven to 400˚F. In a measuring cup, combine the extra virgin olive oil with dried basil, dried oregano, garlic powder, and fine sea salt. Stir well to combine all the seasonings into the oil.
- Cut pita into wedges: Using a pizza cutter or sharp knife, slice each pita bread into 8-10 triangular wedges, depending on the size of the pita (approximately 6-8 inches).
- Toss pita wedges with seasoned oil: Place the pita wedges into a large mixing bowl. Drizzle the prepared olive oil and herb mixture evenly over the pita pieces. Use your hands to gently toss and coat all the pita wedges thoroughly.
- Arrange and bake: Spread the coated pita wedges out in a single layer on a large half-sheet baking tray, or divide between two smaller baking sheets. Place in the preheated oven and bake for 8-12 minutes, flipping the chips halfway through baking to ensure even crisping. If using two sheets, rotate their positions halfway through baking. Bake until the chips are crisp, golden, and firm to the touch.
Notes
- For extra crispness, ensure the pita wedges are arranged in a single layer without overlapping during baking.
- Baking time may vary slightly based on pita thickness; keep an eye to avoid burning.
- These pita chips make a great accompaniment to hummus, guacamole, or your favorite dips.
- Store cooled pita chips in an airtight container to retain crispness for up to 3 days.
- You can customize seasonings by adding smoked paprika, chili powder, or parmesan cheese for varied flavors.

