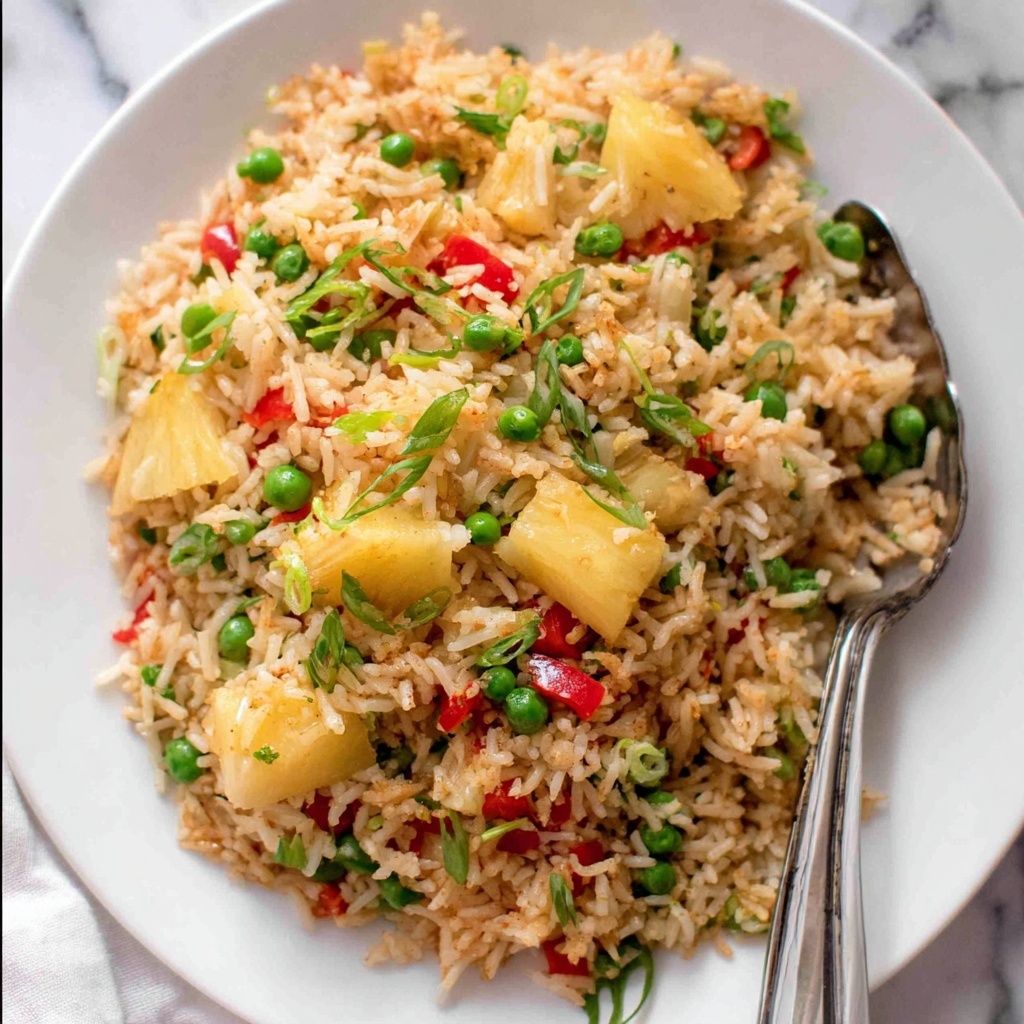
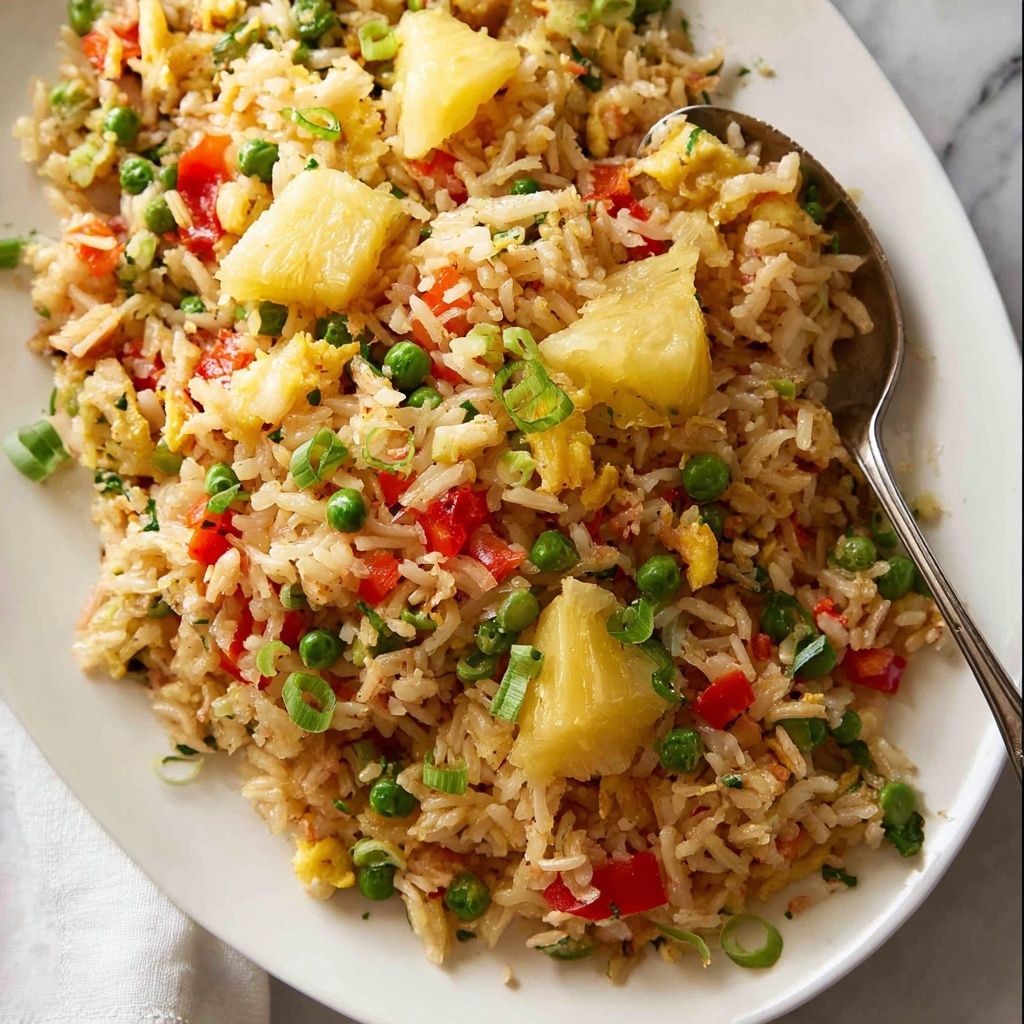
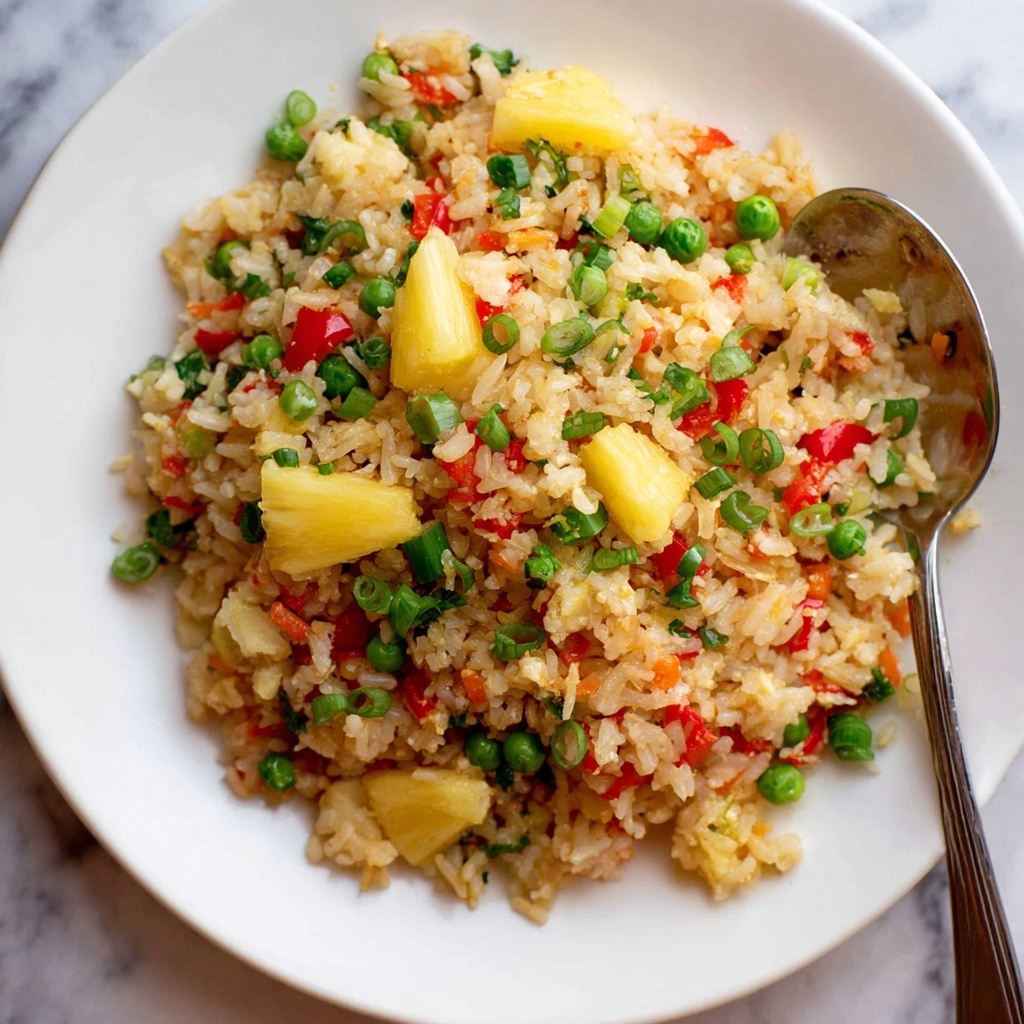
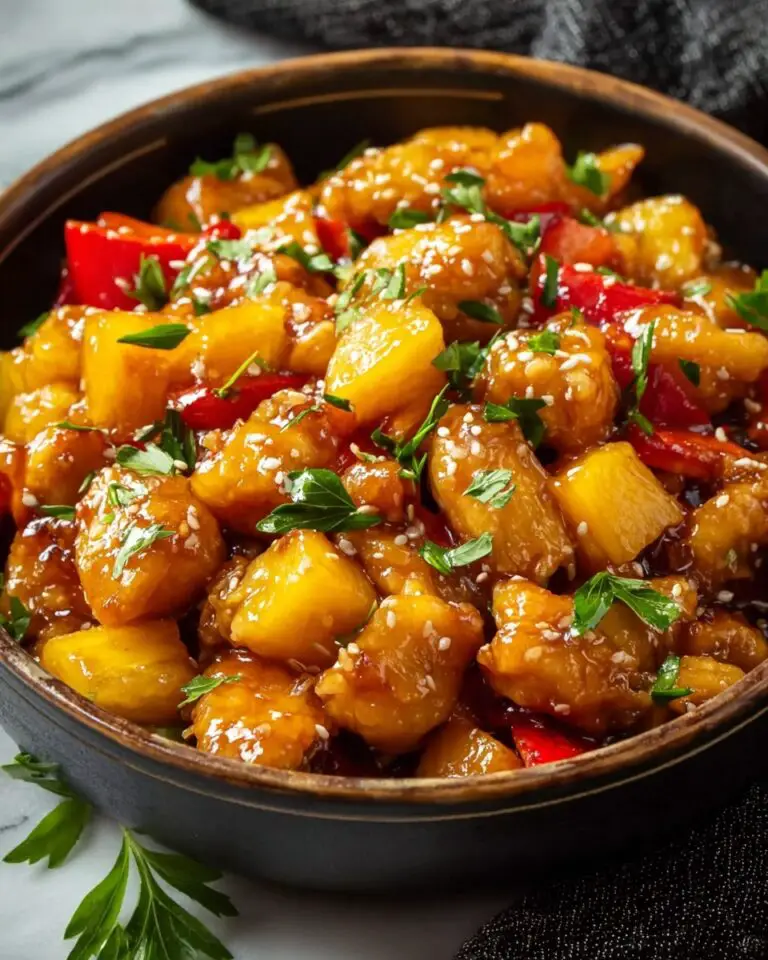
If you ever crave a dish that marries sweet, savory, and a little bit of zest all in one vibrant bowl, the Pineapple Fried Rice (Thai) Recipe is an absolute must-try. This dish balances fragrant jasmine rice with juicy pineapple chunks, fresh veggies, and that unmistakable umami punch thanks to oyster and fish sauces. It’s colorful, bursting with flavors, and surprisingly simple to whip up, making it a fantastic way to brighten any meal or impress guests with an authentic taste of Thailand right at home.
Ingredients You’ll Need
The beauty of this Pineapple Fried Rice (Thai) Recipe lies in its straightforward ingredient list, where each component plays a key role in building layers of flavor and inviting textures. You’ll notice how fragrant garlic and onions create the foundational aroma, while juicy pineapple and crispy capsicum add those irresistible pops of freshness and color.
- 2 tbsp vegetable oil: Perfect for stir-frying without overpowering the other flavors.
- 2 garlic cloves (finely minced): Brings a fragrant, savory depth to the dish.
- 1/2 onion (finely chopped): Adds subtle sweetness and texture.
- 1/2 red capsicum / bell peppers (diced, ~ 3/4 cup): Offers crunch and vibrant color.
- 1/2 cup peas (frozen): Brings a gentle sweetness and pop of green.
- 3 cups day old jasmine rice (cooked): Best if refrigerated overnight to keep grains separate and firm.
- 1 1/2 cups pineapple pieces (fresh or canned, drained, ~ 220g): The star ingredient adding juicy sweetness and tropical flair.
- 1/2 cup green onion (sliced): Adds freshness and mild sharpness.
- 1 tbsp oyster sauce: Deep umami flavor that ties all the ingredients together.
- 1 1/2 tbsp fish sauce: Intense savory note contributing authentic Thai taste.
- 1/2 tsp sugar: Balances the salty and sour elements beautifully.
- 1 1/2 tbsp soy sauce (light or all purpose, not dark): Lends saltiness and color without bitterness.
- 1 tbsp Thai Seasoning (Gold Mountain): Infuses complex layers of herbal and savory flavors unique to Thai cuisine.
How to Make Pineapple Fried Rice (Thai) Recipe
Step 1: Heat the Oil and Sauté Aromatics
Start by heating your vegetable oil in a wok or large non-stick skillet over high heat. When the oil is hot and shimmering, toss in the finely minced garlic and chopped onion. Stir-fry them quickly for about one minute until fragrant and golden, forming the super flavorful base you just can’t get enough of in fried rice dishes.
Step 2: Add Capsicum for Crunch and Color
Next, add your diced red capsicum to the pan. Give everything a good stir and let it cook for one more minute. This step brightens up your dish visually and injects a lovely crisp texture to contrast with the soft rice and sweet pineapple.
Step 3: Toss in the Peas
Frozen peas might seem simple, but they bring a subtle sweetness and a vibrant pop of color. Stir them in and cook for about 30 seconds just long enough to warm through without losing that fresh bite.
Step 4: Incorporate the Rice and Sauces
Now it’s time for the star starch: the day-old jasmine rice, perfectly cooled and flaky. Add it to your wok along with the oyster sauce, fish sauce, soy sauce, sugar, and Thai seasoning. Stir everything constantly for around two minutes. You’ll notice the rice grains starting to caramelize slightly, developing a glossy coating that’s full of rich flavor and just a hint of sweet-savory char.
Step 5: Add Pineapple Pieces
The moment we’ve all been waiting for: pineapple. Fold in your juicy pineapple chunks and stir gently for about 30 seconds, just to warm them through without breaking them down, preserving their fresh, tropical burst.
Step 6: Finish with Green Onion and Serve
Finally, stir through the sliced green onions, which add a refreshing lift and a mild sharpness to each mouthful. Give everything one last toss and your vibrant, mouthwatering Pineapple Fried Rice (Thai) Recipe is ready to enjoy!
How to Serve Pineapple Fried Rice (Thai) Recipe
Garnishes
Sprinkle chopped fresh cilantro or Thai basil to introduce an herbal brightness that complements the rich fried rice. Toasted cashews or crushed peanuts also add a lovely crunch and nutty dimension. Don’t forget a wedge of lime on the side for a tangy squeeze that elevates all the flavors.
Side Dishes
Serve this fried rice alongside classic Thai accompaniments like a crisp som tam (green papaya salad), light cucumber relish, or even a simple coconut milk soup. These sides balance the richness and bring variety to your meal.
Creative Ways to Present
For a special touch, serve the rice inside a hollowed-out pineapple half. It’s not only stunning to look at but also intensifies the fruity aroma as you eat. Adding a fried egg on top is another popular way to add richness and round out the dish, turning it into a hearty, complete meal.
Make Ahead and Storage
Storing Leftovers
Store any leftover Pineapple Fried Rice (Thai) Recipe in an airtight container in the fridge for up to three days. This way, you can quickly reheat it for a fast, flavorful lunch or dinner the next day.
Freezing
While the dish freezes reasonably well, some textures like capsicum and pineapple might soften after thawing. If you choose to freeze it, portion into freezer-safe containers and use within two months for the best taste.
Reheating
For the best results, reheat the rice in a hot skillet or wok with a drizzle of oil to revive its original texture and prevent it from becoming soggy. Stir frequently until warmed through and enjoy it almost as fresh as when first cooked.
FAQs
Can I use fresh pineapple instead of canned?
Absolutely! Fresh pineapple adds a wonderfully juicy, bright flavor that really enhances this dish. Just be sure it’s ripe and evenly chopped to prevent overpowering any other ingredients.
Is it okay to use day-old rice for this recipe?
Day-old rice is actually perfect for fried rice recipes like this one. It’s less sticky, which helps keep the grains separate and prevents your dish from becoming mushy.
Can I make this dish vegetarian?
Yes, swap out the fish and oyster sauces for vegetarian versions or soy sauce alternatives. You can also leave out any meat or seafood additions to keep it completely plant-based.
What level of spiciness does this dish have?
This Pineapple Fried Rice (Thai) Recipe is typically mild in spice, focusing more on savory and sweet flavors. You can always add chili flakes or fresh chilies if you want to kick up the heat.
What protein complements this fried rice best?
Grilled chicken, shrimp, or tofu are fantastic choices to add alongside or mixed in with the rice, making it a full and satisfying meal.
Final Thoughts
The Pineapple Fried Rice (Thai) Recipe is truly one of those dishes that feels like a celebration every time you make it. Bright, flavorful, and just the right mix of sweet and savory, it’s a fantastic way to bring a bit of Thailand into your kitchen. Whether you’re cooking for yourself or sharing with friends, this recipe is sure to become a beloved staple in your meal rotation. Give it a go and watch how quickly it disappears from the plate!
Print
Pineapple Fried Rice (Thai) Recipe
- Prep Time: 10 minutes
- Cook Time: 10 minutes
- Total Time: 20 minutes
- Yield: 6 servings (or 6-8 as a side)
- Category: Main Dish
- Method: Stovetop
- Cuisine: Thai
Description
This vibrant and flavorful Thai Pineapple Fried Rice combines fragrant jasmine rice with sweet pineapple, colorful bell peppers, peas, and a blend of savory sauces. Quick and easy to prepare, it’s a perfect dish for a satisfying meal that captures the essence of Thai street food with a delicious balance of sweet, salty, and umami flavors.
Ingredients
Vegetables & Aromatics
- 2 garlic cloves, finely minced
- 1/2 onion, finely chopped
- 1/2 red capsicum / bell pepper, diced (~ 3/4 cup)
- 1/2 cup frozen peas
- 1/2 cup green onion, sliced
Rice & Pineapple
- 3 cups day old jasmine rice, cooked
- 1 1/2 cups pineapple pieces, fresh or canned drained (~220g)
Oils & Sauces
- 2 tbsp vegetable oil
- 1 tbsp oyster sauce
- 1 1/2 tbsp fish sauce
- 1 1/2 tbsp light or all-purpose soy sauce (not dark soy)
- 1 tbsp Thai seasoning (Gold Mountain)
- 1/2 tsp sugar
Instructions
- Heat the oil: Heat 2 tablespoons of vegetable oil in a wok or large non-stick skillet over high heat to prepare for stir-frying.
- Sauté aromatics: Add the finely minced garlic cloves and chopped onion to the hot oil, cooking for 1 minute until fragrant and translucent.
- Cook the bell peppers: Add the diced red capsicum to the wok and stir-fry for another 1 minute to soften slightly while maintaining crunch.
- Add peas: Toss in the frozen peas and stir for 30 seconds to warm them through.
- Incorporate rice and sauces: Add the 3 cups of day-old jasmine rice and all the sauce ingredients (1 tbsp oyster sauce, 1 1/2 tbsp fish sauce, 1 1/2 tbsp soy sauce, 1 tbsp Thai seasoning, and 1/2 tsp sugar). Stir constantly for about 2 minutes until the rice is evenly coated and begins to caramelize slightly.
- Mix in pineapple: Add the pineapple pieces and stir for just 30 seconds to warm them through without overcooking.
- Finish with green onions: Stir in the sliced green onions just before serving to add freshness and color.
Notes
- Use day-old jasmine rice that has been chilled in the fridge for the best texture to avoid mushy fried rice.
- You can substitute fresh pineapple with canned pineapple pieces, ensuring they are well drained to avoid soggy rice.
- Adjust seasoning and sauces based on personal taste preference for saltiness and sweetness.
- For a vegetarian version, replace oyster and fish sauce with soy sauce or vegetarian alternatives.
- Serve immediately for optimal flavor and texture.


